Table of Contents
XFur Studio™ 2
XFur Studio 2 is a complete solution to render and simulate fur within Unity. It contains many features dedicated to produce high fidelity rendering as well as the best performance both in desktop/console and mobile devices.
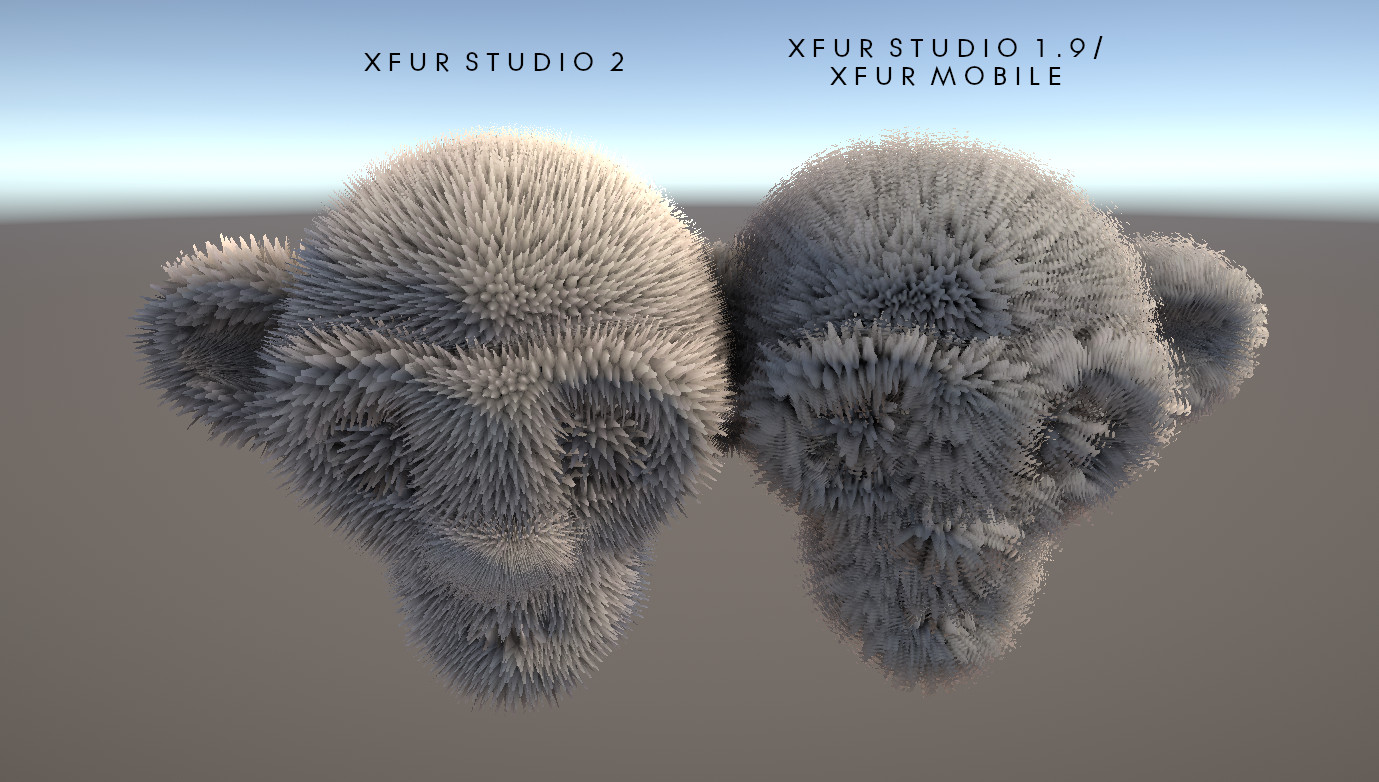
XFur Studio 2 is a complete rewrite and evolution of the original Unity Awards nominated XFur Studio™ released in 2018 and as such contains dozens of improvements and new features over the original release, with even more features planned for the upcoming months. In this manual we will cover all the different features and settings available in XFur Studio 2, how to use them in an actual character or model, how to access and use the advanced features both with and without coding as well as the best practices for models and workflows that integrate XFur Studio 2.
Before we start, please read the following recommendations and requirements for your project :
- Unity 2019.1 or above. Using of LTS versions of Unity is highly recommended.
- Built-in rendering pipeline or Universal RP / High Definition RP versions 7.x
- Linear color space is highly recommended
- Enable Scene Reloading in the Enter Play Mode Options to ensure that resources are loaded / cleaned properly.
- Make sure that your models have a proper UV layout with separate UV islands
- Models with mirrored / overlapping UVs may not work properly with some modules such as physics and VFX
- Use FXAA instead of Temporal Anti-aliasing. Temporal Anti-aliasing does not mix well with high frequency details such as fur and may produce artifacts. Motion Blur based on Motion Vectors may produce a similar issues.
- While XFur Studio 2 is highly optimized and will work with mostly any model it is recommended to use lower polygon counts for the best performance as well as to ensure that your models use fur in only one Mesh or Skinned Mesh renderer.
Quick Start Guide
XFur Studio 2 has been designed with ease of use, flexibility and compatibility in mind. As such, it will allow you to add fur to basically any model within seconds in an entirely non-destructive way. XFur Studio 2 is NOT a simple shader & material system and it requires the use of the XFur Studio Instance script in order to work and while extensive optimizations have been made and most of the XFur Studio 2 code runs on the GPU, additional CPU overhead is to be expected when using XFur Studio 2.
Installing the Package
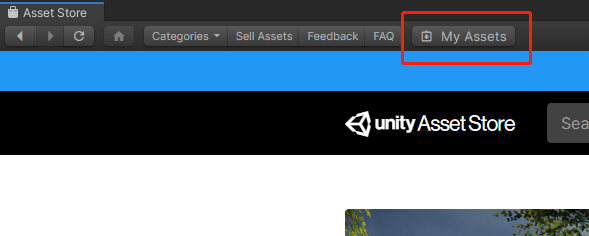
Installing the package is fairly easy. In the Unity Editor, open the Asset Store window. Once opened, locate the “My Assets” button on the top of the window and click on it. Afterwards, simply search for XFur Studio 2 on the search bar at the right. Once found, press the “Import button”
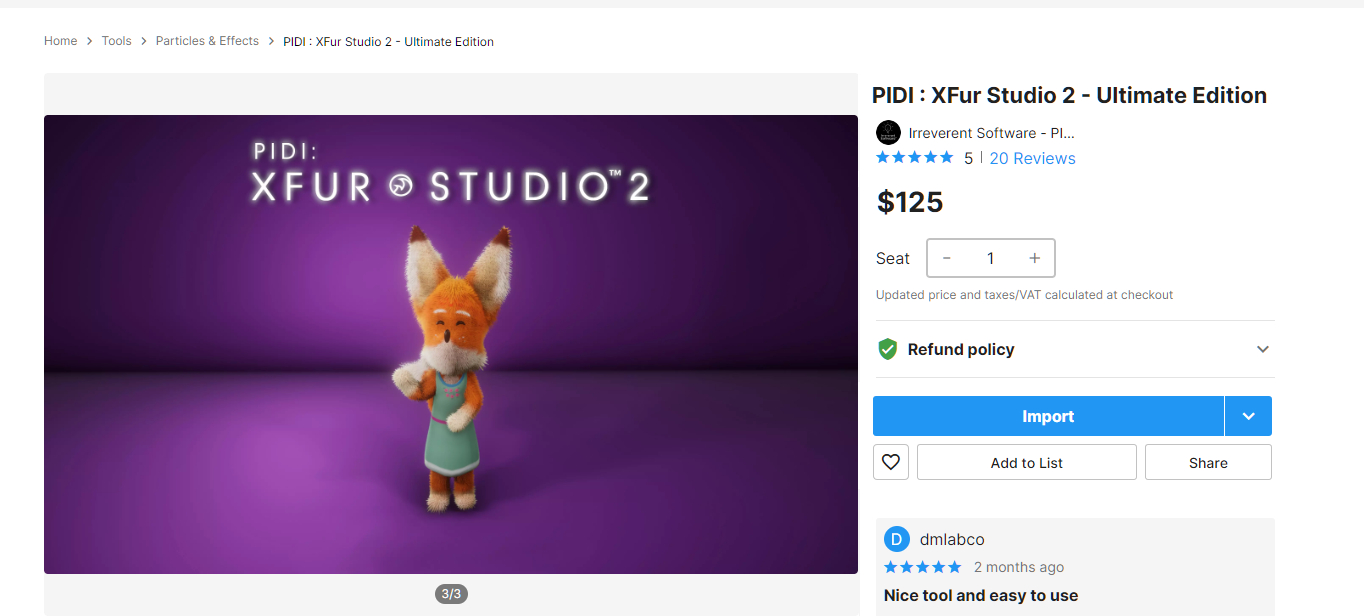
Alternatively, you can also search XFur Studio 2 directly in the asset store and press the Import Button after going to its Store page.
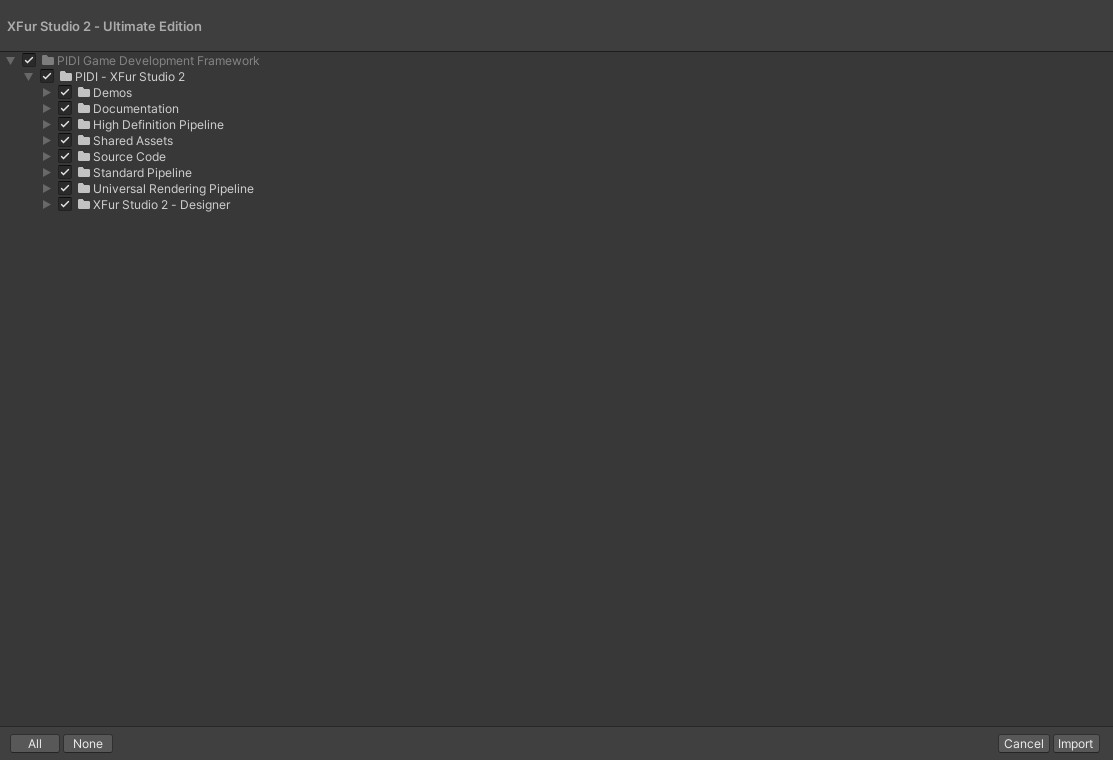
Import all the contents of the package and wait for them to be installed to your project. Depending on which pipeline you are using, you can deselect the folders of the other pipelines. For example, if you are using the Standard Pipeline you can remove or skip importing the High Definition and Universal Rendering pipeline folders, etc..
To install either the Universal RP add on or the Hight Definition RP resources simply go to the folder with the name of the pipeline you are using within the PIDI - XFur Studio 2 folder. Inside this folder you will find a unitypackage with all the shaders, demos and content for the given pipeline. Unpack the unitypackage file by double clicking on it and you will be ready to start using XFur Studio 2 on your SRP of choice.
Basic XFur Resources
Before we can start adding fur to a custom model or character it is important to verify that the installation process has been completed successfully as well as to ensure that all the basic resources needed for XFur Studio are properly loaded
XFur Studio Database
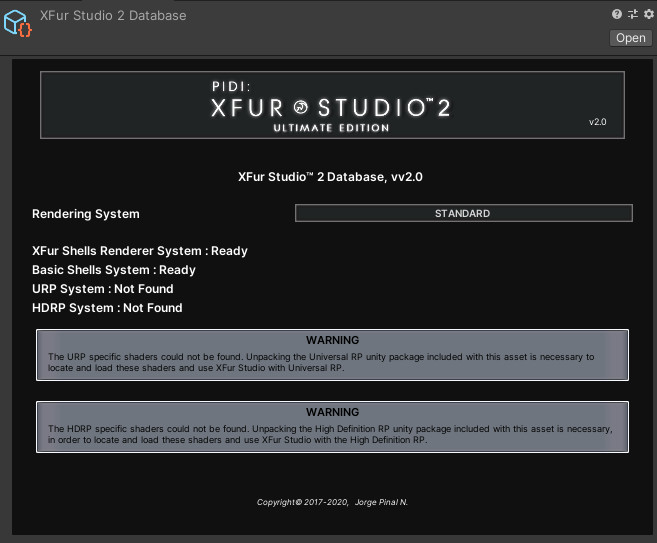
Inside the Shared Assets folder you will find a pre-made, fully configured XFur Database Asset called “XFur Studio 2 Database”. This asset contains references to all the resources needed for XFur Studio 2, the different modules and the runtime painting API. It also allows you to switch between the different rendering pipelines with a simple dropdown menu and, in future versions of XFur Studio, it will also allow you to control different features and settings for the XFur Shaders. Think of it as a global settings and resources manager
The database asset automatically tracks, creates, loads and assigns all the resources it needs without requiring you to do any manual setups. It also tells you which rendering pipeline assets have been found and are ready to use, and any other relevant information for your project. While you can use directly the database provided with the asset, this is not recommended, and you should either duplicate it or create a brand new one for your project. In most cases only one database asset is necessary for the entire project
If you are using the Universal Rendering Pipeline or the High Definition Pipeline and have already unpacked their resources by double clicking on their corresponding unity packages then the URP System or HDRP System will be displayed as Ready. In order to make XFur Studio 2 compatible with the pipeline you are using make sure to select the appropriate rendering method with the Rendering System dropdown in the Database Asset.
XFur Studio Strands Asset
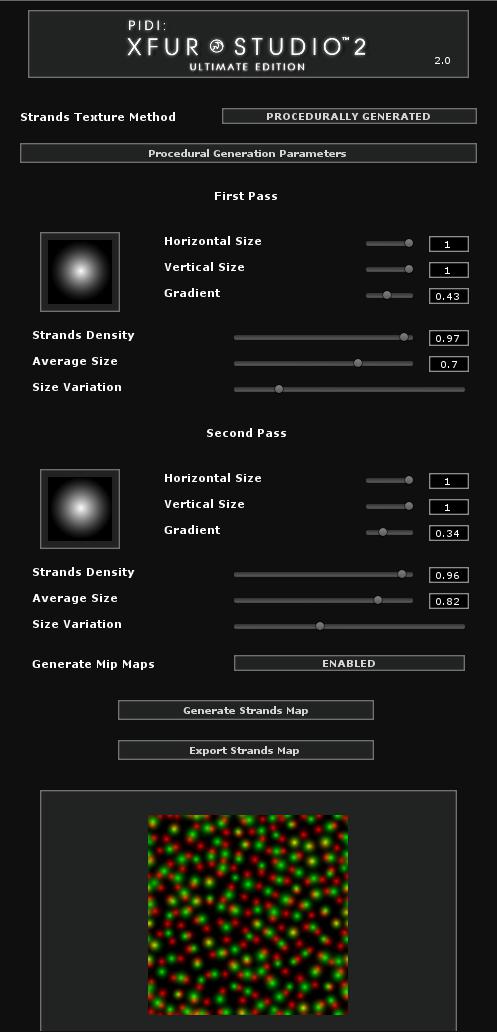
The Strands asset provides the XFur Studio shaders with information about the shape and distribution of the strands that will form the fur of the character / model. These strands are stored in a texture's red and green channel and, for convenience, they can be procedurally generated through the Strands Asset itself or, if special shapes or additional customization is needed, a custom texture can be provided.
The default strands asset provided with XFur Studio 2 is procedural, and its first pass controls the red channel while the second pass controls the green channel of the strands texture. In the final XFur Studio shaders the red and green strands are used to provide color variation in the fur (the additional blue and alpha channels are reserved for upcoming features so in custom textures you should leave them empty).
If you do not want any color variation in the strands you can use the parameters to generate only red or only green strands. Furthermore, this procedural texture can be exported for further editing.
Setting up an XFur Studio™ Instance
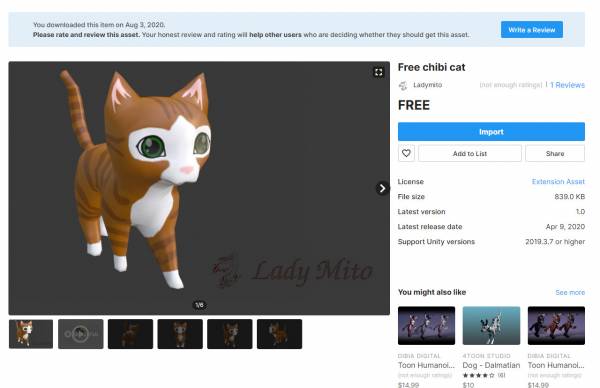
To learn how to use XFur Studio 2 we will use a free character model from the asset store. This tutorial, however, will work with any other model as well. Open the Asset Store window and search the Free chibi cat model made by Ladymito, then import it to your project.
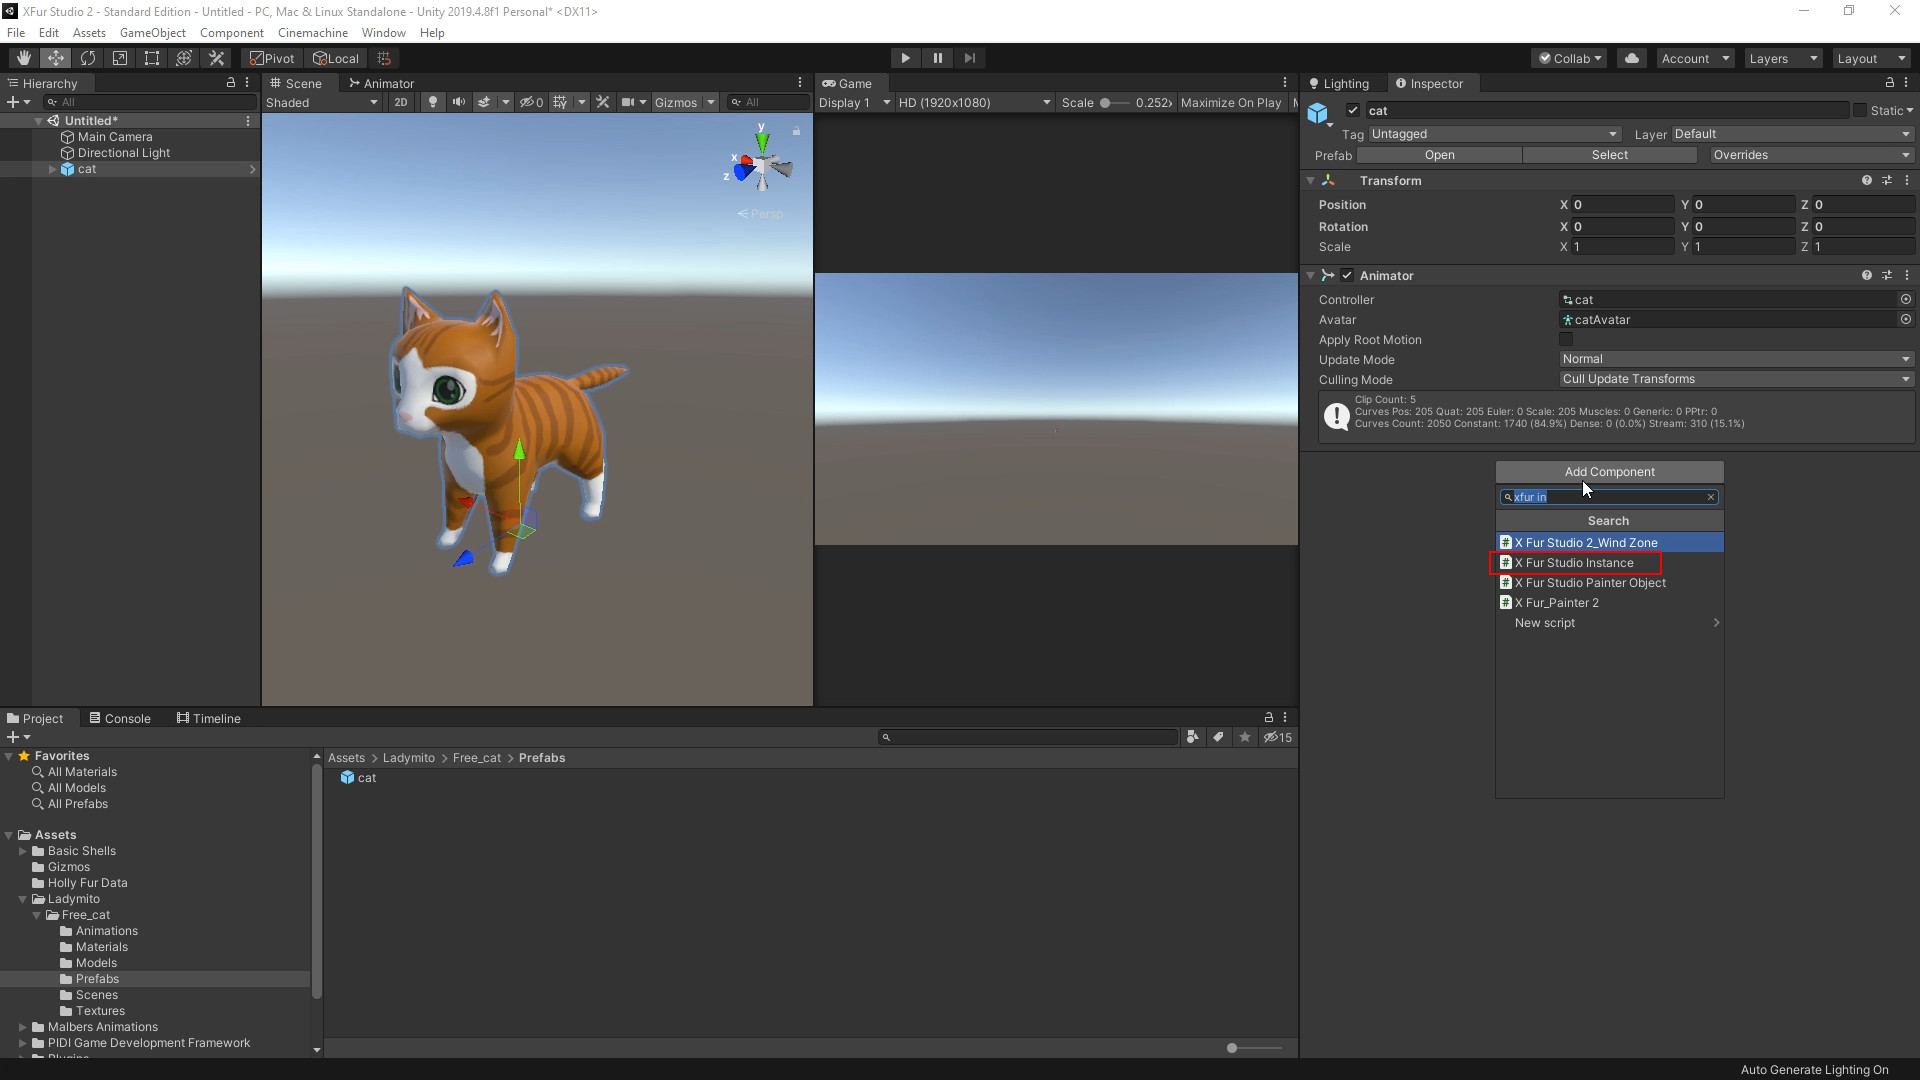
Once imported, drag the mesh into the scene and select its root object. On this object, add a XFur Studio Instance component by pressing in the Add Component button and then using the search box to find and select the XFur Studio Instance component.
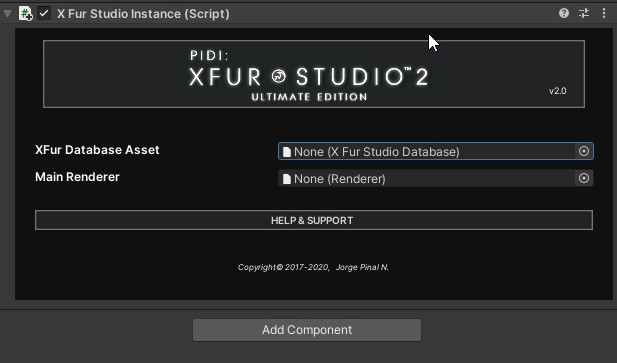
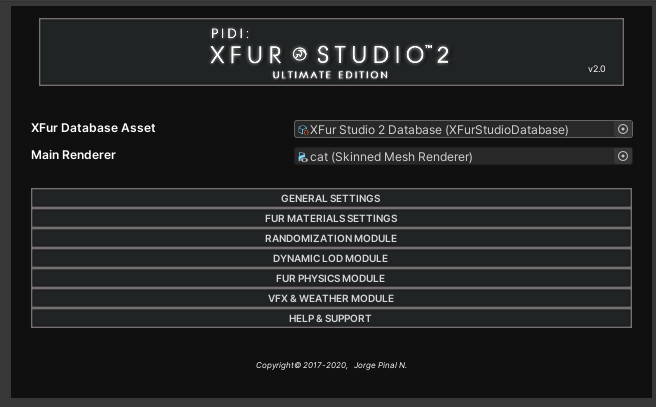
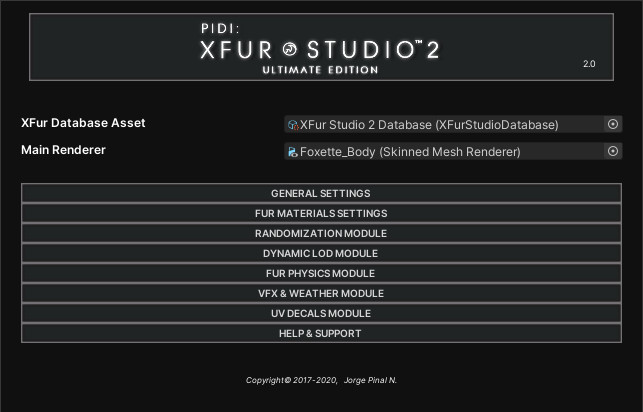
Once added, the XFur Studio Instance component will display two slots, one for an XFur Studio Database asset and one for a Renderer. Assign either the database included with XFur Studio 2 or one created by yourself to the first slot, and the main renderer component of the model or its LOD0 ( in this case located in the “cat” child object) to the second slot.
After adding the database asset and the renderer to the corresponding slots, XFur Studio Instance will automatically configure itself and, by default, enable most advanced features. This means that for first time users the UI of an XFur Studio Instance may be a bit overwhelming.
To make things simple and since we will not be using any of the advanced features for now, we will open the General Settings tab and disable all of the built-in modules. This will remove all their settings tabs from the UI. After this, we will open the Fur Material Settings and enable fur rendering for the main material of the cat model.
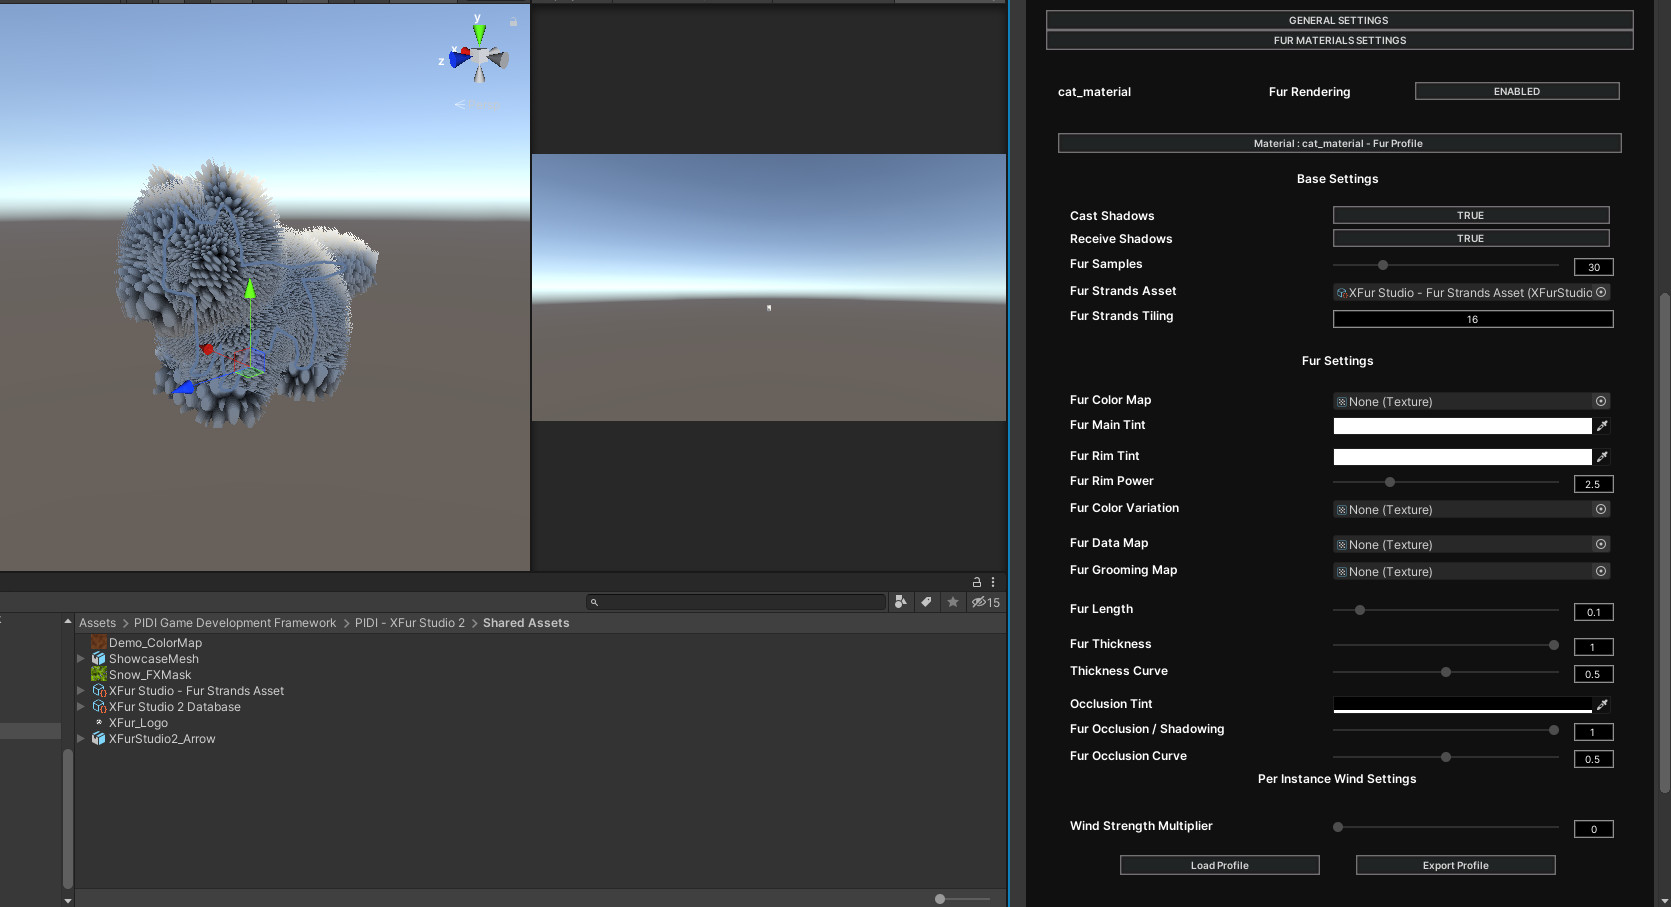
The final step to display fur over the cat model is to add the XFur Strands Asset included with XFur Studio 2 ( or one created by yourself ) to the Fur Strands Asset slot. This will make a thick fur appear over the model but with extremely large fur strands. You can adjust the density of the fur by increasing the Fur Strands Tiling Value. We recommend setting it for this particular model to a value of 16. To ensure it doesn't distract us from customizing the fur, turn the Wind Strength Multiplier value to 0.
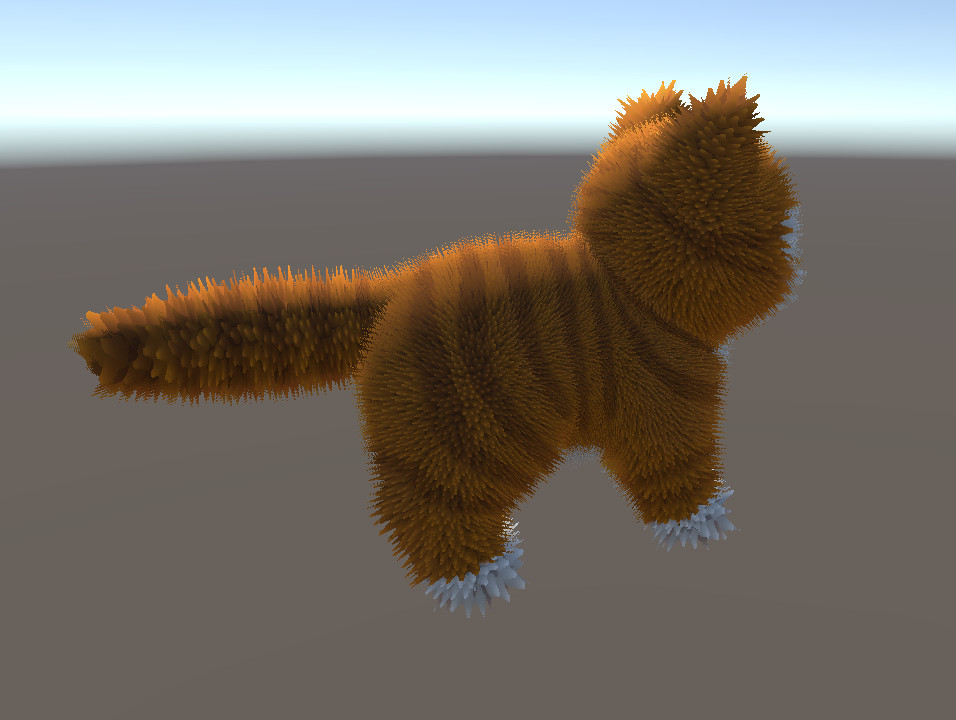
After this, assign the cat_diffuse texture to the Fur Color Map Slot. Play with the different values for Fur Length, Thickness, Shadowing and Rim Lighting to achieve the best look for the fur of the cat. Hovering your cursor over the name of any parameter will display a tooltip with additional information about what each setting controls.
You can follow this same tutorial in video format with the embedded video below in order to better familiarize yourself with the concepts covered in this section.
Upgrading characters from XFur Studio™ 1.9.x & XFur Mobile™
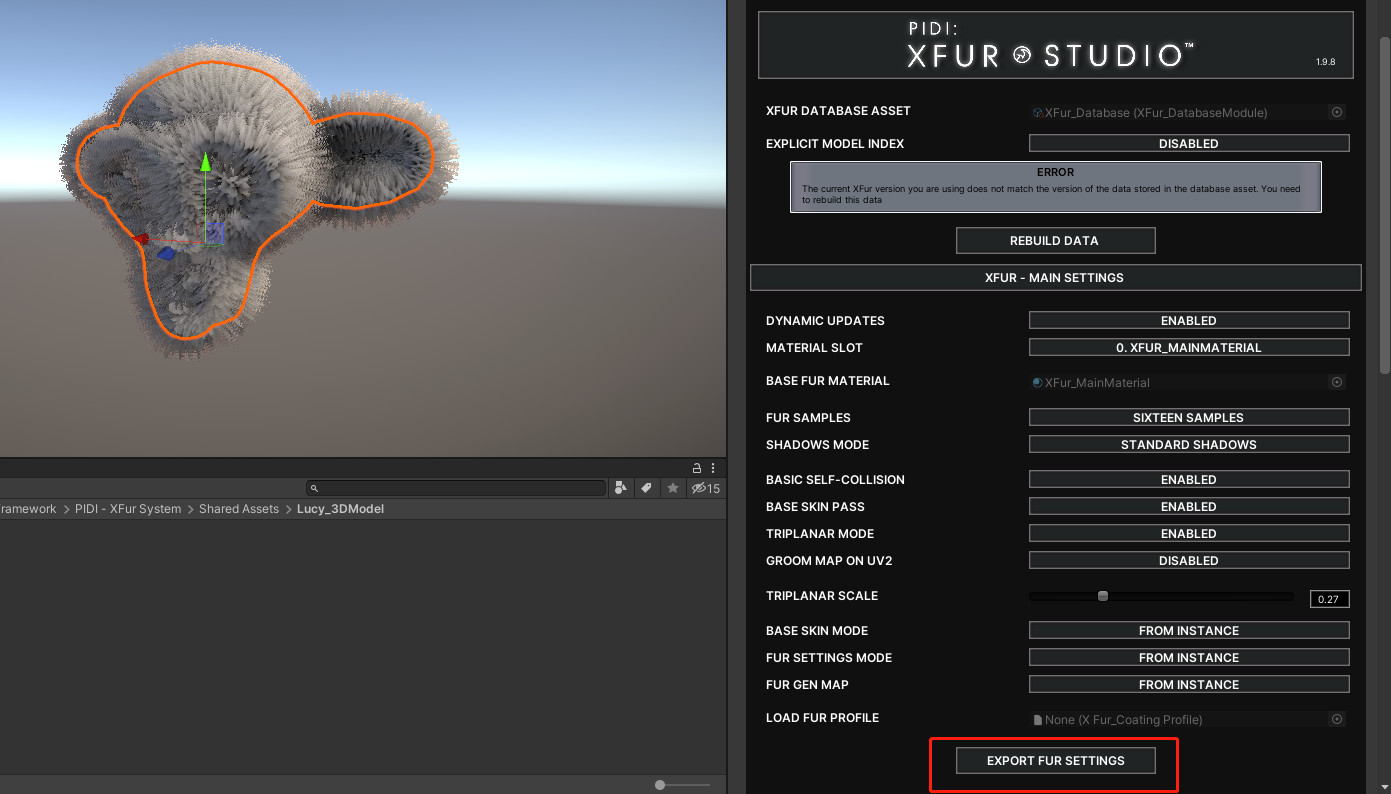
Due to the many differences between XFur Studio 1.9 / XFur Mobile and XFur Studio 2 there is currently no way to automatically upgrade characters using the former to the later. However, some tools are provided to make the upgrading process easier and more upgrading tools will be provided in the weeks after the release. The easiest way to upgrade a character from a legacy XFur Studio release to the new XFur Studio 2 is to first export a fur profile from the old version and then import it into the new version. To export a profile from a legacy XFur Studio release, select the character using XFur Studio 1.9 or XFur Mobile and press the Export Fur Settings button
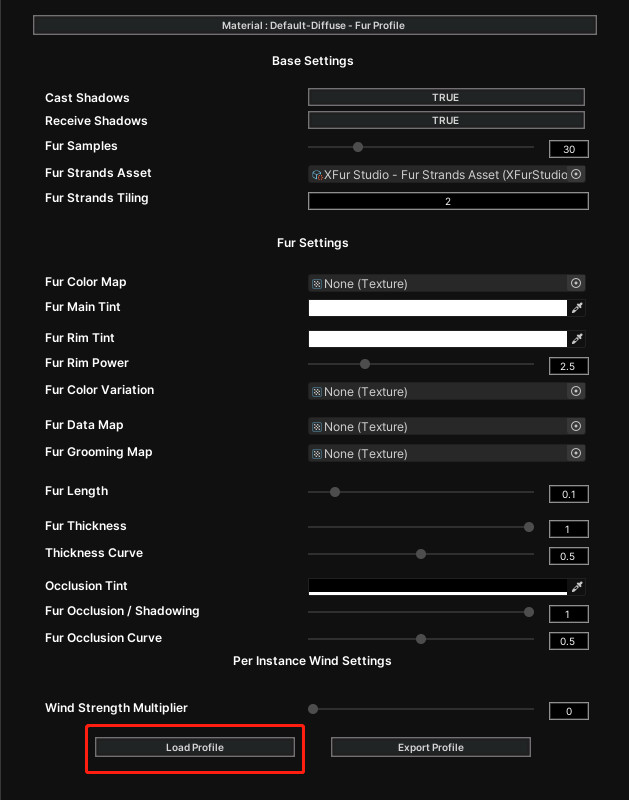
Now prepare your model for XFur Studio 2 in the same way we did for the cat tutorial or, alternatively, remove the XFur_System component and add an XFur Studio Instance component to the root of your model. Once your model has its XFur Studio Instance component set up with its Strands Asset and the Fur enabled and the Wind Strength multiplier set to 0, press the Load Profile button and load the legacy profile you exported.
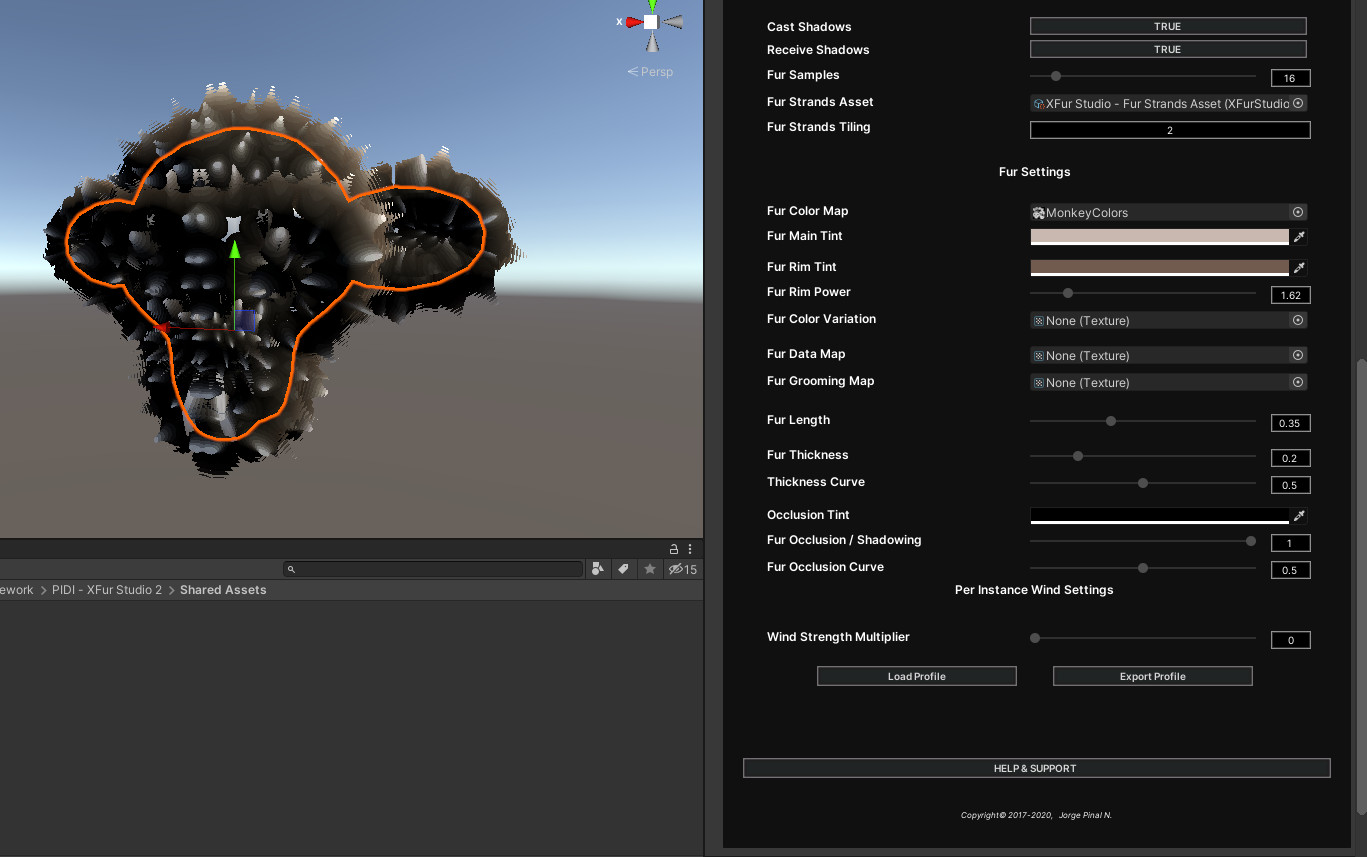
Once loaded you will notice that not all values match the look of the old model. This is because the Fur Strands Assets used in XFur Studio 2 have a very different format and a much higher quality than those used in the legacy XFur Studio releases, which were simpler texture maps.
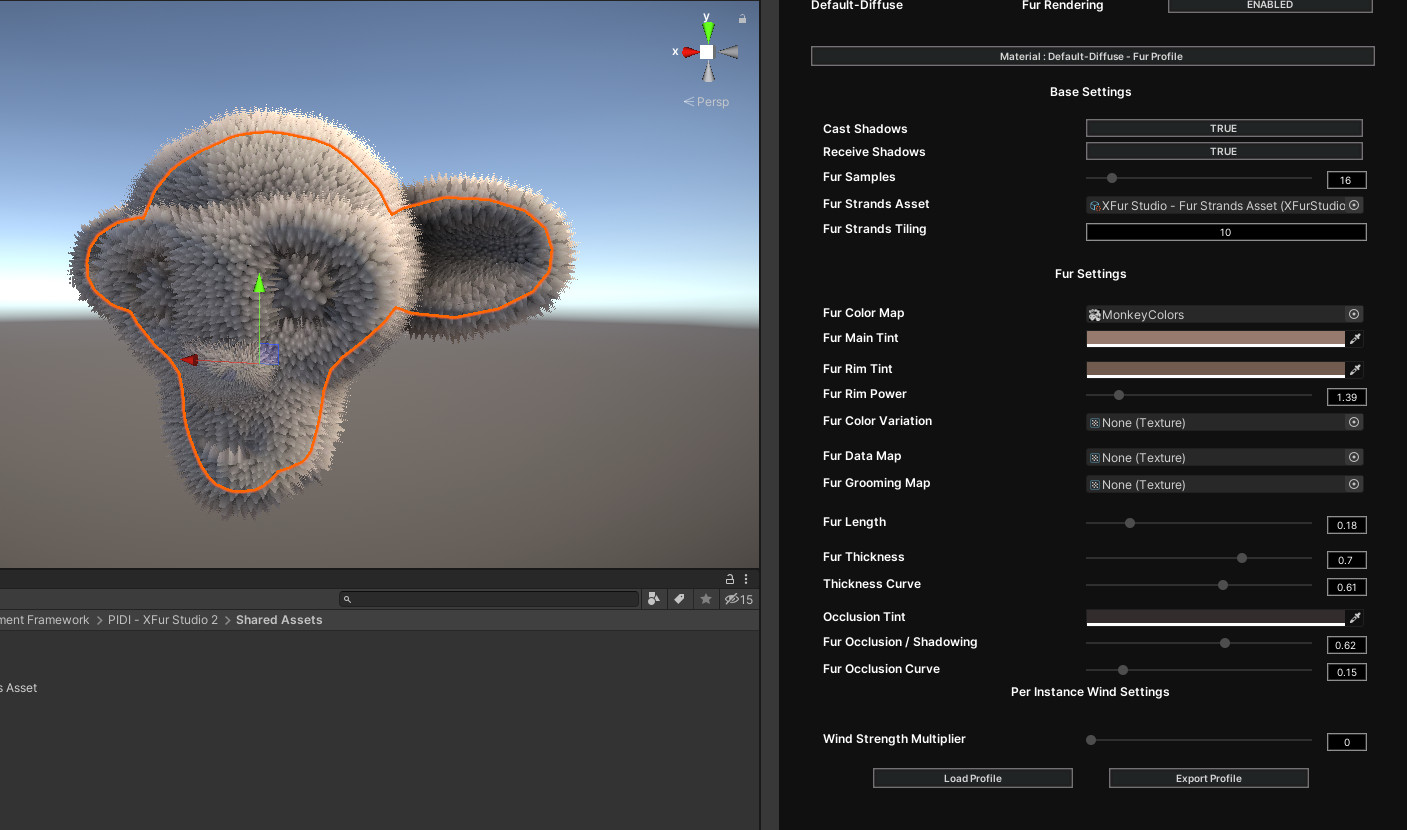
You will need to adjust some values in order to match the look of XFur Studio 1.9 / XFur Mobile as much as possible, but loading the profiles in this way will allow you to save some time. Additionally, the Fur Data Map from XFur Studio 1.x and XFur Mobile is fully compatible with XFur Studio 2, which will also save you time when upgrading your work. To match the look of XFur Studio 1.x / XFur Mobile even more closely you can use custom textures within the Strands Assets that match the XFur Layers textures used by XFur Studio 1 / XFur Mobile, you only need to ensure that you swap the alpha channel of the legacy XFur Layer textures for the red or green channels required by XFur Studio 2.
In the example showcased in this manual, we only needed to adjust the occlusion value and the tiling of the fur strands to closely match the look of XFur Studio 1.
While we are aware that the upgrade process from XFur Studio 1 to XFur Studio 2 is far from perfect and requires some manual work in order to get a correct look, the difference in visual quality and performance, even when using a fairly basic setup makes the extra work worthwhile. However, as part of our compromise to ensure ease of use and a high quality product, additional tools to make the upgrade process easier are currently being developed to be released after the release.
For a more detailed and dynamic demonstration of the upgrade process and how simple it is, watch the video below. The whole upgrading process takes a few minutes for most characters and models and will continue to improve with each new update.
XFur Studio™ 2 - Full User Manual
This reference manual will cover in detail all the features, tools and settings available in XFur Studio 2. This section of the manual is not aimed to beginners since it assumes some level of experience and familiarity with the Unity Editor and 3D art in general. The last section of the manual, covering the XFur Studio API, requires some knowledge about coding in C#.
XFur Studio Database
XFur Database assets contain the references to all the resources used by XFur Studio 2. This allows the asset to better manage memory and loading times while ensuring that everything is ready to use at every moment, without requiring the user to do any manual setups.
While a fully ready XFur Database Asset is provided with the asset you may want to create your own database in order to prevent it from being overridden with every new XFur Studio update. In order to create a new database asset simply right click anywhere in your project view and go to the Create menu. Then navigate to XFur Studio 2/Database Asset to create the new database Asset.
Once it has been created save your project in order to refresh the Unity asset's database, which will ensure that the XFur Database Asset displays all the resources it has created. The resources creation, loading and assignment to the XFur Database asset is an automatic process that should not require any input from the user
XFur Strands Asset
The XFur Strands Asset controls the appearance of the fur that covers a character. They can be created by right clicking anywhere on your Project window and the navigating to Create/XFur Studio 2/ New Fur Strands Asset.
The Strands Map can also control color variation over the fur by using two layers of strands, one in the red channel and one in the green channel. There are currently two ways of defining the shape of these strands, either procedurally or with a pre-made texture.
When using procedurally generated strands you can adjust all kinds of values such as the horizontal and vertical size of each strand, their gradient (which will control the thickness and shadowing of the fur), their density on the strands map as well as their average size (since each strand is slightly randomized). The first pass controls the red channel and the second pass the green one. Finally, you can decide whether the texture will use mip maps or not. Using Mip Maps in the fur strands map may cause the fur strands to fade away with the distance, but this will also produce a softer, more natural look for characters that are far away from the camera.
Additional parameters for the procedural strands generator, such as custom per-pass strand shapes, additional passes for extra detail, random rotation and more are currently being researched and developed as free updates for XFur Studio 2, thus ensuring that the fur quality and variation only improves as time goes by
XFur Studio Instance
The XFur Studio Instance component is the core script that controls the whole fur simulation for a character or model. Unlike standard shader / material systems for Unity, XFur Studio depends entirely on the XFur Studio Instance component in order to work due to the unique way in which it handles fur rendering and simulation. From this component's UI you can enable / disable and configure every part of the simulation and appearance of the fur of your character.
General Settings
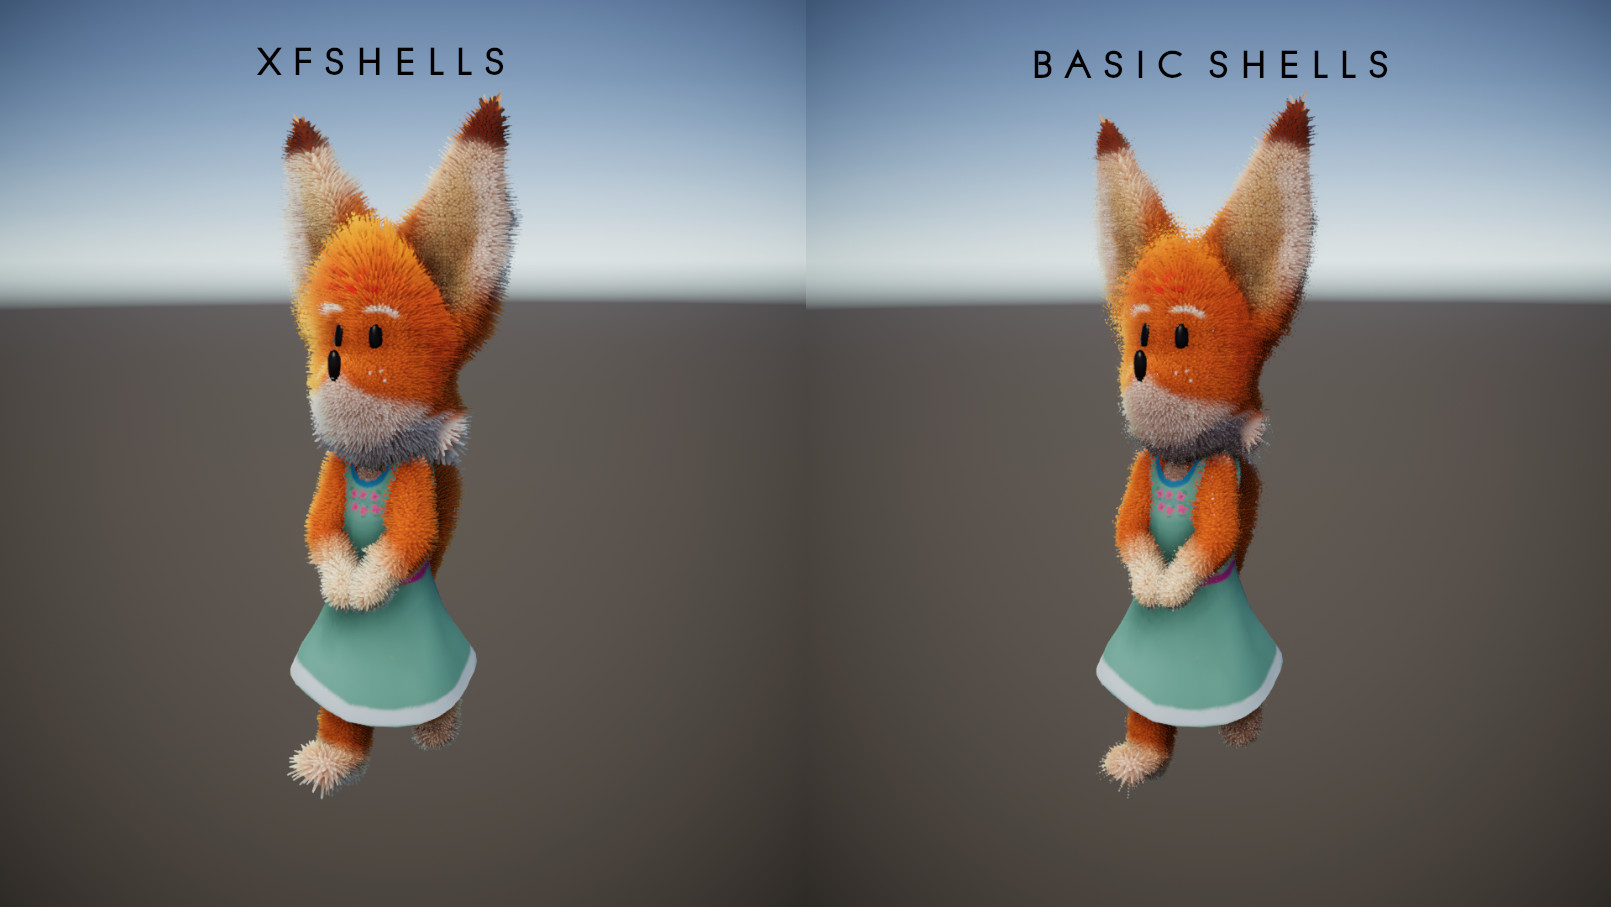
The UI of the XFur Studio Instance component automatically adjusts itself to the features needed and used for the character. General and per-material settings are available as well. In the General Settings tab you will be able to select the Rendering Mode to be used, either XFShells or Basic Shells.
XFShells are extremely scalable and can be used on any platform, device and pipeline. If your project's main focus is on quality you should use XFShells since they allow for a perfect balance between visual fidelity and performance. Basic Shells provide a simpler rendering and less flexibility but they are faster than XFShells when used in multiple characters at once ( >60 on screen characters ). Below you can find a small comparison table of the features, advantages and disadvantages of both rendering methods
| Feature | XFShells | Basic Shells |
|---|---|---|
| General Fur properties (length, thickness, color etc) | ✓ | ✓ |
| Dynamic Sample counts and adjustable quality | Up to 128 samples | 4 or 8 samples only |
| GPU Physics Module | ✓ | Partial |
| VFX (Snow/ Rain/ Blood) Module | ✓ | ✓ |
| Dynamic LOD Module | ✓ | Partial |
| Randomization Module | ✓ | ✓ |
| Decals Module | ✓ | ✓ |
| Fur grooming and wind | ✓ | ✓ |
| Mesh Skinning | CPU forced | Set by Unity |
| Draw calls count | 1-3 per material* | 1-3 per sample |
| Point lights in Standard pipeline + Forward | With additional draw calls | ✓ |
| Accurate Fur Shadows | ✓ | Deferred only |
| Universal Rendering Pipeline Compatibility | ✓ | X |
| High Definition Pipeline Compatibility | ✓ | X |
Choosing the right rendering mode for your project is important but in most cases you can take the best of both worlds by letting the Dynamic LOD module switch between them at runtime depending on a character's distance to the camera or by using different rendering methods for different characters depending on their importance. This will allow you to take full advantage of XFur Studio 2 in closeups and main characters while keeping performance stable in demanding scenes with dozens of characters on screen at once.
By default, XFur Studio 2 automatically updates the fur material settings every tenth of a second to ensure that any changes made to the main fur properties (length, thickness, occlusion, sample counts etc) are applied and sent to the internal rendering system. This process, while extremely efficient, can be disabled for a small performance gain if no changes to the fur properties will happen at runtime. If changes will happen but only occasionally, the changes to the fur materials can be applied manually through the XFur Studio API.
Finally, from this General Settings tab you can enable or disable any of the Built-in modules as well as verify they do not run into any errors, their version and status ( which may change over time as more features are added or if experimental features are enabled )
Beta Features
Starting with version 2.1.0 you can enable support for Beta Features directly from the General Settings Tab. This will update the UI to expose all properties, settings and new parameters currently under development for XFur Studio 2. While we only make available features that have been thoroughly tested and are as usable as possible, these Beta features should be used with caution as they may produce errors or incompatibilities with other XFur modules and, more likely, they may suffer multiple changes before they are labeled as stable.
Beta features are not always released in all pipelines at once. Some beta features may be locked to a single rendering pipeline depending on their requirements or may not be compatible with certain devices. Always make a backup of your work before enabling Beta features support in any XFur Studio 2 instance.
Fur Material Settings
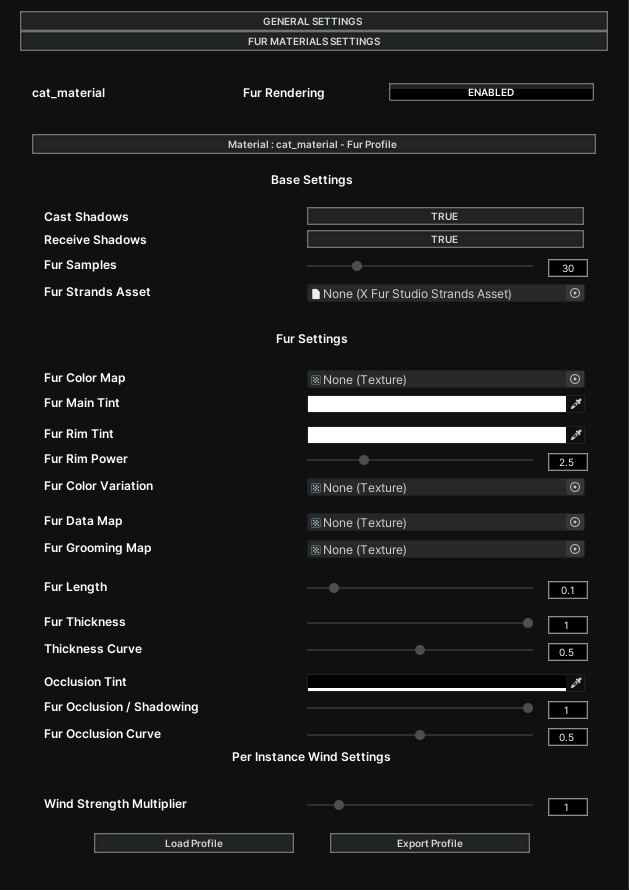
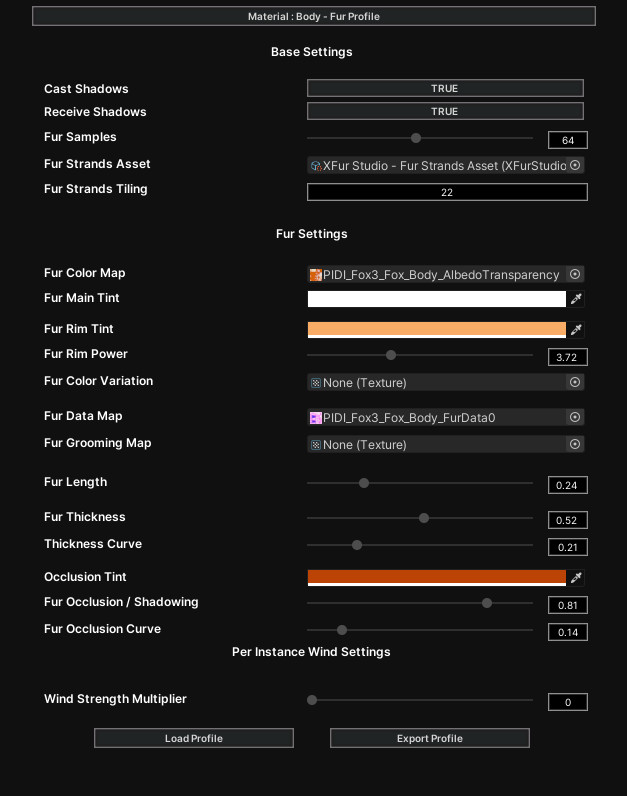
The Fur Material settings tab allows you to control the fur rendering parameters of each material and enable or disable fur rendering entirely for each one of them.
When using XFShells, you can control for each material whether the fur will cast and receive shadows and the total amount of fur samples ( the higher the sample count, the higher the quality of the fur ).
When using Basic Shells additional slots for a texture, color, normal map and smoothness value are available since the Basic Shells shaders also render a simple “skin” pass under the fur
On both rendering modes a Fur Strands Asset must be assigned for the shader to generate the actual fur, while using the Fur Strands Tiling value to control the strands density.
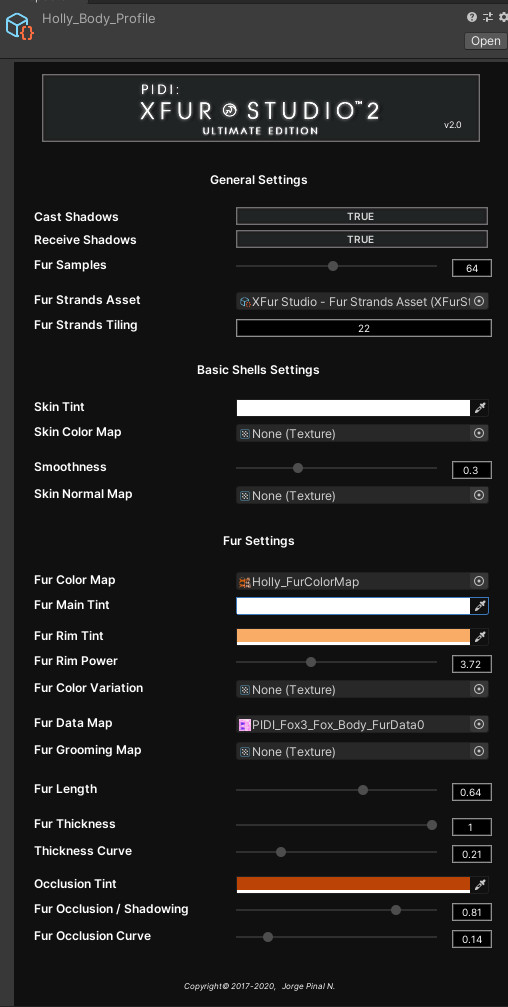
The Fur Color Map and Fur Color Tint control the final color of the fur that covers the character. Rim Tint and Rim Power control the Rim lighting effect over the character, but can be disabled by setting the Rim Color to black. The Fur Color Variation Map is a splat map that adds one additional fur tint for each one of the four channels of the texture and allows you to add even more variation to the fur of your character.
The Fur Data Map defines which parts are covered in fur (Red channel), its length variation (Green channel), its shadowing variation ( Blue channel ) and its overall thickness (Alpha channel). The Fur Grooming Map contains information about the direction in which the fur flows over the surface. Since grooming maps store complex global and object based directions in tangent space they should be generated within XFur Studio 2 by using the XFur Designer tool to ensure the best results
Finally the different sliders control the appearance of the fur, its length, thickness and shadowing as well as how much influence will the global wind in the scene have over the character, to produce more precise adjustments on each character and material.
Just below the fur parameter sliders you will find two additional buttons, Load and Export Profile. These buttons allow you to either Load or Export all the settings from your fur material into a Fur Profile Asset, which makes it very easy to share configurations across models (or team members) and quickly create fur variants for a same character without having to set up every parameter from scratch every time.
NOTICE : Unity's Undo system is not always reliable when working with systems as complex as XFur Studio 2. If you are making constant changes to the fur parameters of your character it is advisable to Export your Fur Profile often (you can overwrite profiles without issues) as a quick backup in case of an error with Unity's Undo system
XFur Studio™ Built-in Modules
XFur Studio 2 has five different built-in modules that provide several advanced features, from Randomization and LOD to physics and snow simulations. Each one of these modules can be set up with specific per-instance parameters. In this section we will cover the different features and settings of each one of them.
Randomization Module
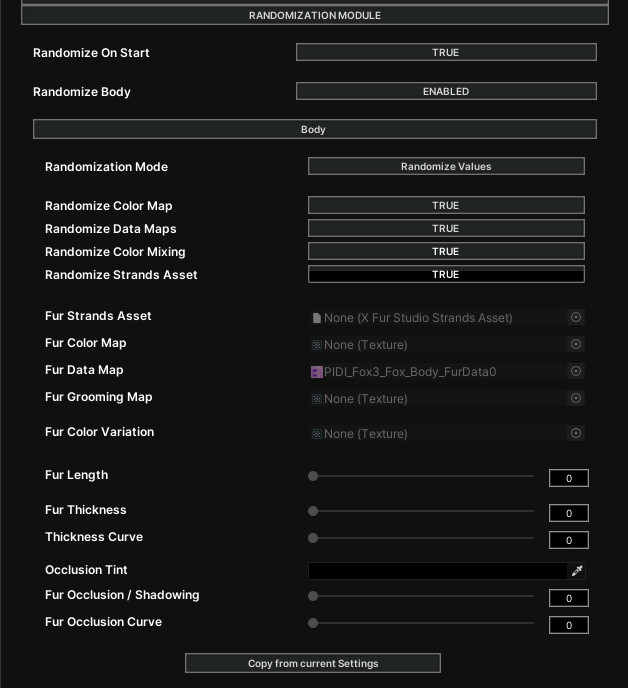
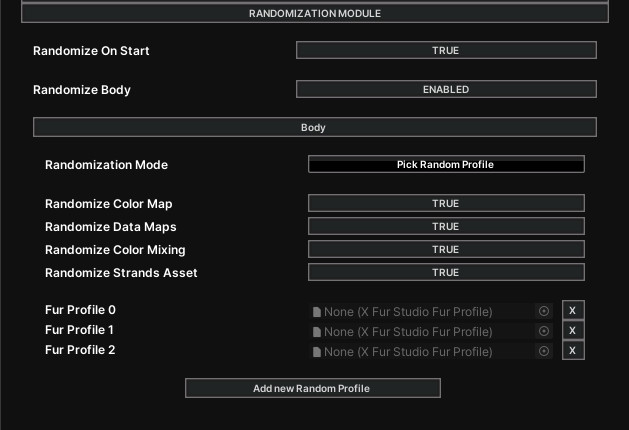
The randomization module allows you to generate endless variations for your characters by manipulating all fur parameters at runtime within certain specific rules. The randomization module can be run in three different modes : Randomized values, Pick Random Profile, and Randomize Values and Profiles. The randomization can be triggered automatically on the Start function or manually through code.
When using the Randomize Values mode you can provide a series of alternative values for most fur parameters on a per-material basis. When active, the Randomization module will generate a new variant by selecting random values for each parameter that are located between their original values and the alternative values provided by you.
When using the Pick Random Profile mode a list of Fur profiles is provided to the module for it to pick one at random. If you select the Randomize Values and Profiles mode each parameter will be randomized between the values of the original parameters and those of a random profile from the list.
For any randomization mode, you can select whether to randomize only the general fur parameters or also the different textures and even the Strands Asset, which can allow you to have an almost infinite amount of variations.
Dynamic LOD Module
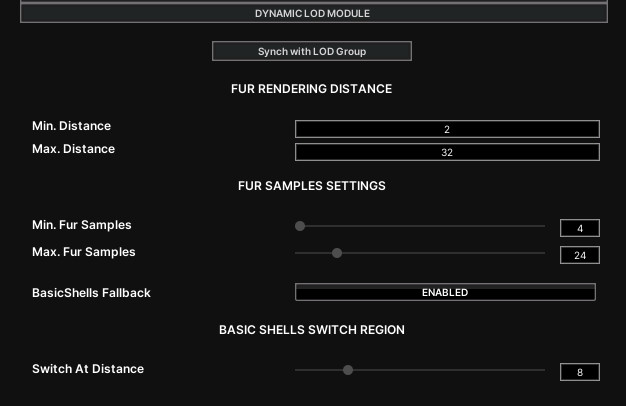
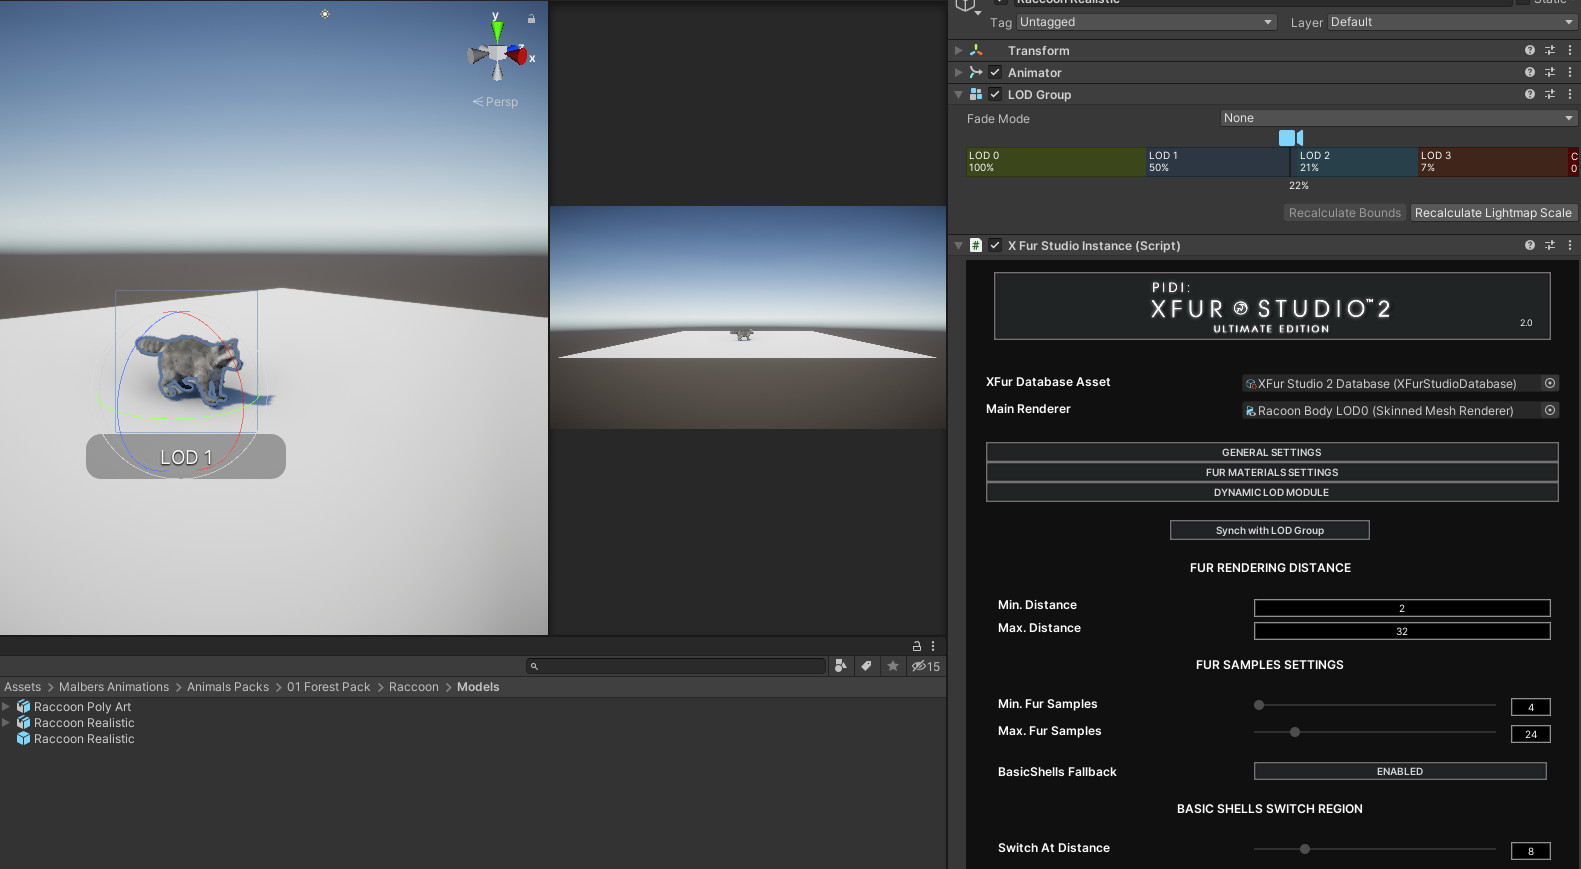
The Dynamic LOD module allows you to dynamically adjust the quality and features of XFur depending on the distance between the character and the camera. It is compatible with the standard Unity LOD Group component, adding fur to each active LOD level when needed and aiding you to keep a stable performance.
The component will ensure that the amount of fur samples used by XFur will move from Min. Fur Samples to Max. Fur Samples as the character gets far from the camera, reaching Max. Fur Samples when it is a Min. Distance and Min. Fur Samples when it is at Max. Distance. If Basic Shells is enabled, once the character is further away than the Switch At Distance value it will automatically switch to the Basic Shells rendering mode.
Pressing the Synch with LOD Group will automatically find the LOD Group component attached next to the XFur Studio Instance component, read the first Renderer assigned to each LOD Level and automatically add fur to it when needed.
NOTICE : The Synch with LOD Group feature works only on the first renderer attached to each LOD Level. If your character is made of multiple renderers or the mesh using fur is NOT the first renderer assigned to each LOD Level, you should not use the Synch with LOD Group button. Instead, you may enable the experimental features in the LOD module and manually set up each LOD Level renderer. Be warned that Experimental features may cause unexpected errors.
Physics Module
The physics module allows you to simulate basic physics on the fur of your characters. It is entirely run on the GPU so its performance impact is extremely low, and its memory footprint can be adjusted by changing the quality of the Physics Simulation. Low and Very Low qualities will be enough for most models and in its lowest setting the Physics module uses less than 10Kb of memory for each material using the physics simulation. To use it, simply enable the module in the General Settings tab and then enable the simulation for the corresponding fur materials in the Physics Module tab
The Gravity strength and the Physics Sensitivity settings are shared across all materials in the instance and while at release fur length has the most influence over the physics effect, additional control over how much influence the physics module has over every section of the fur will be provided through an additional stiffness map in upcoming updates
VFX Module
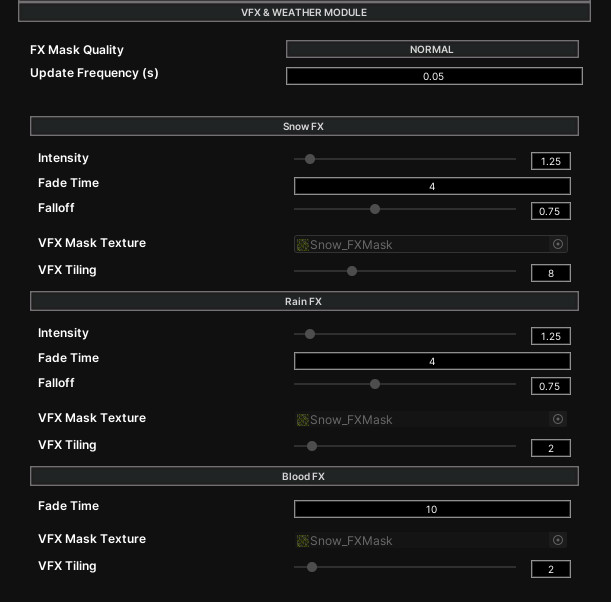
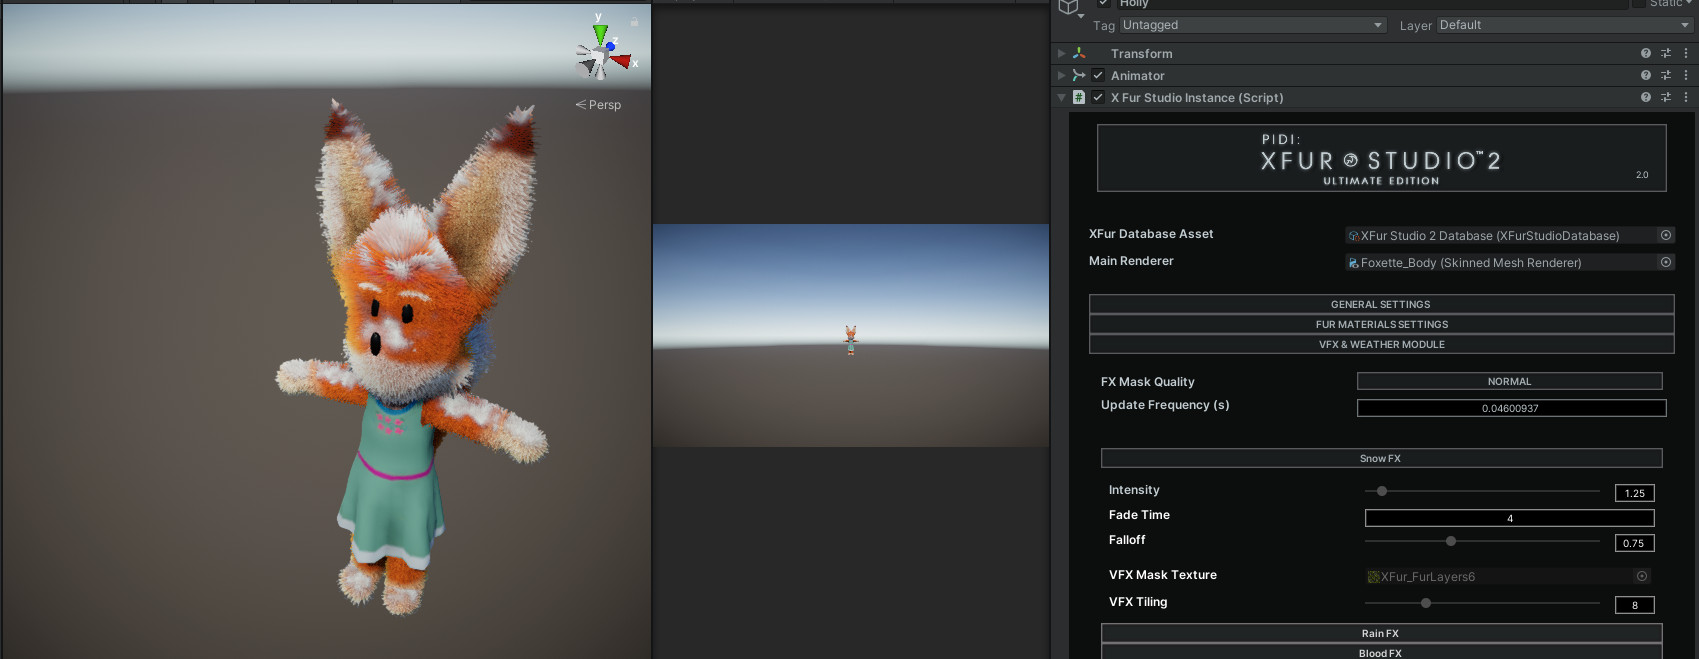
The VFX module lets you simulate snow coverage, blood effects and rain on the fur. These effects can be adjusted on a per-instance basis but can also be influenced by the XFur Studio 2 Wind Zone object in the form of global rain and snow effects with unique directions and intensities.
For each effect you can adjust the intensity of its progressive coverage (in the case of rain and snow), the speed with which they fade away in seconds, their falloff over the normals of the model (again for the snow and rain) as well as an additional VFX mask with tiling to provide even more variety to the way the effect is projected over the character's fur. To disable either the Snow or the Rain effects, simply set their intensity to 0. The blood effect is applied on demand, so unless a Painter object applying the Blood effect interacts with the character it will not be visible.
In an upcoming update, additional settings for each effect including metalness / smoothness and other properties will be made available in order to further extend the capabilities of the VFX module and allow users to simulate more unique characters. On the first release, Snow and Blood colors are fully customizable and additional effects can be “faked” through the use of Painter Objects.
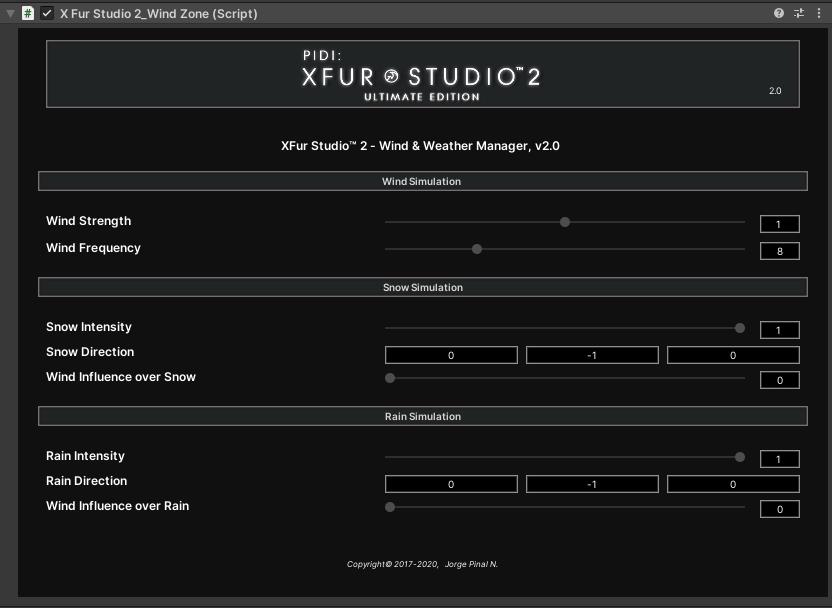
Finally, the XFurStudio2_VFXModule is deeply linked to the XFurStudio2_WindZone object, which handles the global intensity of the wind, snow and rain simulations as well as their global directions. To add a WindZone to the scene, create an empty object and add the XFurStudio2_WindZone component to it.
The Snow intensity and Rain intensity values provided by the WindZone script are further multiplied by the Snow and Rain intensity values in the VFX Module of each instance. This means that setting the Rain intensity in the Wind Zone object to 0 will stop the rain simulation across all instances while setting it to 0 in the VFX module will disable it only for that particular instance. When no Wind Zone object is available, Snow and Rain intensities are set to 1 by default and their direction is set fully downwards ( 0, -1, 0 )
The wind simulation provided by the Wind Zone script also influences the direction of the Snow and Rain effects for a more realistic behavior. You can control the influence of the wind strength (and its direction) over the Snow and Rain effects independently on their corresponding tabs
Decals Module
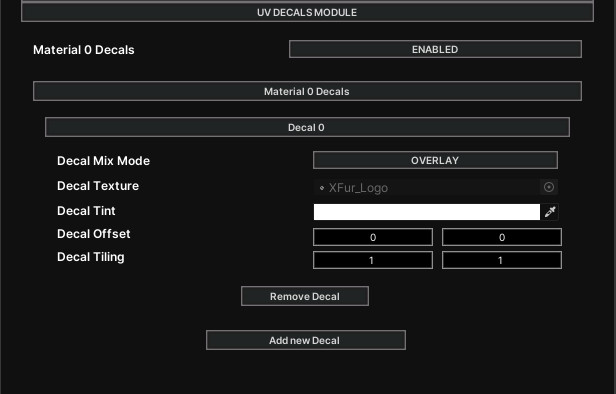
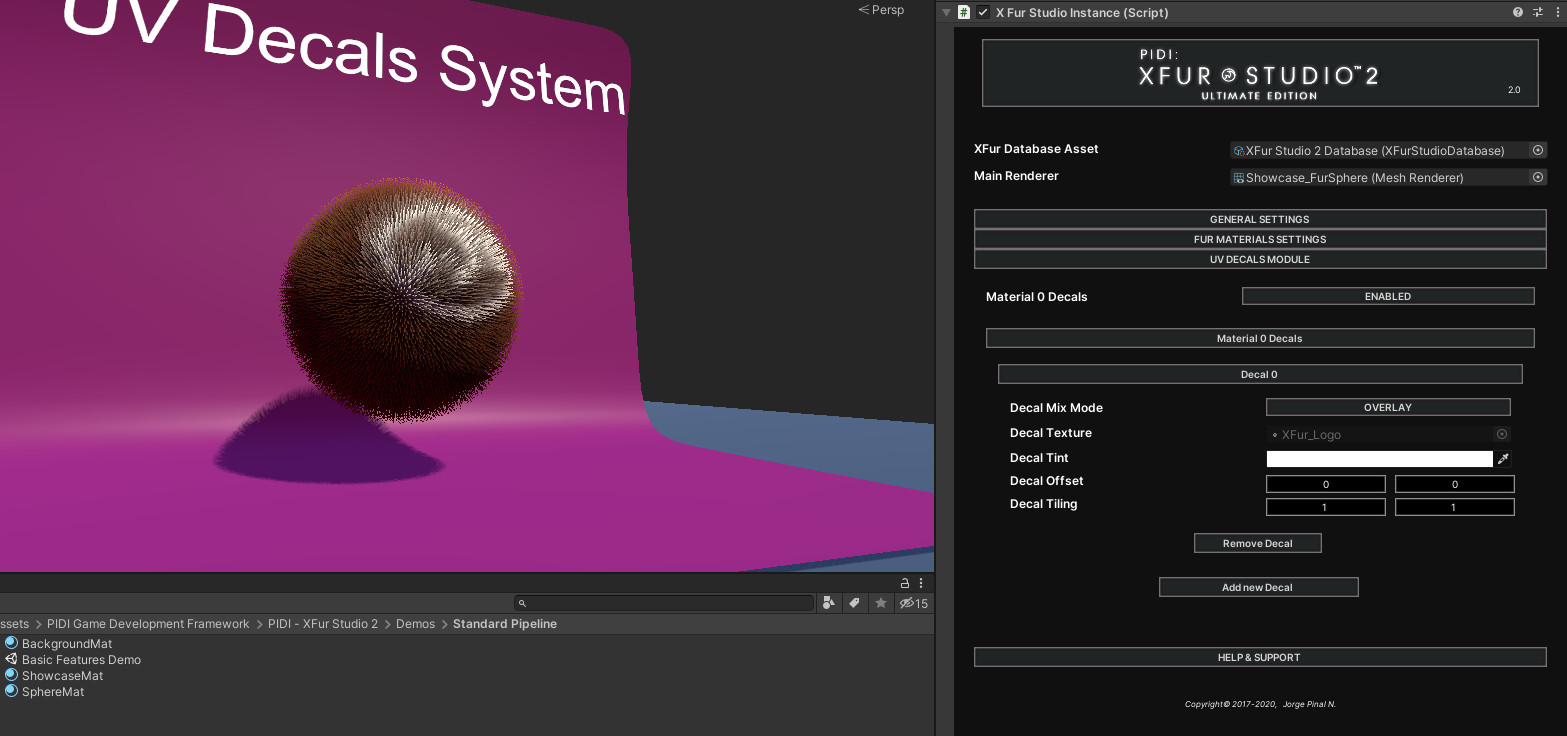
The Decals module allows you to project additional textures over your fur. Up to four decals per material can be applied and each one of them can be layered and mixed in overlay, additive or multiplied mode. These decals are projected using the main UVs of the character. In practical terms, it is similar to adding layers to a photoshop image in a very performant way
Decals can be swapped at runtime since they are added in a non-destructive way. They can have different offset and tiling values for each decal, allowing great flexibility when customizing your characters.
Curly Fur (Beta)
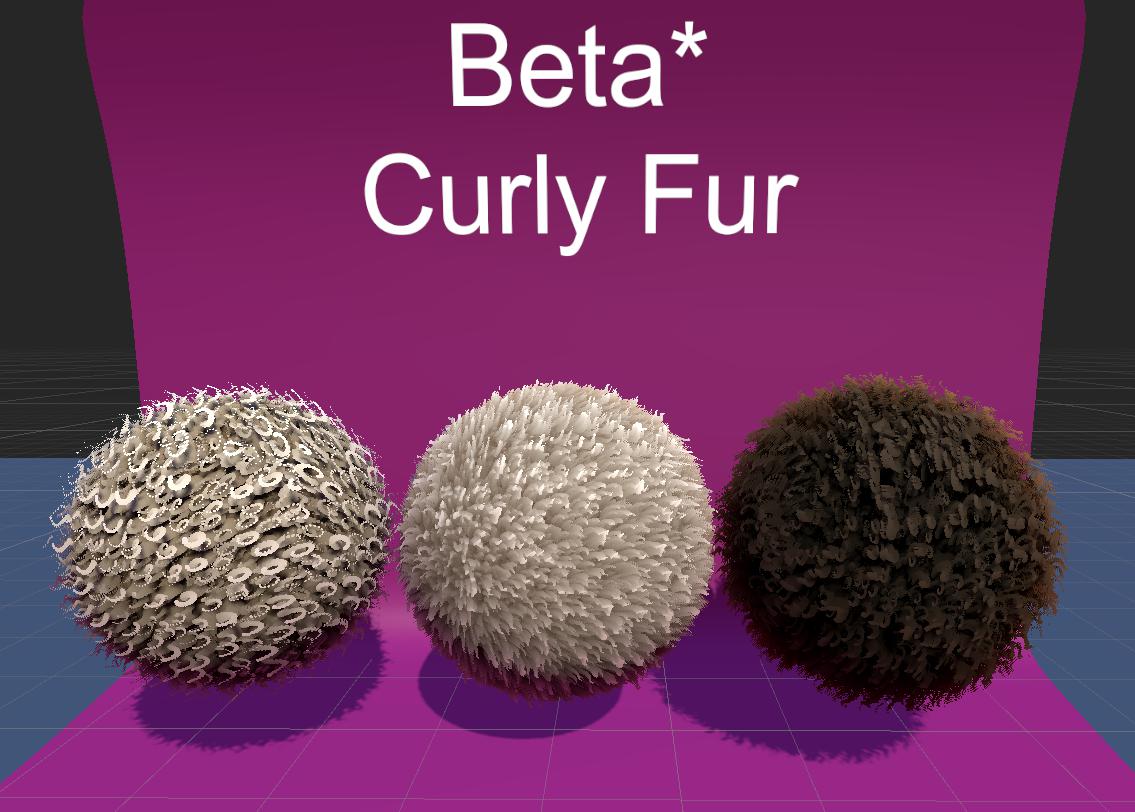
Introduced in version 2.1 is a brand new beta feature : Curly fur. The current curly fur implementation allows for manual adjustments of curl amount and size on both the X and Y axes and works with procedural and manual fur strand maps, the latter producing often times better results.
The curls are currently generated in a single direction producing reduced variety in some cases, something that will be addressed in future updates.
To enable the Curly fur parameters simply enable Beta features support in the General Settings tab of the XFur Studio Instance component.
The available parameters control the amount of waves / curls to be generated on the X and Y axes as well as their size. By playing with these parameters you can create many different kinds of curly fur, from thin and well defined “spring-like” curls to wool-like materials, etc.
Curly fur is compatible with all XFur modules including physics and weather FX.
XFur Studio Painter Object
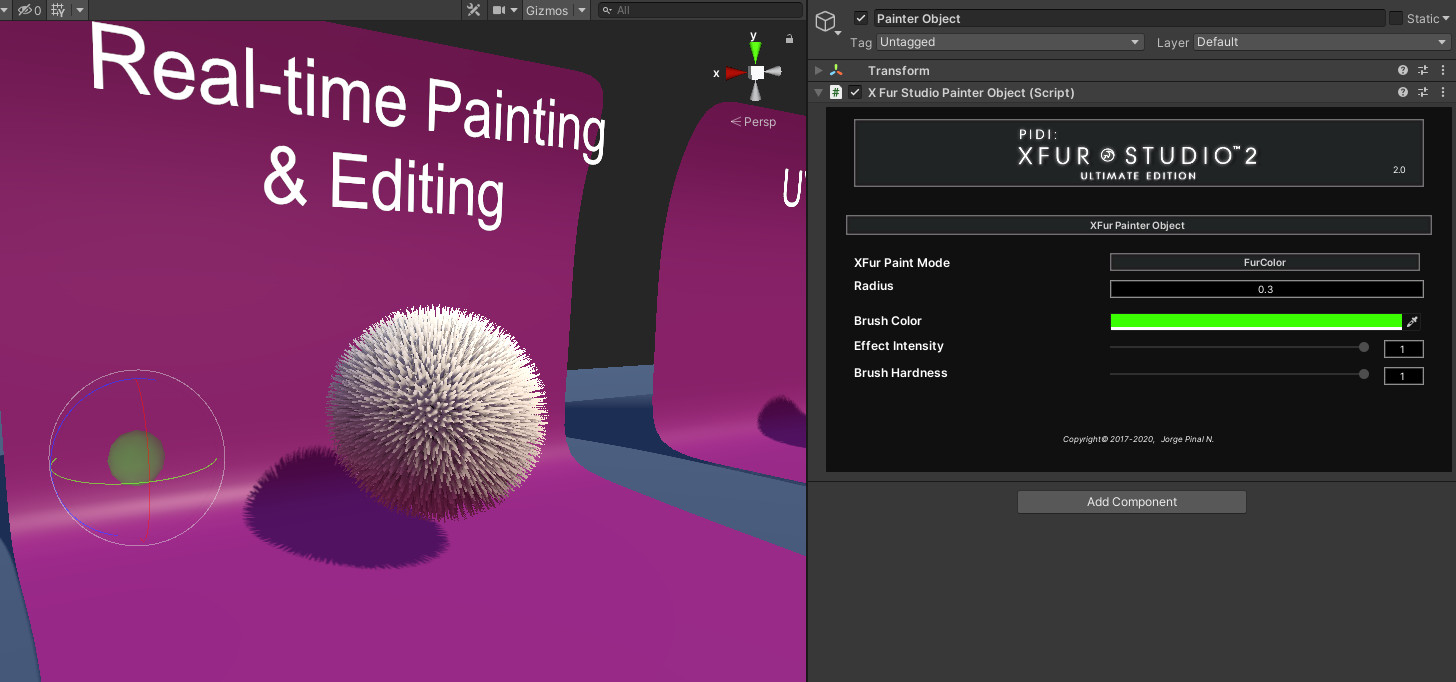
Painter Objects are extremely useful “Virtual Brushes” that allow you to modify the appearance of the fur at runtime in a similar fashion to XFur Designer. This is a feature that was very often requested in XFur Studio 1.x and XFur Mobile and lets you shave, paint or trim the fur using the Painter Object as a three dimensional, spherical brush.
Depending on the Paint Mode selected the UI of the Painter Object will automatically adjust itself to expose the right parameters to use, either a Brush color, effects intensity, whether to invert the painting mode (when painting the Fur Mask for example, it allows you to either add or shave away fur) etc.
To add an XFur Painter Object to your scene, simply create an empty game object and add the XFurStudioPainterObject component to it.
With future updates, additional Painter Object shapes and features will be added to allow for a more flexible integration with your projects and to expand what is achievable in XFur Studio 2 without any coding experience.
NOTICE : On the first release, grooming through Painter Objects is an experimental feature and may not produce accurate results under certain circumstances. In all our tests, however it has produced highly usable results.
XFur Studio™ Profiles
XFur Studio Profiles act as templates that allow you to fast and easily share complete configurations for your fur materials as well as to easily create fur variations for your characters. With them, you could create a base Fur configuration for an animal and then create copies of said profile and add simple color, length and texture variations all other fur patterns, colors and appearances.
To create a new Fur Profile you just need to select a XFur Instance and, within the Fur Material Properties of the material you wish to generate the profile from, press the Export Profile button. Alternatively, you can create a completely independent profile by right clicking anywhere in the Project Window and navigating to Create/XFur Studio 2/New Fur Profile Asset.
XFur Studio™ Designer
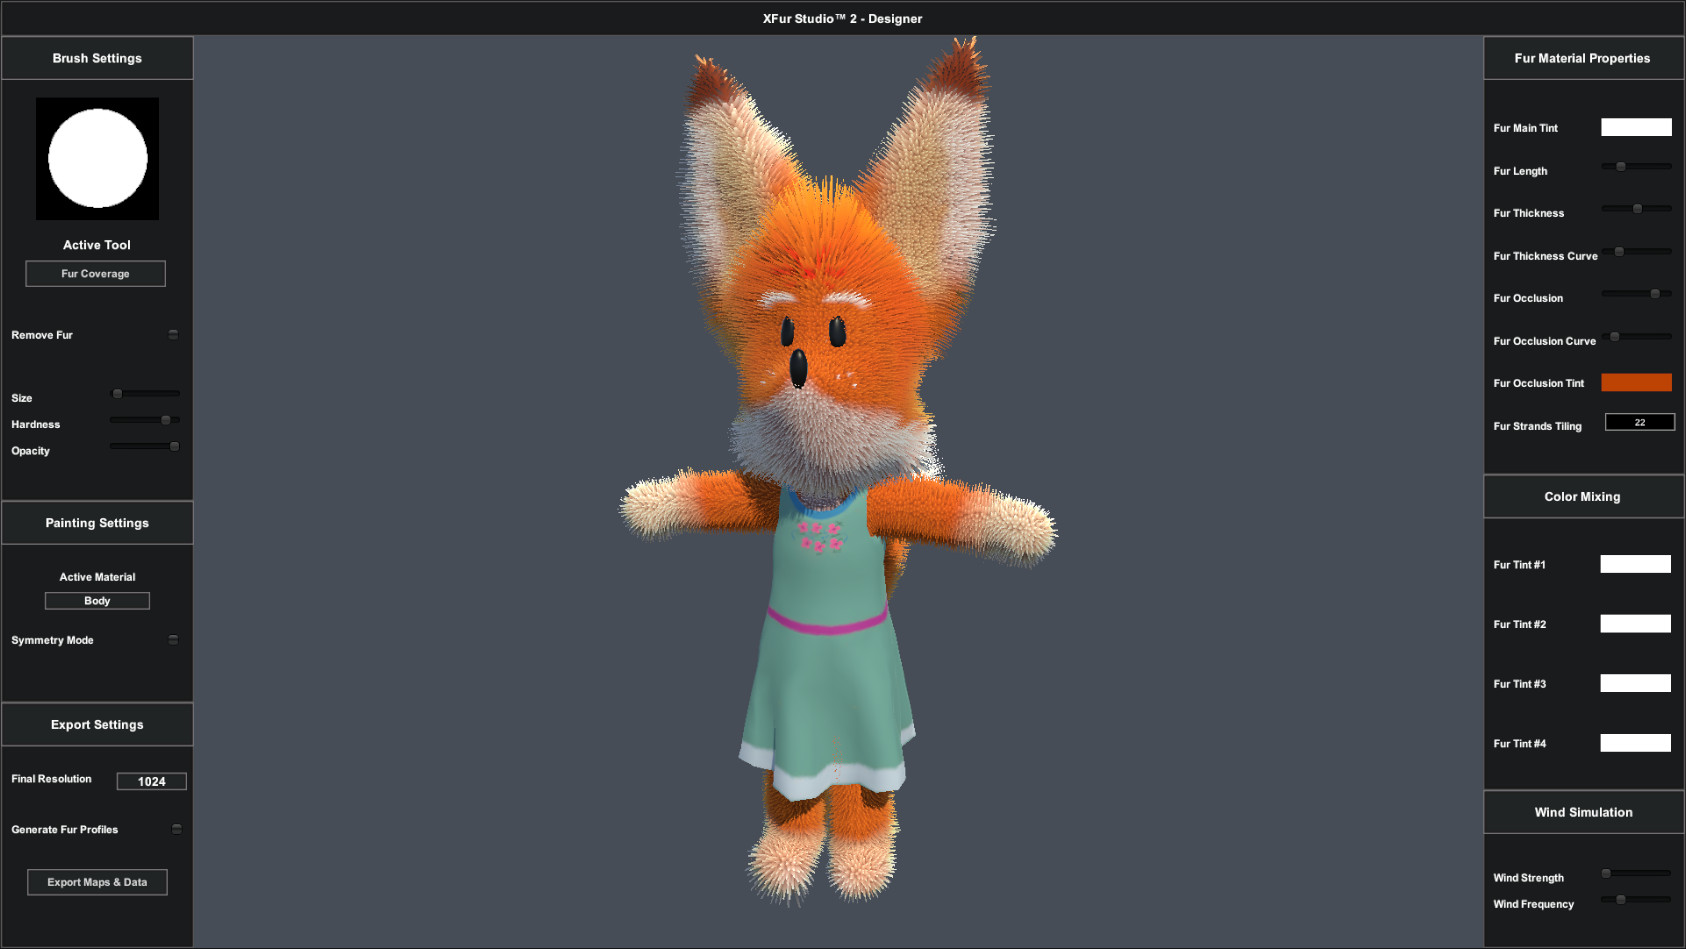
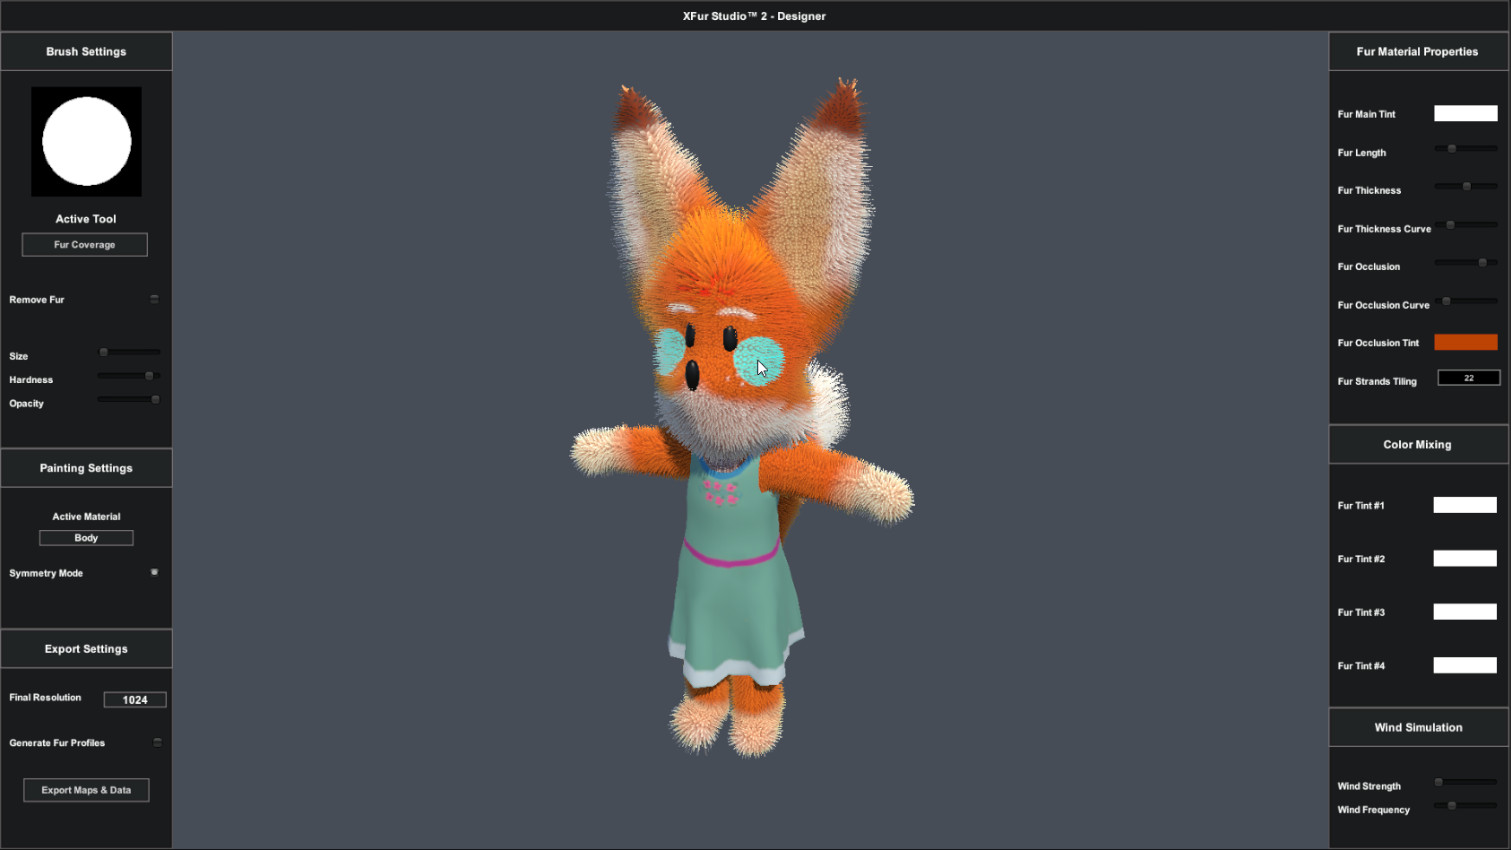
XFur Studio Designer is a very powerful tool included with XFur Studio that allows you to edit in real-time all fur properties and customize in detail every aspect of the fur of your characters with a workflow that resembles that of standard 3D modelling, sculpting and painting apps which should make 3D artists feel right at home. To make using XFur Studio Designer easier it is a good idea to familiarize with the built-in shortcuts.
| Action | Input Shortcut |
|---|---|
| Adjust brush size | Shift + horizontal left click drag |
| Adjust brush hardness | Shift + vertical left click drag |
| Adjust brush opacity | Shift + horizontal right click drag |
| Switch secondary mode for the active tool | X |
| Toggle Symmetry mode | S |
| Zoom on model | Mouse Wheel |
| Pan view | Shift + Middle mouse button drag |
| Rotate around model | Middle mouse button drag |
| Undo changes (independent for each tool) | Shift + Z |
| Redo changes (independent for each tool) | Shift + Y |
While some experience with 3D designing applications is highly recommended to use XFur Studio Designer effectively this is not in any way a requirement and the toolset has been designed to be intuitive and easy to use. To use XFur Studio Designer open the included XFur Studio Designer scene and drag the model you want to edit into this scene. Do not open the scene in additive mode, ensure that XFur Studio designer is the only open scene and that the model you want to edit is the only model in the scene.
The XFur Studio Designer UI is split into two main panels. In the Left Panel you can find options to control the different tools to edit the fur while in the Right Panel you can adjust the fur properties to help you visualize the effects and results better, as well as to fine tune the fur of your character,
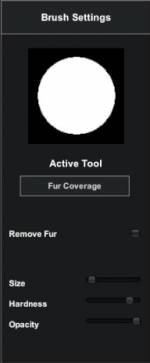
The top section of the left panel shows a preview of the shape of the brush being used as well as a dropdown menu to select which tool to use. The paint tools available are Fur Coverage, Fur Properties, Fur Grooming, Fur Color Variation and Fur Color. Each one of these tools will adapt the panel to show context appropriate controls. However, the controls for brush size, hardness and opacity are shared across all active tools
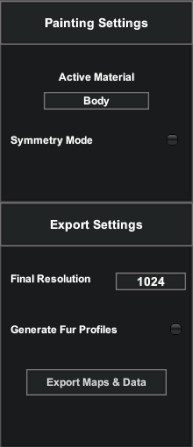
The Painting Settings panel lets you select which material to edit since only one material can be edited at a time. The symmetry mode applies 3D world space symmetry to the painting tools on the X axis, allowing you to paint, shave, groom or edit both sides of your character at the same time to reduce development times.
In the Export Settings panel you can adjust the final resolution of the textures once they are exported (which allows you to upscale them or downscale them at will, which is useful when generating low-resolution versions for lower end devices) as well as optionally generating one fur profile for each material of the character will all the textures and fur properties conveniently assigned leaving them ready to use on your characters and reducing set up times.
NOTICE: To use XFur Studio Designer effectively make sure that your character is placed at the 0, 0, 0 location, a 1,1,1 scale and with a 0, 0, 0 rotation
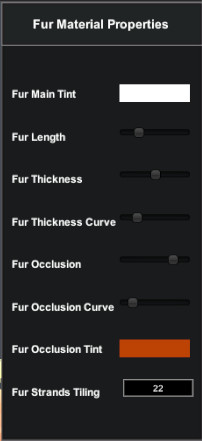
In the right panel, in the Fur Material Properties section, you can adjust in a more precise way all the main fur properties of the material currently being edited. This allows you to adjust the final appearance of the character and experiment with different parameters alongside the fine painted data
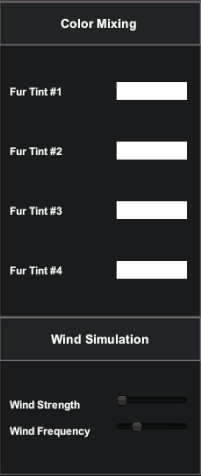
The bottom part of the right panel allows you to select the 4 different tints that will be blended with your character's fur using the Color Variation map as well as the wind simulation for the character, in order to see how it interacts with this simulation. For a more hands-on demonstration of XFur Studio Designer and how to use all its different features please refer to the following video.
NOTICE : Models with overlapping / mirrored UVs may not work accurately with XFur Studio Designer. Models without UV coordinates will not be compatible with XFur Studio Designer either
XFur Studio™ - API Reference
To access any of the different XFur Studio 2 classes the first step is to properly include the corresponding namespace XFurStudio2. This ensures that there are no conflicts between XFur Studio 2 classes and any other scripts in your project, including those of XFur Studio 1.x and XFur Mobile.
using UnityEngine;
using XFurStudio2;


public class MyClass:MonoBehaviour{
    //Your code goes here
}
While all the public accessible code meant to be available to your game is extensively commented and has contextual “<summary>” declarations to ensure in-line help pops out in your IDE, this section of the manual will cover the basics of interacting with XFur Studio 2 through code as well as using the brand new XFurStudioAPI
Your main point of access for the whole XFur Studio 2 code should always be the XFurStudioInstance component. To get a reference to the component use a standard GetComponent<T>() call from within your script like you would for any other component in Unity.
using UnityEngine;
using XFurStudio2;


public class MyClass:MonoBehaviour{

    public XFurStudioInstance xfurInstance;

    void Start(){
        xfurInstance = GetComponent<XFurStudioInstance>();
    }
    //Your code goes here
}
Once you have this reference, you are ready to access all the settings and features from XFur like we will see in the following sections
XFur Studio Instance
There are several useful functions within an XFur Studio Instance that will allow you to further control the way the fur works as well as what you can do with your characters. As we have explained before, Fur Profile Assets are a great way to share and copy the settings and parameters from the fur of a character's material. Internally, these properties are stored in a struct of type XFurTemplate.
The XFurStudioInstance component offers you functions to get and set these XFurTemplates on a per-material basis :
GetFurData
Retrieves the settings and properties of a fur material in use by this instance as an XFur Template. All properties are copied.
//"index" - The index of the material from which we will retrieve the properties
//"furTemplate" - The template from where the properties will be copied

public void GetFurData( int index, out XFurTemplate furTemplate )
SetFurData
Assigns an XFur Template with fur properties to the given material in this instance
//"index" - The index of the material to set
//"furTemplate" - The template from where the properties will be copied
//"replaceColorMap" - Whether the fur color map should be set or left unchanged
//"replaceDataMaps" - Whether the fur data maps should be set or left unchanged
//"replaceColorMix" - Whether the fur color variation map should be set or left unchanged
//"replaceStrandsMap" - Whether the fur strands asset should be set or left unchanged

public void SetFurData( int index, XFurTemplate furTemplate, bool replaceColorMap = false,
bool replaceDataMaps = false, bool replaceColorMix = false, bool replaceStrandsMap = false )
SetFurDataFull
Assigns an XFur Template with fur properties to the given material in this instance. All properties and settings are overwritten.
//"index" - The index of the material to set
//"furTemplate" - The template from where the properties will be copied

public void SetFurDataFull( int index, XFurTemplate furTemplate )
Whenever fur properties are modified through code these changes are not applied nor visible immediately. If the XFurStudioInstance has its autoUpdateMaterials variable set to true (the default behavior) the changes will be visible in an instant. However, if this variable is set to false or if you want to see the changes immediately you must push these changes and perform a manual update.
UpdateFurMaterials
Applies all changes to the fur properties across all materials and forcefully updates any modules that work on the render loop
//"forceUpdate" - Whether to force the update regardless of the autoUpdateMaterials settings

public void  UpdateFurMaterials( bool forceUpdate = false )
Below you can also find a list of all the public variables available in XFurStudioInstance that you can access and modify at runtime.
| Variable Type | Variable Name | Variable's Purpose |
|---|---|---|
| XFurRenderingMode | RenderingMode | The rendering method to be used on this XFur Instance |
| bool | FullForwardMode | Enables / disables full forward lighting compatibility (point lights) mode |
| bool | AutoUpdateMaterials | Whether the fur properties will be updated and applied automatically |
| float | UpdateFrequency | The interval of time (seconds) between each automatic materials update |
| XFurTemplate[] | FurDataProfiles | The Fur Template profiles assigned to each material (Read Only) |
| XFurStudio2_Random | RandomizationModule | The randomization module assigned to this instance (Read Only) |
| XFurStudio2_LOD | LODModule | The dynamic lod module assigned to this instance (Read Only) |
| XFurStudio2_Physics | PhysicsModule | The physics module assigned to this instance (Read Only) |
| XFurStudio2_VFX | VFXModule | The vfx / weather module assigned to this instance (Read Only) |
| XFurStudio2_Decals | DecalsModule | The decals module assigned to this instance (Read Only) |
| XFurStudio2_WindZone | WindZone | A global wind zone affecting all XFur Studio Instances (static) |
Fur Properties
All fur properties to be edited through code must be accessed through the XFur Studio Instance component by accessing the internal XFur Template (the struct containing all the fur properties for said materials) by its material index. The array of XFur Templates inside the XFur Studio Instance is called FurDataProfiles and it should be accessed as follows :
using XFurStudio2;
using UnityEngine;

public class MyClass:MonoBehaviour{

    void Start(){
        XFurStudioInstance xfurInstance = GetComponent<XFurStudioInstance>();
        int matIndex = 0;
        //Will print to the console the current length of the fur in the material with index 0 for the
        //XFurStudioInstance component attached to this GameObject
        Debug.Log( xfurInstance.FurDataProfiles[matIndex].FurLength );
    }

}
Below you can find a list of all the accessible properties within each Fur Data Profile element.
| Variable Type | Variable Name | Variable's Purpose |
|---|---|---|
| bool | CastShadows | Whether this fur material will cast accurate shadows |
| bool | ReceiveShadows | Controls the maximum length of the fur |
| int | FurSamples | The amount of samples / passes used on this fur material |
| float | FurUVTiling | The tiling applied to the Fur Strands map |
| float | FurLength | Controls the maximum length of the fur |
| float | FurThickness | Controls the thickness of the fur as it goes towards the tips |
| float | FurThicknessCurve | Controls the variation of the thickness from root to tips |
| float | FurOcclusion | Controls the overall self shadowing / occlusion in the fur |
| float | FurOcclusionCurve | Controls the strength of the shadowing over the strand |
| float | FurRimPower | Controls the thickness of the rim lighting outline |
| float | SelfWindStrength | The local multiplier for the overall wind simulation strength |
| float | SkinSmoothness | The smoothness of the “skin” pass on Basic Shell shaders |
| Color | FurMainTint | The final tint to be applied to the fur |
| Color | FurColorA | The color to be blended by the red channel of the Color Variation Map |
| Color | FurColorB | The color to be blended by the green channel of the Color Variation Map |
| Color | FurColorC | The color to be blended by the blue channel of the Color Variation Map |
| Color | FurColorD | The color to be blended by the alpha channel of the Color Variation Map |
| Color | FurShadowsTint | The tint of the occlusion / self-shadowing effect |
| Color | FurRim | The color used for the Rim lighting effect |
| Color | FurEmissionColor | The color used for the emission channel when Emissive Fur is enabled |
| Color | SkinColor | The final tint applied to the “skin” pass of Basic Shells shaders |
| Texture | FurColorMap | The texture containing the color to be applied to the fur |
| Texture | FurData0 | The texture that controls fur coverage, length, occlusion and thickness |
| Texture | FurData1 | The texture that controls fur grooming direction (RGB) and stiffness (A) |
| Texture | FurEmissionMap | The texture that controls the emission channel of the fur |
| Texture | SkinColorMap | The color map of the “skin” pass on the Basic Shell shaders |
| Texture | SkinNormalMap | The normal map of the “skin” pass on the Basic Shell shaders |
| XFurStudioStrandsAsset | FurStrandsAsset | The fur generation map (procedural or Texture) stored in an asset |
Fur Modules
All built-in modules are derived from a core XFurStudioModule class, which means that all of them share some core functions that are important when trying to use them through code.
Enable
Enables the module and loads its resources
//Example :
void Start(){
   xfurInstance.VFXModule.Enable();
}
Disable
Disables the module and unloads its resources
//Example :
void Start(){
   xfurInstance.PhysicsModule.Disable();
}
XFurStudio2_Random
The randomization module can be configured through code if necessary, to achieve a more flexible randomization process. Internally, it uses the XFurStudio2_Random.RandomizationSettings class to define the way in which each profile is randomized. These settings are the same that are exposed in the module's UI
To access the randomization settings of any profile you must first access the Randomization Module then the corresponding item in the RandomSettings list.
To trigger the randomization event at any moment you just need to call the RandomizeProfiles function and, optionally, provide the index of the profile to randomize.
//Example :

void Start(){
    xfurInstance.RandomizationModule.RandomSettings[0].Enabled = true;
    //Randomization mode = 0 means randomization by values
    xfurInstance.RandomizationModule.RandomSettings[0].RandomizationMode = 0;
    //Set the fur length value you want to randomize towards
    xfurInstance.RandomizationModule.RandomSettings[0].RandomizeTo.FurLength = 0.5f;
    //If no index is provided when calling the RandomizeProfiles function all profiles with randomization enabled
    // will be randomized at once.
    xfurInstance.RandomizationModule.RandomizeProfiles(0);
}
Painter API
New in XFur Studio 2 is the XFurStudioAPI, a static class that allows you to dynamically paint and edit the fur appearance at runtime with virtual, world-space spherical brushes through code. The Painter Objects included with XFur Studio 2 are based on the XFurStudioAPI as is XFur Studio Designer, meaning that for the first time you have the same powerful set of tools used to customize the fur within the editor available at runtime to expand massively the amount of things you can do with XFur within your game
Using the XFurStudioAPI is very simple and in this last section of the manual we will cover its main functions
Groom
The Groom function, as its name implies, allows you to pass a world-space direction to an XFur Instance's specific fur material and apply deformation in the form of grooming to the fur in that same direction. This world space direction is internally transformed to mesh based coordinates to ensure that the direction stays the same even in animated characters
//"target" - The target XFur Studio instance whose fur will be groomed
//"matIndex" - The index of the material to be edited
//"brushCenter" - The center of the brush sphere, in world coordinates
//"brushNormal" - The normal / direction in which the brush is looking, in world coordinates
//"brushSize" - The size of the brush sphere in world units
//"brushOpacity" - The opacity of the brush as a float between 0 and 1
//"brushHardness" - The hardness of the brush as a float between 0 and 1
//"groomDirection" - The direction in world coordinates in which the fur will be groomed
//"invert" - If true, grooming data will be removed rather than applied

public static void Groom( XFurStudioInstance target, int matIndex, Vector3 brushCenter, Vector3 brushNormal,
float brushSize, float brushOpacity, float brushHardness, Vector3 groomDirection, bool invert = false )

//Example :

public Transform myBrushObject;

void OnApplyGrooming(){
    //Will groom the fur upwards wherever the myBrushObject transform intersects the xfurInstance object within
    //a 0.25f units radius
    XFurStudioAPI.Groom( xfurInstance, 0, myBrushObject.position, myBrushObject.forward, 0.25f, 0.35f, 0.5f,
    Vector3.up );
}
Paint
The Paint function allows you to modify all the other aspects of the fur that are driven by textures, including its length / thickness / occlusion ( via the FurData0 map ), its color ( via the FurColorMap ), its color variation ( via the ColorVariationMap ) and even the output of the VFX module to add effects such as blood, snow or rain / wetness at runtime.
//"target" - The target XFur Studio instance whose fur will be groomed
//"painterMode" - The data that will be modified
//"matIndex" - The index of the material to be edited
//"brushCenter" - The center of the brush sphere, in world coordinates
//"brushNormal" - The normal / direction in which the brush is looking, in world coordinates
//"brushSize" - The size of the brush sphere in world units
//"brushOpacity" - The opacity of the brush as a float between 0 and 1
//"brushHardness" - The hardness of the brush as a float between 0 and 1
//"brushColor" - The color of the brush. For fur data values and masks use either white or black
//"brushTexture" - Optional brush texture ( functionality not fully implemented yet)

public static void Paint( XFurStudioInstance target, PaintDataMode painterMode, int matIndex, Vector3 brushCenter,
Vector3 brushNormal, float brushSize, float brushOpacity, float brushHardness, Color brushColor, Texture brushTexture )

//Example :

public Transform myBrushObject;

void OnApplyRedPaint(){
    //Will paitn the fur red wherever the myBrushObject transform intersects the xfurInstance object within
    //a 0.25f units radius. Since brushTexture is not fully implemented yet it is extremely important to
    //pass this value as Texture2D.whiteTexture
    XFurStudioAPI.Paint( xfurInstance, XFurStudioAPI.PaintDataMode.FurColor, 0, myBrushObject.position,
    myBrushObject.forward, 0.25f, 0.35f, 0.5f, Color.red, Texture2D.whiteTexture );
}
With these two functions you can easily create all kinds of interactions between your game's world, its players and XFur Studio 2 in ways that were not possible before. An almost limitless amount of gameplay possibilities are available thanks to these API commands and the new modules system, Painter Objects, WindZone objects and the many features that are planned for upcoming updates. With XFur Studio 2 you have the most complete, efficient and advanced fur simulation system for Unity in any rendering pipeline you use, and for any device you develop.
If you have any questions, suggestions or technical issues related to this tool please don't hesitate in contacting us to our support email. For support requests, please make sure to include your invoice / proof of purchase with your invoice number visible, the exact Unity version you used as well as the exact version of XFur Studio you are using for your project as well as all the relevant information and screenshots that may help us reproduce the issue.
We thank you for choosing XFur Studio 2 for your project and hope that it will assist you in creating all sorts of amazing creatures and worlds.
The Irreverent Software Team
Copyright© 2012-2020, Jorge Pinal Negrete. All Rights Reserved. Irreverent Software™, PIDI Game Development Framework™ and XFur Studio™, their logos and branding are all trademarks and intellectual property of Jorge Pinal Negrete. All other logos, trademarks and intellectual property belong to their respective owners.

