Table of Contents
PIDI PBR Skin + Eye Shader (Legacy Edition)
###
This package contains a set of realistic and highly detailed skin and eye shaders for 2017.1 and above, compatible with forward and deferred rendering paths as well as with the new Lightweight SRP. Mobile versions of the skin shader are also provided.
###
###
This skin shader includes advanced features oriented towards high-end art assets and games, such as tessellation, full subsurface scattering and translucency, dynamic bone/blendshape driven wrinkles and much more.
###
###
In this manual we will cover all the basics so you can get started and using these advanced Skin and Eye Shaders in no time.
###
###
We thank you very much for purchasing our product and hope that PIDI – PBR Skin + Eye Shaders will help you make amazing games.
###
Quick Start Guide
Installation
### While PIDI : PBR Skin + Eye Shader has been designed to be integrated to any project at any stage of development with little to no setup required, there are still some considerations to be made ###
Standard Pipeline Projects
###
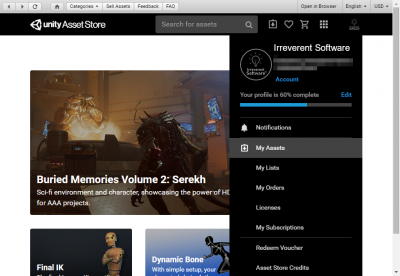
For projects working with the Standard Pipeline there is little to no setup required. If this is a first time installation you just need to head to the Asset Store and find this asset either under the section “My Assets” or by a normal search in the store itself.
###
###
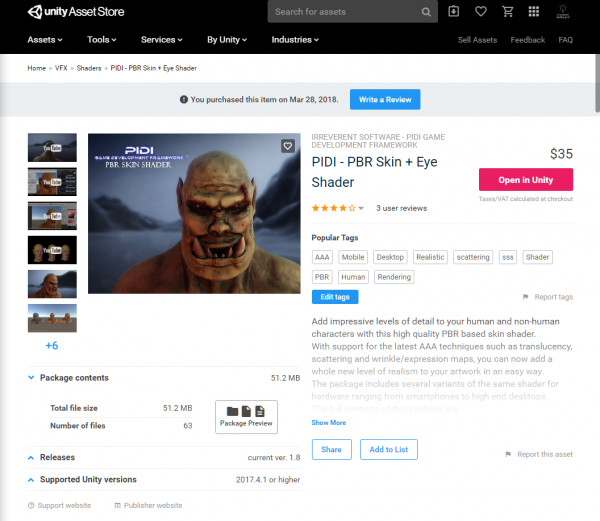
If you have bought the asset, a Download / Import / Update button will show, depending on if you have never downloaded the asset before, you have downloaded it and it is in cache already or there is a new version available for download, respectively.
###
###
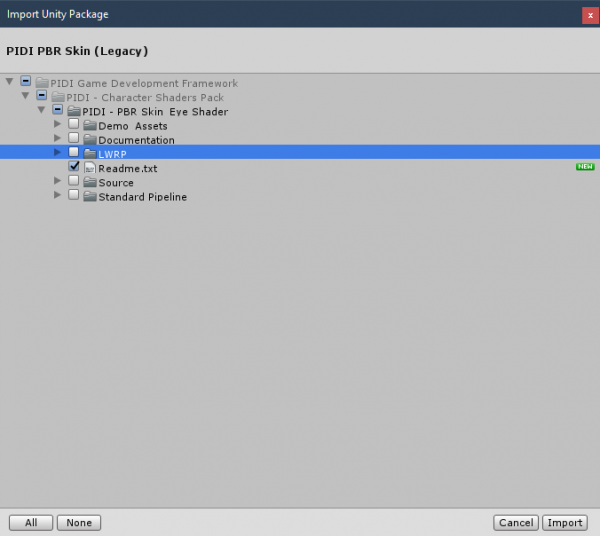
Once the import dialog appears, just import all the contents of the asset as usual. To verify that the asset was imported without any errors try to open one of the demo scenes. If they work without issues, the package has been imported correctly. If you see any graphical errors you must re-import the asset. If the issues persist even with a brand new and empty project, please contact us at our support email
###
LWRP Projects
###
In the last step described above, once you see the import dialog while adding this asset to your project, DO NOT import the Standard Pipeline folder to your project. Importing this folder would cause errors due to the shaders and materials included in it being incompatible with LWRP.
###
###
Instead, once the tool has been fully imported, unpack LWRP 5.7.unitypackage (which is located inside the LWRP Contents folder) into the project or the LWRP 6.9.unitypackage file if you are working on Unity 2019.2 and import its contents. This will add all the necessary shaders, demo scenes and additional files for you to start using PIDI PBR Skin + Eye Shader in Unity 2019.1+ with LWRP 5.7+
###
### While we do our best to keep up to date with LWRP releases there may be times when Unity updates their pipelines and adds or removes functionality from them (and in most cases breaking the compatibility of LWRP shaders) before we can issue the corresponding update. If your version of LWRP does not load the shaders appropriately or the demo scenes inside the LWRP Add on folder show pink materials please be patient, as we will issue the corresponding patch usually within 1-2 days of a new LWRP release or contact us to let us know the details of the error to our support email. ###
### Warning : Please remember to make a backup of your project before upgrading or installing any tool or asset. While we do our best to ensure that our software is free of errors and easy to use, we are not responsible for any loss of data, corrupted files or projects produced during the installation or use of this software. ###
### Once the asset has been successfully installed into your project, adding reflections to an existing scene is a simple process that can be done in just a few minutes. For more advanced uses and in-depth information about each feature please continue reading this documentation. ###
Creating & Setting up a simple Skin Material
###
The skin shaders included in this package have support for different features, different rendering methods and are oriented to different levels of hardware. Starting with version 1.2, these shaders are split into two main groups : Standard Pipeline and Lightweight SRP.
###
###
It is heavily recommended to upgrade your materials to the new versions of the shaders, since these are build and designed for continued support and improvement.
###
###
Starting with version 1.2 the skin shader has been completely redesigned and reworked to streamline its integration to any project, optimize it, make it usable in a wider variety of rendering pipelines and most importantly to guarantee that it can be built upon in future versions.
###
###
The shader has several groups of features, some basic and some advanced. The more advanced features require a more complex preparation of your art assets, such as the creation of specific skin data maps, high poly sculpts for wrinkle generation, HD texturing, high quality rigging etc. while the basic and general features can be used without any hassle in practically any model.
###
Basic Settings
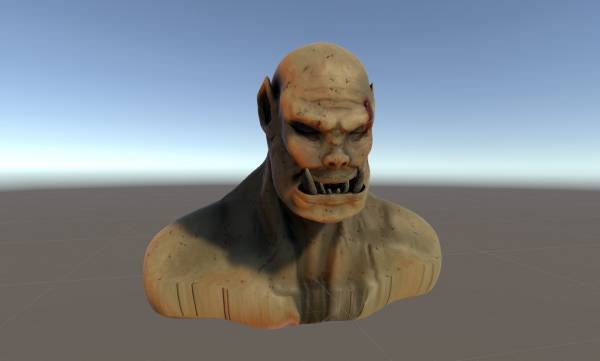
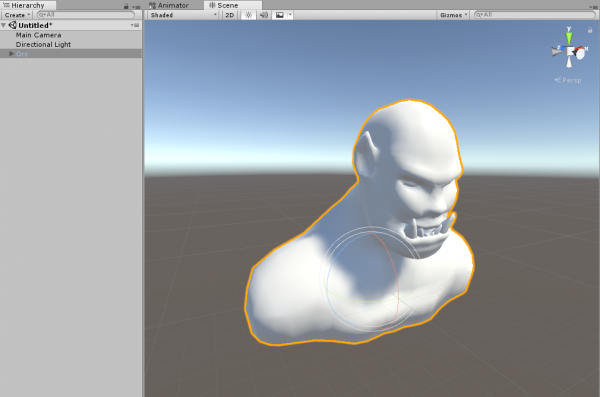
### First let's create a new scene and set your camera to render in Forward mode. Then, drag and drop the Orc model that you can find in the Demo_Assets/Orc Demo folder. ###
###
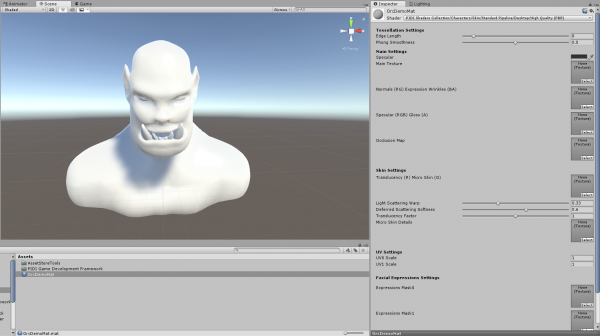
Now, create a new material in your project and select one of the included skin shaders for it. On “PIDI Shaders Collection/Characters/Skin/Standard Pipeline” you can find 2 different branches of shaders : Desktop and Mobile. For this tutorial, we will use the Desktop branch, select the High Quality (PBR) shader and assign the material to the orc.
###
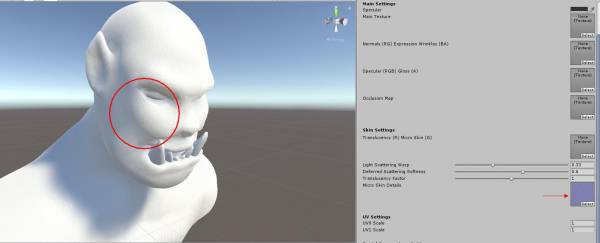
### Now we will add a Micro Skin details texture to the shader. This texture adds small, soft normals across the surface and is used internally by the shader to simulate the finer imperfections of skin. Go to the Demo_Assets folder again, grab the MicroSkin texture included with this package and assign it to the Micro Skin Details slot in the material. ###
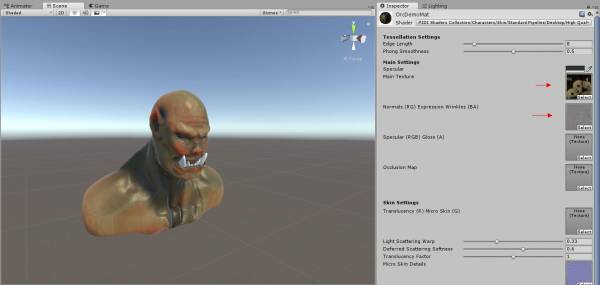
### As you can see, the surface of the mesh now has a correct lighting and it also shows the small, soft bumps found in real skin. The micro-skin details are projected onto the mesh using the secondary UV channel whenever it is present. You can adjust the tiling factor of the micro-skin details by changing the UV1 Scale. Right now it has a value of 1 but we will set it to 3 to make the details even smaller, since they should be most visible only during close ups. ### ### Let's add our other textures the same way we would do for any other material. We will assign our Orc_Albedo texture to the Main Texture slot and the Orc_NormalsMerged texture to the normals slot. Our model should look like this now : ###
### As you can see, the smoothness of the model is too high, making it look like it has been under heavy rain or it is made of some kind of ceramic. ###
### You will notice as well that there are no options for smoothness nor skin color on the material. In fact, several key variables are missing. This is because our PBR Skin Shader has been designed with real, actual games in mind and, in an actual game, you may have dozens of instances of the same enemy type (let's say, a zombie) where the only differences between two of them would be the smoothness (if one of them is wet) and the skin color. ###
### With our shader, these and other properties are managed by the Skin Shader Manager, which allows you to modify them for each instance without having to create dozens or hundreds of material variations. ###
Let's learn now how to use it.
Skin Shader Manager
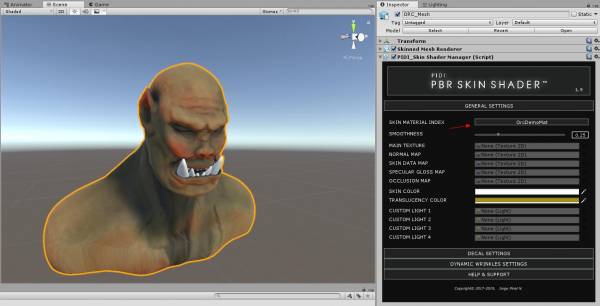
### First, select the Orc mesh in the hierarchy panel and add the PIDI_SkinShaderManager component to it. Open the General Settings tab and, from the drop down menu next to Skin Material Index select the material on your character that is using the Skin Shader ###
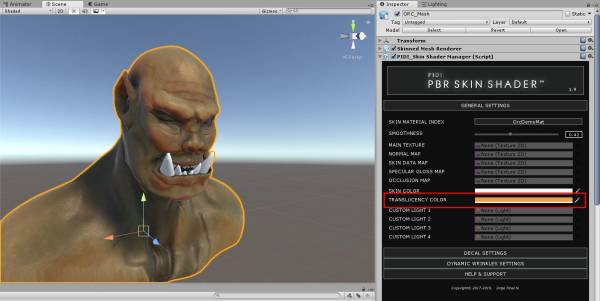
### If you move the smoothness slider, you can adjust the precise look you want for your skin. In this example, we will use a value of 0.4. If you adjust the skin color, you will see that the material responds immediately and that its appearance changes just like if you were manipulating the material directly. ### ### The translucency color allows you to have more control over the way the sub surface scattering and translucency of the skin works, allowing you to precisely control the color the light takes as it passes through the model. ###
### The four custom lights that you can see there are also used for Deferred and Lightweight modes. Due to their limited support for customization, these rendering pipelines cannot support translucency for an unlimited amount of lights the way Forward does. They have support for up to 4 lights, which can be defined in the Skin Shader Manager inspector or at runtime with the array lights[] accessing the indices 0 to 3. ###
### Before we leave the Skin Manager inspector, let's add some decals. ###
Decal / Overlay Textures
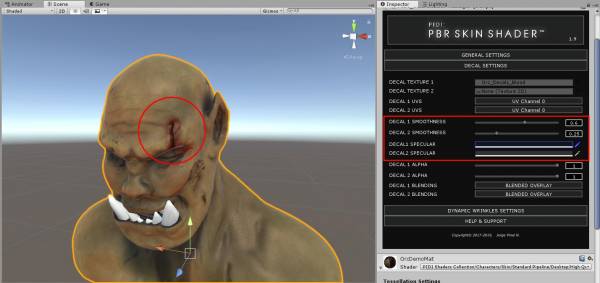
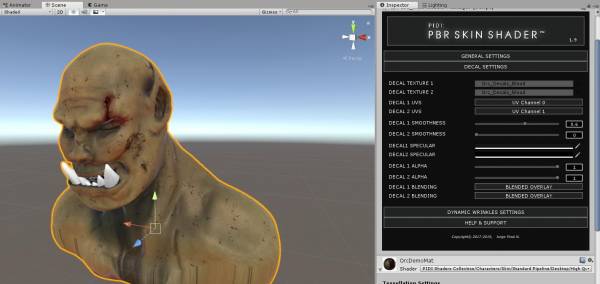
### Open the Decal Settings tab on the inspector. You will see settings for the decal textures to use, the UV Channels they will use, their smoothness, specular and alpha values. ### ### Let's assign the Orc_DecalBlood texture as our first Decal. You will see the blood appear on the surface of the model immediately. Let's increase the smoothness of this decal and make the Specular color almost black so our blood looks more like a fresh wound. ###
### Let's add the same texture to the Decal Texture 2 slot, but let's change the UV coordinates of this second decal to the UV Channel 1. We will also set the Specular of the decal 2 to black and its smoothness to 0. If you set the blending mode to additive, you can simulate other effects such as sweat and water. Everything depends on the kind of effects you want to achieve. For this case, we will use Blended Overlay as our blending mode. ###
###
The model is now covered in small and big sections of mud and blood, just like in the demo video you can see on the Asset Store page. If you play with the Alpha sliders you can have even more control over the final look of the model.
###
### Now let's go back to work on the final look of our material in this basic guide before we dive into the more complex and advanced features. ###
Scattering, Translucency and Skin Data Maps
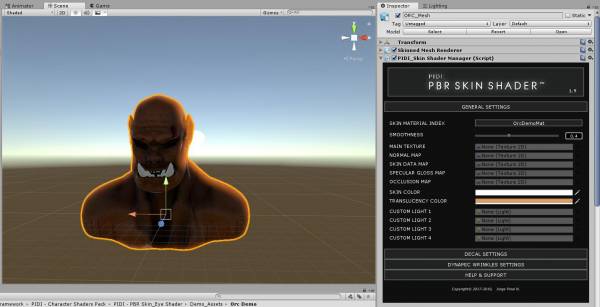
### It's time to talk about scattering and translucency, some of the core features of this shader. First, let's adjust the lighting of our scene so it comes from behind the orc. ###
### You will notice right away that the lighting of the model looks softer than in Unity's standard materials and that some light is going through the model's ears and shoulders. What we are looking at, is the translucency and scattering of the light on the skin's surface. ### ### The scattering is produced when part of the light reaching the skin is absorbed and part is diverted to other directions. This makes the light “warp” around the surface, producing a softer look. ### ### If you adjust the Light Scattering Warp value on the material inspector you can easily adjust how soft or harsh you want the lighting to look on your model by controlling how much of the light warps around it. ###
### Some of the light will also make it the whole way through the skin and be visible from the other side. This is called translucency. Both effects are necessary to have believable skin. However, right now, the shader has no idea of the density of our model nor about which parts are too thick for the light to go through. The only thing preventing the mesh from looking like an orc shaped jelly or candle are the shadows that prevent most of the light from getting through the whole object. ###
###
To control this, we use what is called a Skin Data Map. In the material inspector, assign the Orc_SkinDataMap texture to the Skin Data Map slot. You will notice right away that the translucency has been adjusted and that light only comes through the ears now, dimmer than before.
###
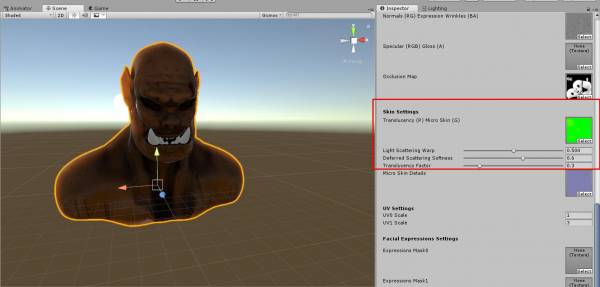
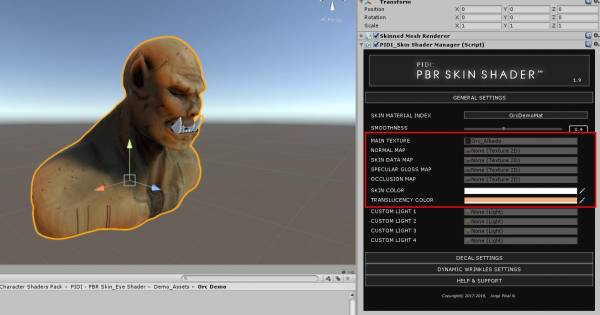
### Now you can assign additional maps as you need them in the same way you would with a standard PBR shader, assigning for example Occlusion and Specular maps to the material. ###
### All the textures of the Skin Shader can be assigned either directly to the material or through the interface of the Skin Shader Manager. Assigning them through the Skin Shader Manager has the huge advantage of managing each object independently regardless of if they share the same material or not, meaning that you could have multiple models or copies of the same model all of them using a single material and assign different textures and properties to each object without having to add new materials. ###
### With this we conclude our basic guide for the skin shader and we have our very first skin material ready to use. In the next chapters we will cover more complex topics such as wrinkle maps and advanced wrinkle-to animation synchronization methods. ###
PIDI PBR Skin & Eye Shader : Advanced Topics
Skin Data Maps
### A skin data map is a special texture that contains specific information for this shader stored in the 4 channels of the image. ###
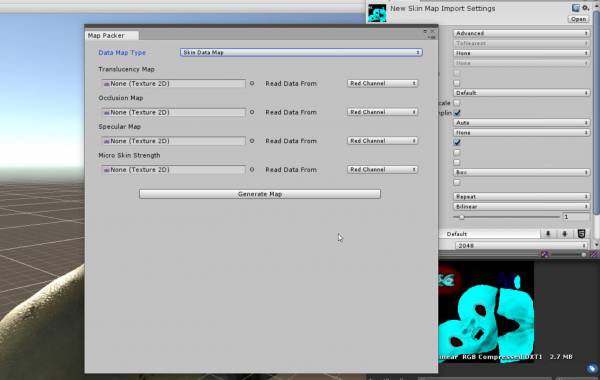
### In the RED channel we store a grayscale containing the depth of the model so the shader can know which parts will be translucent and which ones won't. A fully black red channel means no translucency while a completely full red channel means full translucency. This value is then multiplied by the translucency factor value on the material. ### ### The GREEN channel stores the model's occlusion. The BLUE channel multiplies the Specular color and the ALPHA channel controls the strength of the Micro Skin details to make them fainter if needed. ### ### There are several ways of authoring these maps, either by using an image manipulation software such as GIMP or Photoshop to directly create the textures channel by channel or by using any drawing software to generate 4 grayscale textures and combine them using the Skin Map Generator. ### ### You can find it on the Window menu under Window/PIDI PBR Skin/Utilities/Skin Map Generator ###
### The Skin Map Generator or Map Packer can help you create all of the special textures needed for the skin shader, including the Skin Data Maps, the merged Normals+Wrinkles maps and the Wrinkle Regions Masks. We will see more about those later in this manual. ### ### To generate a Skin Data map from a set of grayscale textures you must first mark each of those 4 textures as Read/Write enabled on the importing settings in Unity. Then, make sure that all textures are exactly the same size. Once this is done, assign each texture to the corresponding slot on the Skin Map Generator Window. Select from which color channel you want to read the information from each texture and once everything is set up click on the Generate Map button. ### ### Select the location where you want to save your texture, wait for a few seconds so the map gets created and saved to your project and you will be ready to use it on any skin material. ###
Creating wrinkle maps.
### Wrinkle maps are standard normal maps that contain special wrinkles and distortions that will only show up under certain conditions, movements and animations. For example, the wrinkles on the forehead of a character that will only appear when the character raises his eyebrows or frowns. ### ### The standard way of creating these wrinkle maps is by creating several different 3D sculptures/models depicting these wrinkles on their respective facial expressions, and bake them into a single normalmap. ###
### The example above shows a small demonstration of the process explained above. The middle model shows the wrinkles forming in the brow section while the one on the right shows the wrinkles on the forehead. The model on the left shows an emotionless face without any additional wrinkles. ### ### The normals from the model on the left will be baked into a normalmap while the wrinkles on the other two models will be baked and mixed into a singular normalmap that displays wrinkles both in the brow and forehead. ### ### The new Orc model went through a similar process, where a resting expression was sculpted in Blender. After the retopology process and adding a facial rig, his face was put into an “angry” expression and sent back for a second round of sculpting where the wrinkles on forehead, brow and around the eyes were added. ### ### The resting expression's normals were baked onto a normalmap and the “angry” expression's ones into another. ###
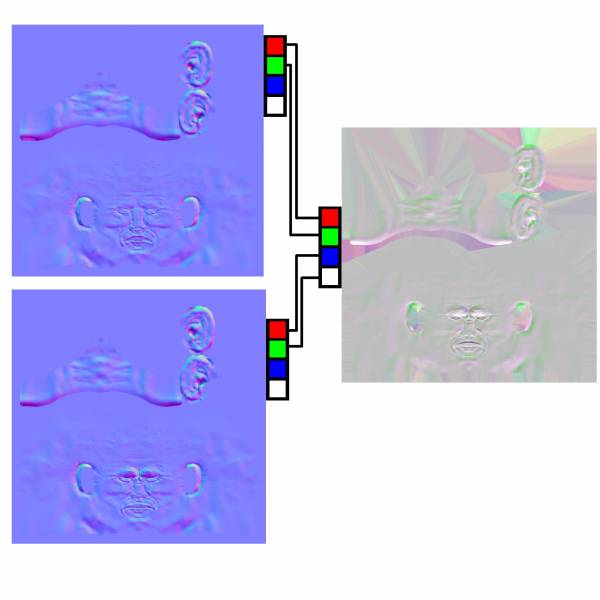
### Once you have both normalmaps ready you must merge them into a normal+wrinkles map. The channel configuration when combining these maps goes as follows : ###
### The red and green channels of the first normalmap go into the red and green channels of the combined one while the red and green channels of the second normalmap go to the blue and alpha channels. This process can be done on any image editor or by using the Skin Map Generator. ###
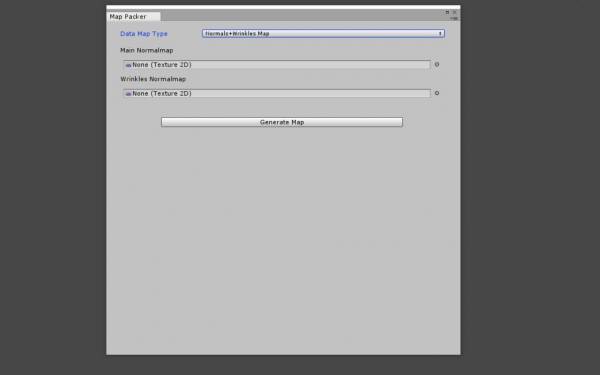
### Select Normals+Wrinkles map as the Data Map type and assign both normal maps to their corresponding slots. Each of these textures must be marked as Read/Write enabled. Press the Generate Map button and select where do you want to save it. After a few seconds, the normals+wrinkles map will be generated and ready to use. ###
###
Please Notice : For any skin data map to work with this shader and especially for the normals+wrinkles maps, they must have their “Bypass sRGB” flag enabled or, in the case of newer Unity versions, have the “sRGB (Color Texture)” flag disabled. If any data map (skin data map, normal+wrinkles, wrinkle regions map or micro skin details map) are not marked to bypass sRGB the data stored in them will be read as color value instead of the actual linear values they store, producing multiple errors
###
###
Once your normals+wrinkles map is created, assign it to your material on the corresponding slot. Since we have not defined any wrinkle regions yet nor assigned any wrinkle tracks only the main normals (stored in the channels RG) will be displayed.
###
###
To show the wrinkles as we want to, we will need to define the wrinkle regions using what we call Expression Maps or more generally Wrinkle Region Maps.
###
Expression Masks / Wrinkle Region Maps
### To control precisely which regions of your model will have wrinkles and at which time a wrinkle regions map or expression mask is necessary. These maps are a complex textures packed with information that is usable for the shaders. On them, up to 6 different zones are mapped to half colors while the alpha channel is used to define a left-right side division on your model. The Skin Shader supports up to two of these maps for a total of 12 facial expression regions per mesh. Each map regions are defined as follows : ###
- First region – Stored on the red channel, for any value above 0.5
- Second region – Stored on the red channel, any value below 0.5
- Third Region – Stored on the green channel, any value above 0.5
- Fourth Region – Stored on the green channel, any value below 0.5
- Fifth Region – Stored on the blue channel, any value above 0.5
- Sixth Region – Stored on the blue channel, any value below 0.5
- Left-Right side definition – Alpha channel. Full opacity defines the right side, full transparency defines the left side.
Here is an example of one of these wrinkle region maps :
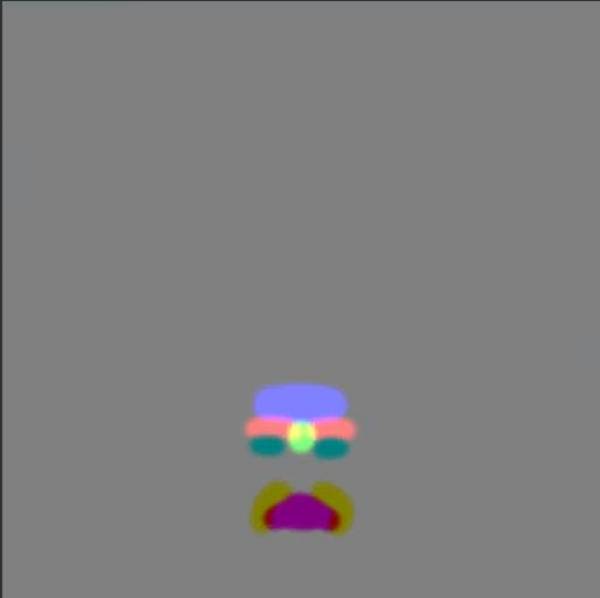
###
When creating these maps, you have to be careful and make sure that two regions in the same color channel don't overlap or the precision of the region may be lost.
###
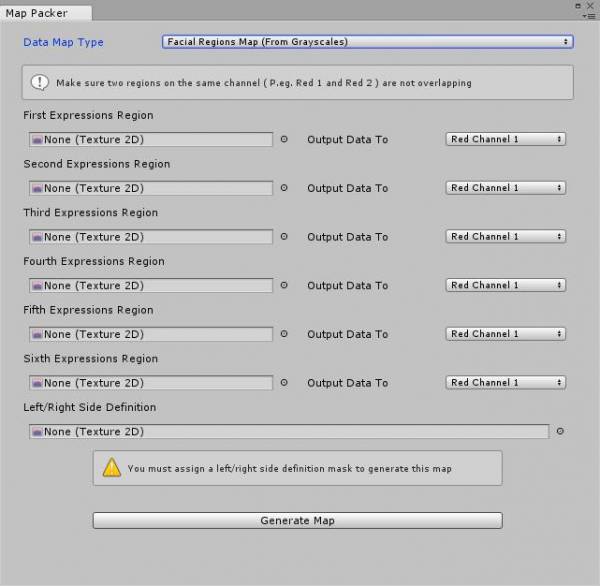
### Creating these maps by hand may be a daunting task. Because of this, the Skin Map Generator comes with a mode to create them in a much easier way. For this, you need up to 6 different grayscale textures and an additional one that defines the left and right sides (left = black, right = white ). ###
###
When using the Skin Map Generator, set the Data Map Type to Facial Regions Map (From Grayscales). Assign the grayscales ( you can use less than 6 ) and then select which channel you want to write them to.
###
###
Make sure that no channel is repeated and that two regions in the same channel are not overlapping. This means that while you can use the Red Channel 1 to store the forehead and Red Channel 2 for the mouth, you should not use the Red Channel 1 for the forehead and the Red Channel 2 for the eyebrows since they would overlap at points, reducing the precision of both zones.
###
###
Assign a left/side definition grayscale (black = left side, white = right side) so that each region can have its strength split into a left and right sides, and click on Generate Map.
###
###
To continue with the example we started on the basics guide, we will add the pre-generated Orc_FaceMask texture to the Expressions Mask 0 slot of our Orc Material.
###
###
Once this is done, we are ready to start defining the wrinkle regions and sync them to facial movements in the Skin Shader Manager component.
###
Defining Wrinkle Regions
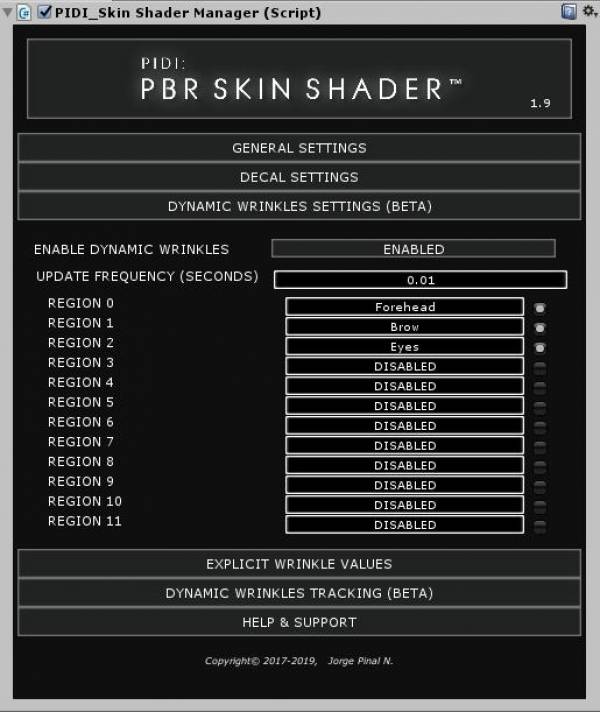
### Using the same resources we had in our previous tutorial, go again to the Skin Shader Manager component and open the Dynamic Wrinkles Settings tab. Once there, enable dynamic wrinkles. ### ### This will automatically display a list of the 12 wrinkle regions you are allowed to have in your material as well as create 2 new tabs : Explicit Wrinkle Values and Dynamic Wrinkles Tracking. ### ### First, let's work with the list. Our Orc model uses only 3 wrinkle regions since his face is simpler in details than, for example, an old human's face. Because of this, we will disable all regions except the first three by toggling them off. This will change their name to “DISABLED”. Then we will give the appropriate names to the first 3 regions : Forehead, Brow and Eyes. They match the Red 1, Red 2 and Green channel of our Expressions Mask texture. ###
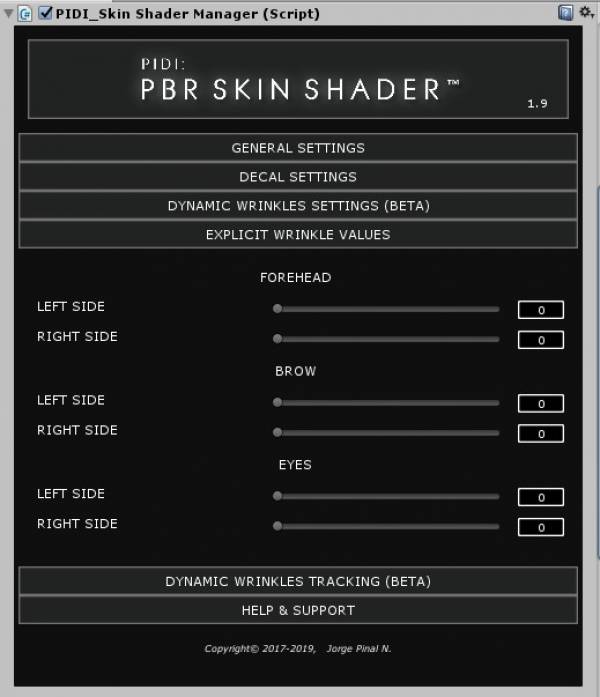
### Now, before proceeding with the last step, we will test that everything is working as intended. To test that the wrinkle regions are well defined, well named and responding well to the left-right side definitions, we will now close all tabs and open the Explicit Wrinkle Values tab. ###
### Here we can see the three regions we just defined with sliders to control the left and right side of any of them. By moving the sliders you can see the wrinkles appear and disappear from the Orc's face. This is useful to make sure that every parameter has been correctly set up before we go to the last and crucial step of defining which bones or blendshapes will have influence over which wrinkles. ###
If everything is set up correctly, we can move now to the next and last step.
Dynamic Wrinkles Tracking
###
The main goal of dynamic wrinkles is to improve the visual quality of complex animations, especially facial animations. To do this however, the wrinkles must be synced somehow to the movement of either bones or blendshapes.
###
###
Since version 1.2 with the addition of the Skin Shader Manager there is a simple way to add tracking sets for each wrinkle region that, once defined, will automatically sync the wrinkles to the facial animations of your model.
###
###
In this tutorial we are using the Orc Model which has a facial rig. This means that our wrinkles must be synced to specific sets of bones to work as intended.
###
###
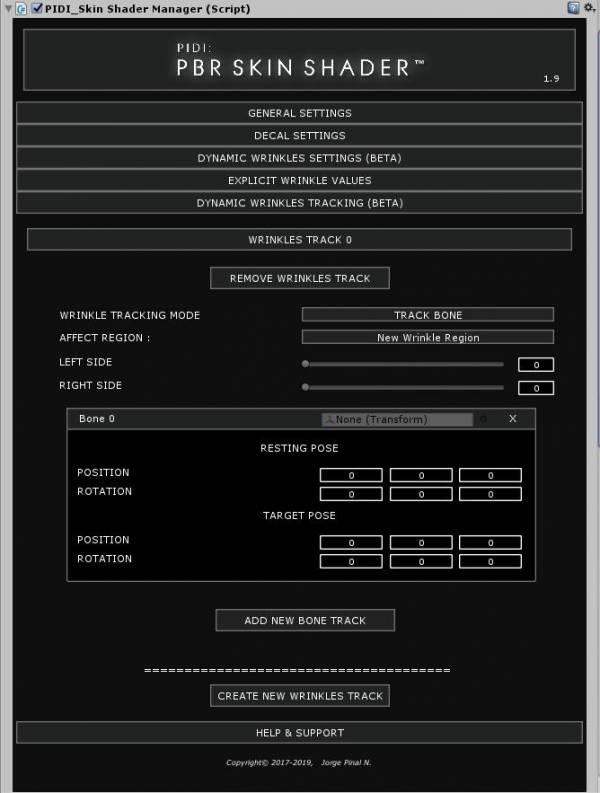
To start adding tracks, open the Dynamic Wrinkles Tracking tab on the Skin Shader Manager and then click on the Create new Wrinkles Track button
###
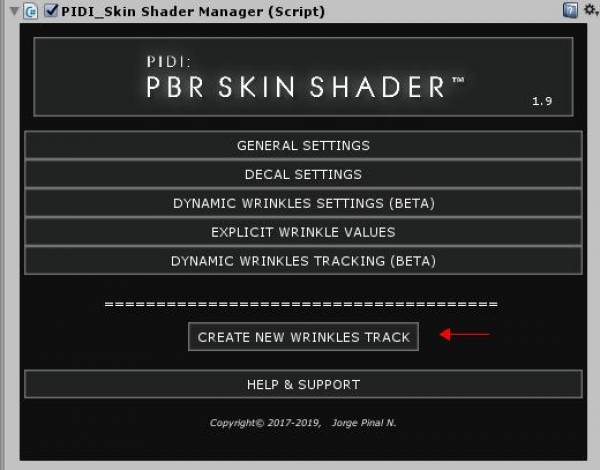
### Click then on the Wrinkles Track 0 that just appeared. There you can see a tracking mode (which is set by default to “Track Blendshapes”, the “Affect Region” is set to the Forehead region, both a Left and Right Side sliders to control the intensity of the wrinkles when affected by this tracked blendshapes/bones and finally a small button that lets you add blendshapes to track. ###
### Change the tracking mode to Track Bone and then click on the Add new bone track button. ###
### This will add a small container that lets you add a bone transform that will be tracked as well as defining its resting pose and its target pose. As the bone moves / rotates from the resting pose and towards the target pose, the wrinkles of the affected region will move towards the target Left/Right values. ###
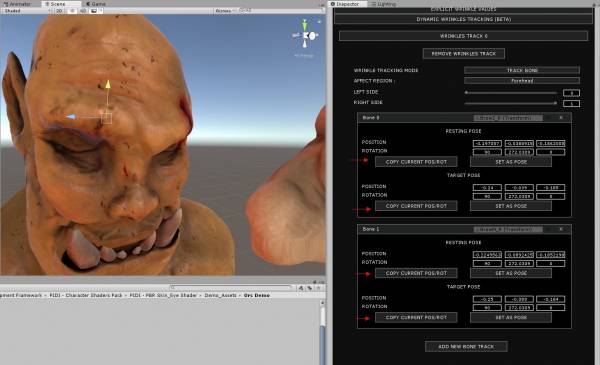
### Once you add a transform to be tracked as a bone the script will let you copy its current position and rotation to either the resting pose or the target pose. Once those values are defined you can also set the current pose of the bone to match either the resting or target pose. This makes prototyping and testing these poses quite easy, ###
### In this example we have moved the position of the Brow2_R and BrowM_R bones slightly upwards. This will be our resting Pose so we just need to click now the Copy Current Pos/Rot under the Resting Pose section. The current position/rotation of the bone will be automatically assigned. ###
### Repeat the process for the BrowM_R bone and then, once you have set the resting pose of both bones, move them both further upwards and click on the Copy Current Pos/ Rot of the Target Pose section to define this new pose as the one the bones have to take for the wrinkles to appear ###
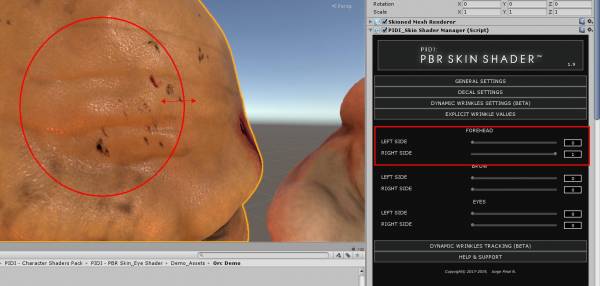
### To finish, let's turn the strength of the Right Side value to 1. This will make the wrinkles of the right side of the forehead be fully visible as the bones we are tracking move upwards. If you move the bones in the editor the wrinkles will now start becoming visible and invisible as the bones move closer or further away from the rest and target poses we just defined. ###
### In the image above you can see how the bone moving upwards produces dynamic wrinkles. The Skin Shader Manager automatically updates and performs calculations for the wrinkles based on the bone positions and blendshape values which ensures that once they are defined they will work automatically even with complex animations. ###
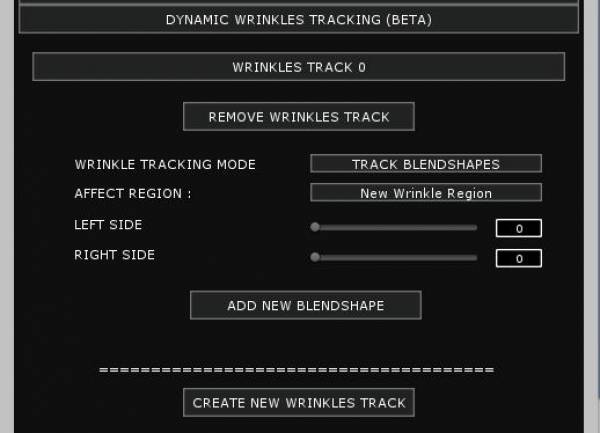
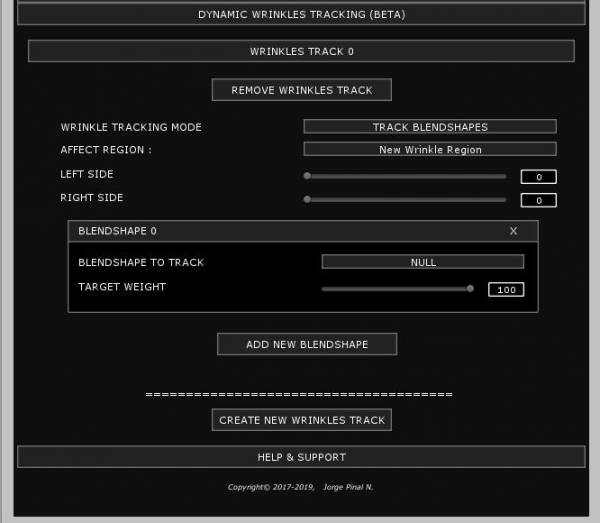
### If we were using Blendshapes instead of bones the whole process is somewhat similar. Instead of adding a bone track we add a blendshape track : ###
### On it, we select the blendshape we want to track from the drop down list (in the image the current blendshape is set to a null value) and with the slider on the right we decide which weight must the blendshape have for the wrinkles to appear in full force. ###
### A single Skin Shader Manager component can mix both bone and blendshape track as required and the weights of all the bones and blendshapes that influence a wrinkle region are added and averaged to achieve realistic and predictable results. ###
###
This means that you can have very complex and detailed animations using blendshapes, bones or a mix of both and have the skin of your characters deform and wrinkle in a believable way and synced to all animations just by making sure you follow this set up guide carefully.
###
PBR Eye Shader
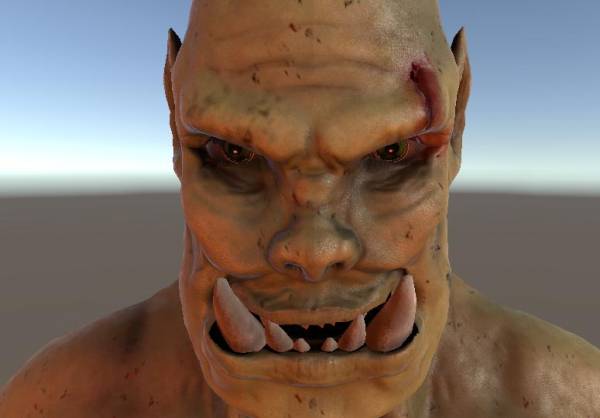
### Starting with version 1.2 of this package an advanced Eye shader has been included. This shader is designed for a specific workflow where the movement of the eye is controlled through the shader itself rather than through rotation of the eye object. However, it can be used in that workflow as well. ###
### This eye shader is in active development to add more features and, in version 1.3, a small script system that handles object tracking in an easy to implement way. ###
### The main textures used for these shaders are : ###
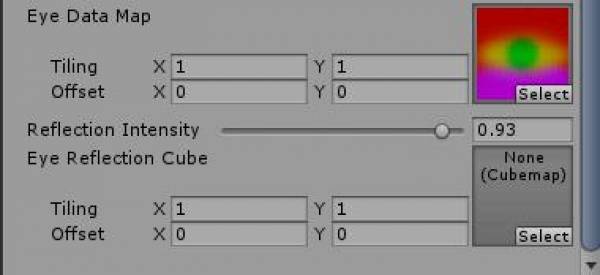
- Eye Data Map that has Eye Occlusion information on the green channel and a pupil area shaped like a gradient-circle to allow for dilation on the alpha channel
- Albedo + Iris Map that contains the main texture and, marked as full transparency, the iris area that will change colors when we modify the Eye Color variable in the material.
- Normal map, to add details to the eye's surface
- Reflection cubemap to add more realistic reflections to the eye itself
Example textures for this shader are provided to show how the material looks when set up properly.
### The eye occlusion in this shader stays still when the eye moves by using the shader's Eye Direction variable. This adds a very high level of realism to the eye by adding the shadowing produced by the eyelids of the character. However, if you are rotating the spheres to perform your Eye tracking it is recommended to turn this occlusion down so it doesn't break the immersion. ###
The shader's properties are mostly self explanatory :
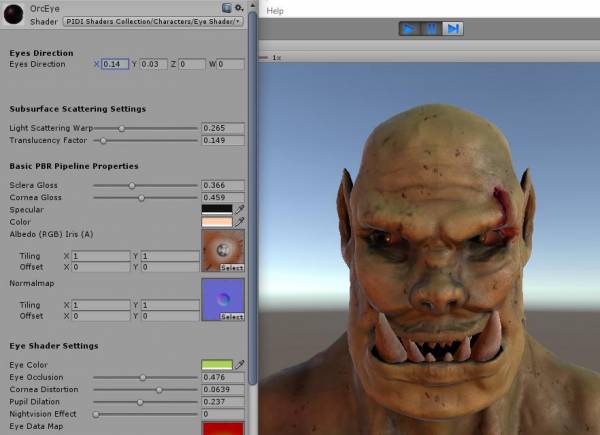
### The eyes direction variable controls the direction in which the eyes point. A positive value on the X axis turns them to the right, a negative one to the left. A positive Y value turns the eyes down while a negative one turns them up. ### ### The Sclera Gloss value controls the glossiness of the white part of the eye while the cornea gloss controls the glossiness of the iris and cornea areas. ### ### Specular and Color control the specularity and overall color of the eye (white and iris) ### ### The Albedo texture has the main texture for the eye. The iris area should remain as a grayscale with no actual color. The alpha value of this texture defines the iris zone, for which we will set the Eye Color value later. ### ### The normalmap texture is a standard normalmap used to add detail to the eye's surface. ### ### The eye color controls the color of the irises while eye occlusion controls the intensity of the eye's shadowing. ### ### Cornea distortion adds some depth to the eye to make it resemble more closely the real shape of an eye. ### ### Pupil dilation controls how open/closed the pupils are in the eye. This can be used to simulate the eye's reaction to strong and dim lights and to produce interesting effects during close ups. ### ### Night Vision effect allows you to make the pupil of the eye emit light which is useful when working with night vision-like effects. ###
### Finally the Eye Data Map, the Eye Reflection Cube and reflection intensity control the specific properties and final appearance of the eye as described above. ###
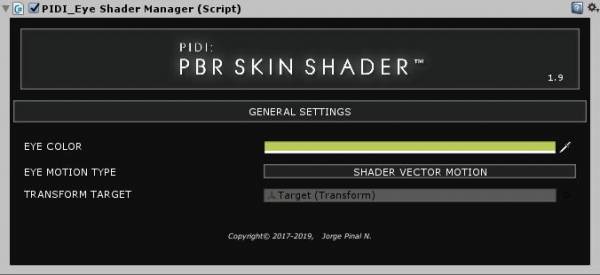
### To better use the eye shader, a new component is available for you called PIDI_EyeShaderManager. ###
### This component allows you to set up the eye color per-instance independently from the color set in the material itself, as well as to select if you want to use the integrated eye-tracking system. ###
### If you set the Eye Motion Type to Shader Vector Motion and assign either a Transform as a target or a global position, either through code or directly in the inspector and the eye will automatically follow it. ###
### If you use code, you need to assign the value of the variables transformTarget for a Transform component or pointTarget for a global position. ###
###
If you would rather use another system or to do the eye tracking on your own, or if you will rotate the eyes directly using the transform component then you must set the Eye Motion Type to either None or the preferred and recommended way, Transform Direction Motion and use the Eye Shader labeled as High Quality (Dynamic).
###
Final Notes
### Please remember that the tracked lights need to be assigned for the translucency and scattering to work as expected in Deferred and Lightweight rendering. Please also be aware that due to limitations in those 2 pipelines the results will not be as accurate as the ones achieved in Forward mode. ### ### The High quality variations of this shader for Desktop (Forward and Deferred) make use of tessellation, so a hardware compatible with Pixel Shader 5.0 (DirectX11 or OpenGLCore) is required. ### ### 2 Mobile shaders are provided for Android devices compatible with OpenGLES 2.0. Their features are limited compared to the main, Desktop branch. ### ### Lightweight SRP is still under development by the Unity team, meaning that some of the features for that platform may change over time. You MUST enable SRP Mode on the Skin Shader Manager component when using Lightweight SRP. ### ### If you have any doubt about this product or how to use it, please contact us at support@irreverent-software.com and we will get back to you to work and solve your doubts as soon as possible. ### ### Thank you very much for purchasing this asset from PIDI – Game Development Framework. I hope that it will help you make amazing games! ###


