
Table of Contents
PIDI 2D Reflections 2
PIDI 2D Reflections 2 is the most efficient and complete solution to add real-time reflections to your 2D games in Unity
A full redesign of the original release, packed with impressive new features, amazing performance and an easy workflow as well as support for many high end effects such as masking, fading, Post Process Stack v2, Universal RP and more, PIDI 2D Reflections 2 is the only tool you need for all your 2D reflection needs.
PIDI 2D Reflections 2, Standard vs Lite
PIDI 2D Reflections 2 is available in two different editions which may adapt to all kinds of teams and budgets. A Lite edition with only the essential features is offered at a much lower price while the fully featured Standard edition is targeted to projects and developers that may need more advanced features out of the 2D reflections system.
Below you can see a comparison table showing the full feature set of each edition. The Lite edition has an additional module that adds Universal RP support in Unity 2019.4+ (this module is included in the Standard edition). To learn more about the specific limits and differences between the standard Unity rendering pipeline (also known as Built-in) and the new Universal RP pipeline, please go to the corresponding section of the documentation.
| Feature | PIDI 2D Reflections 2 Lite | PIDI 2D Reflections 2 Standard |
|---|---|---|
| Source Code Access | ✓ | ✓ |
| Post Process Stack v2 support | X | ✓ |
| Parallax backgrounds support | X | ✓ |
| Masked reflections | X | ✓ |
| Ultra-optimized simple shader based reflection | ✓ | ✓ |
| Lit and unlit shader variants | ✓ | ✓ |
| Support for skewed reflections | X | ✓ |
| Support for custom shaders | ✓ | ✓ |
| 2D Water shader example | X | ✓ |
| Horizontal and vertical reflections | ✓ | ✓ |
| Reflections on any direction | X | ✓ |
| Mobile support | ✓ | ✓ |
| Universal RP Support (Unity 2019.4+) | Sold separately | ✓ |
Both versions grant you access to our support services (via email and the Unity forums) as well as to free updates for this tool during the whole 2.x cycle which covers versions 2.0 through 2.9 of PIDI 2D Reflections 2
Universal RP Add on Limitations
The Universal RP is a new rendering pipeline that is currently supported by our asset in Unity 2019.4 LTS
Due to regular changes in the pipeline, compatibility-breaking bugs and some performance issues can be expected while using this tool alongside any Universal RP version not verified for the latest LTS Unity release
Besides this, the Universal RP pipeline lacks several core features present in the Standard (Built-in) pipeline which has make it impossible to fully port all features of PIDI 2D Reflections 2 to Universal RP. Below you can find a small comparison detailing which features are available in Universal RP and which ones are absent or just partially implemented.
| Feature | Universal RP | Standard (Built-in) |
|---|---|---|
| Post Process Stack v2 support | ✓ | ✓ |
| Parallax backgrounds support | X | ✓ |
| Dynamic Reflection Resolution | ✓ | ✓ |
| Masked reflections | Limited | ✓ |
| Faded reflections | ✓ | ✓ |
| Ultra-optimized simple shader based reflection | X | ✓ |
| Lit and unlit shader variants | ✓ | ✓ |
| Support for skewed reflections | ✓ | ✓ |
| Support for custom shaders | ✓ | ✓ |
| 2D Water shader example | ✓ | ✓ |
| Reflections on any direction | ✓ | ✓ |
| Mobile support | ✓ | ✓ |
Quick Start Guide
While this guide and the documentation itself have been written with the full version of the asset in mind, most of the concepts and workflows described can be used directly on the Lite version as well. Features exclusive to the Standard version are marked as such.
Installation and upgrade
While PIDI : 2D Reflections 2 has been designed to be integrated to any project at any stage of development with little to no setup required, there are still some considerations to be made for projects which are upgrading from the original release (version 1.0 - 1.9 ) or projects using the Universal Rendering Pipeline. Below you will find the steps to follow in order to install and setup PIDI : 2D Reflections 2 in any of these cases.
Standard Pipeline Projects
For projects working with the Standard Pipeline there is little to no setup required. If this is a first time installation you just need to head to the Asset Store and find this asset either under the section “My Assets” or by a normal search in the store itself.
If you have bought the asset, a Download / Import / Update button will show, depending on if you have never downloaded the asset before, you have downloaded it and it is in cache already or there is a new version available for download, respectively.
Once the import dialog appears, just import all the contents of the asset as usual. To verify that the asset was imported without any errors try to open one of the demo scenes. If they work without issues, the package has been imported correctly. If you see any graphical errors you must re-import the asset. If the issues persist even with a brand new and empty project, please contact us at our support email
Universal RP Projects
If you are using the Full version or have purchased the Universal RP Add-on for the Lite version you must follow additional steps before using this asset in a Universal RP compatible project.
In the last step described above, once you see the import dialog while adding this asset to your project, DO NOT import the Standard Pipeline folder to your project. Importing this folder would cause errors due to the shaders and materials included in it being incompatible with Universal RP.

Instead, once the tool has been fully imported, unpack the unitypackage file that most closely matches the Universal RP and Unity version you are using. For the best results, always use the latest LTS Unity version available.
While we do our best to keep up to date with Universal RP releases there may be times when Unity updates their pipelines and adds or removes functionality from them before we can issue the corresponding update. If your version of Universal RP does not load the shaders appropriately or the demo scenes inside the Universal RP Add on folder show pink materials please be patient, as we will issue the corresponding patch usually within 1-2 days of a new Universal RP release or contact us to let us know the details of the error to our support email.
Upgrade from version 1.9x (Standard Only)
Upgrading from version 1.9 is a slightly more complex process. The internal code of the tool has been re-written from the ground up to allow for better performance, improved effects, greater accuracy and a wide array of new features. While this is great for new projects it represents a challenge when trying to upgrade as most of the features of version 1 do not translate directly to version 2.
To help with this issue, a small tool is provided in its own Unity Package called “Auto-Upgrade PIDI2D.unitypackage”. Inside of this package is a special utility that will go through all the objects in a scene that have a PIDI_2DReflection component from the first release and replace it with the new version while, at the same time, porting and adjusting all the corresponding variables and settings to match those of the new version.

Unpack this package into your project by double clicking on it. Once all the contents of the unity package have been imported to your project, a new menu will appear under Assets/PIDI 2D Reflections 2/Update all Reflections.
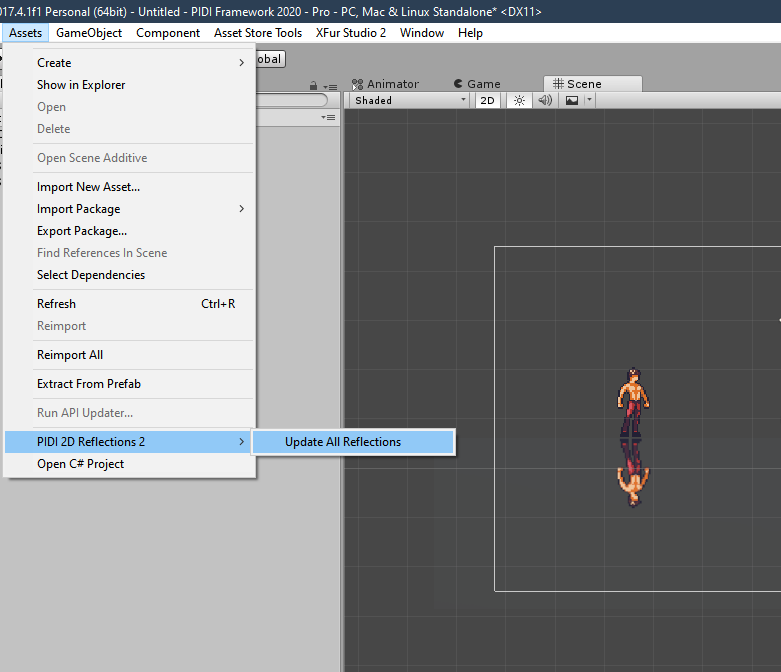
Selecting this option will automatically update all the reflection objects in your scene and replace their PIDI_2DReflection component (version 1.9x) to the new version 2 component. After the upgrade has finished, you just need to assign a material compatible with version 2 of this tool (since most version 1 materials are not compatible) and the reflections will start to work again.
While some additional setup might be done for some objects, the utility should take care of most of it and update all the reflections of a scene in a matter of seconds.
Warning : Please remember to make a backup of your project before upgrading or installing any tool or asset. While we do our best to ensure that our software is free of errors and easy to use, we are not responsible for any loss of data, corrupted files or projects produced during the installation or use of this software.
Once the asset has been successfully installed into your project, adding reflections to an existing scene is a simple process that can be done in just a few minutes. For more advanced uses and in-depth information about each feature please continue reading this documentation.
Adding reflections to a sprite
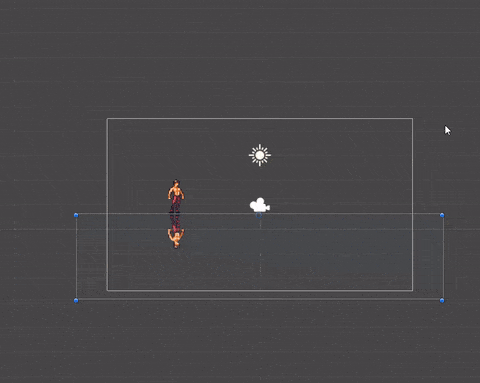
PIDI 2D Reflections 2 is designed to work in a fully two dimensional space. This means that the reflections will work in a single direction at a time and the actual reflective surface has to be assigned to one of the edges of the sprite.

To make this process as simple as possible, the tool by default reflects objects in a Y- (upwards) direction from the origin of the sprite. This means that, to get the best results, the origin of the object must be located on the upper edge of the object.
Do not try to match the origin of the object to the actual “surface” from where you want to reflect. For example, if your sprite shows a small puddle of water in the middle of the object, do not try to set the origin on the puddle but instead set it to the edge of the object, even if the origin ends up floating above the actual puddle.
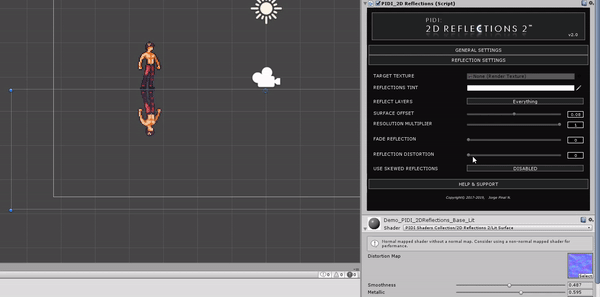
To adjust the reflection's distance to the edge of the object you should use the SURFACE OFFSET variable inside of the reflections settings tab.
Once the sprite is ready, simply add the PIDI_2DReflections component to it and ensure that your Sprite Renderer is using a compatible material, preferably one of the ones included with the tool itself or any material with a _2DReflectionTex property. For better results, set the color of the sprite to a dark gray or black. Since reflections are blended in an additive way, if your sprite is set to a white color the resulting reflection may appear too bright or whited out
To avoid recursive reflections ( when a mirror reflects itself while reflecting another mirror ) any object with the PIDI_2DReflections component must be in a layer which will not be reflected. By default, PIDI_2DReflections ignores the “Water” layer so it is always recommended to place all your reflective sprites / objects in this layer.

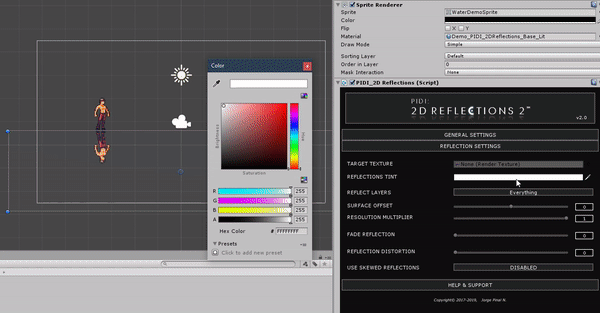
Inside the Reflection Settings Tab you can adjust the Reflection's Tint (its color), the surface offset as we explained before and, most importantly, the layers you want your surface to reflect. For now, since we are starting, select “Everything”. Add any object to the scene and test your new reflective surface, which should now be working without any issues.
If your scene is not too complex or if you are targeting small screen devices such as mobile phones or consoles, you may want to test the Resolution Multiplier slider, which will allow you to downscale the final resolution of the rendered reflection.
Alternatively, a RenderTexture asset can be assigned to the Target Texture slot to ensure that the reflections have a specific resolution, properties and format that adapt better to your target devices.
For more information about what the rest of the settings do and how to use them you can read the rest of this online documentation, click on the corresponding button of the Help & Support tab or just hover your mouse over the corresponding settings, since all of them have fully detailed tooltips.
Performance tips
PIDI 2D Reflections 2 has been designed to provide a careful balance between performance and flexibility. Just like any other real time reflections system it depends on re-drawing the scene for each reflection which, depending on the complexity of the game, may have a greater or lower performance impact.
Reflecting Post Process Effects, masking reflections or using Parallax backgrounds make the reflections even more expensive. There might be cases where it will be unavoidable to enable these effects and, in those cases sharing reflection textures can be a good option to keep an acceptable performance.
It is highly recommended to share a single reflection mask on as many reflections as possible, since masks can be quite expensive to render. By assigning a static RenderTexture as the output for the mask rendering the performance impact can be reduced since this static texture can be assigned to multiple reflection instances while letting only one make the actual rendering.
Reflection textures can also be shared, but due to the way reflections work they can only be shared across objects located at the same Y or X coordinate (depending on the orientation) and when all the mirrors share the same orientation.
If using Post Process effects, it is recommended to reduce the resolution of the reflections to improve performance, since most of these effects work on a per-pixel basis and their performance cost is entirely dependent on the resolution of the screen or reflection. Motion Blur is not compatible with the reflections and will most likely produce graphical errors.
PIDI 2D Reflections 2 - Reference Manual
User Interface
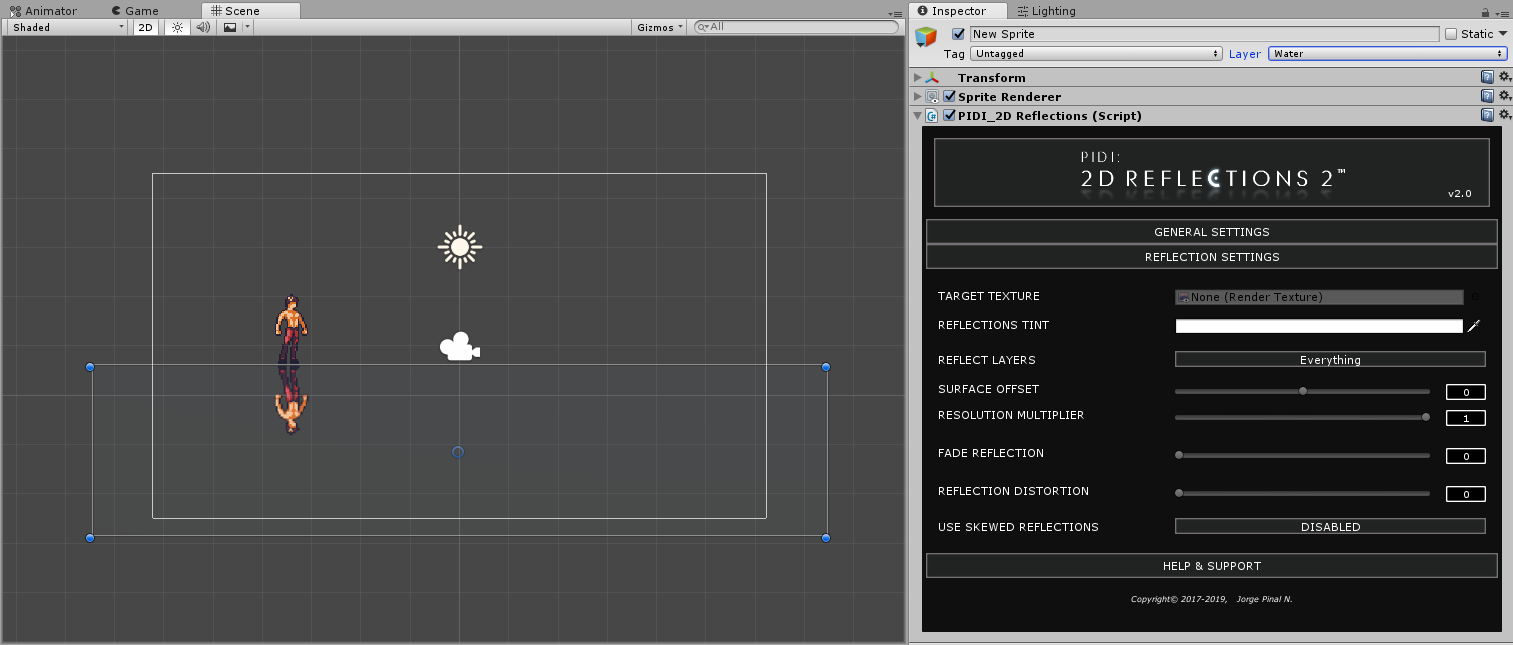
The user interface for PIDI 2D Reflections 2 has been designed to be as simple and efficient as possible. When you first add the PIDI_2DReflections component to a sprite you will notice that only a handful of tabs with some options inside are available.
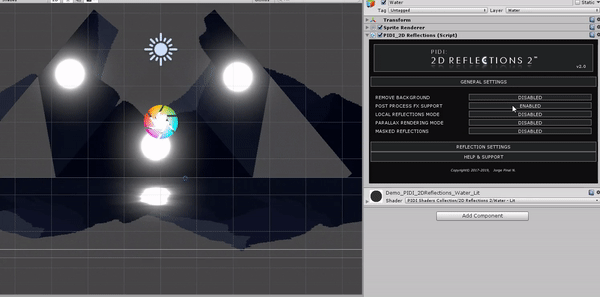
In the General Settings tab you can find several toggles to enable and disable additional features on your reflection and, as you do, additional tabs will appear. Features that are not compatible with the settings you are using will automatically disappear, help boxes will pop up to give detailed explanations for everything.
At the top of the UI for the tool you can always find, next to the name and logo, the current version you are using. After installing any update to this asset always verify a correct installation by checking that the version number displayed in the UI matches the installed update.
Basic Reflection Settings
In this section we will cover the basic features of PIDI 2D Reflections 2, how to use them and how the affect the resulting reflections. Several images, GIFS and other resources are included to provide a deep enough learning material. Reading this whole section is heavily recommended before using PIDI 2D Reflections 2.
Reflection Tint and Resolution
The Reflection Tint controls the final color applied to the reflection. This color is multiplicative meaning that if your reflection has a mostly red color and you add a blue tint to it, the result will look mostly purple.
Furthermore, the reflection itself is additive which means that the darker the tint you add, the fainter the reflection will look as it is displayed over the sprite's surface.
The best results for reflections are achieved when a dark sprite color is mixed with a lighter reflection tint, as this produces a colored, clear and evident reflection over the surface of your sprite.
If you need different blending techniques for your sprites or for the reflection then you may need to create your own custom shaders that integrate this system. Please refer to the Additional Topics section at the end of this article to learn more about how to integrate PIDI 2D Reflections 2 to custom shaders.

If no Target Texture texture has been assigned to the reflection you can adjust its resolution to any value you want between 0.1 and 1.0.
These adjustments can be a great help when optimizing a scene and the resources each reflection takes, especially when using Post Process Effects.
The resolution of the reflection can also be changed at run-time allowing for further control over its quality and a better adaptation to the end user's device, making it possible to adjust on the fly towards higher qualities or higher performance.
Reflection Surface and Layers
Each reflection is calculated and displayed using the origin of the object / sprite as a reference. All internal calculations expect this origin to be located on the upper edge of the sprite.
This however, doesn't mean that the reflections can be displayed in only one direction. If you turn around the reflective object the reflections will adjust automatically to the corresponding orientation, always keeping an accurate and realistic result.
Notice : In the Lite Edition of this tool, reflections can only be displayed in a Horizontal or Vertical direction and have to be marked as such by enabling the corresponding features in the Reflection Settings tab.
The distance between the edge of the reflection and the origin of the sprite can be modified with the Surface Offset value in the Reflection Settings tab. This displacement is based on the Y axis of the sprite.
Each reflection can reflect any number of layers. Selecting which layers the reflection renders and which ones it ignores can be a great aid when trying to optimize a scene since not all objects might need to be re-drawn by each reflection and thus, by ignoring some of them, the performance can be improved.
Faded and Skewed Reflections

The reflections produced with this tool can be faded out either to the sprite color or to full transparency (if the Remove Backgrounds feature is enabled).
This is useful to produce more artistic results with the reflections for cases where you need to reflect text or other elements during cutscenes or menus, etc.
The fading effect is applied ONLY to the reflection itself, and it does not fade the rest of the sprite nor its colors.
Notice : At the moment, PIDI 2D Reflections 2 is not capable of reflecting UI Elements nor anything rendered through the Canvas system.
The Standard Edition includes the ability to further control the appearance of the reflection by modifying its projection parameters and skewing the results. This means that the reflection can be projected in a distorted way to simulate different perspectives over the surface.

To use skewed reflections with PIDI 2D Reflections 2 simply enable this feature (you can find it in the Reflection Settings tab) and use the sliders to control the appearance, scale and offset of the top and bottom edges of the projection. While the control provided over the projection is limited (since otherwise the whole reflection might be broken) it still provides enough control to achieve highly interesting results.
Distortion Maps
All included shaders support the use of distortion maps. The map itself has to be assigned to the material but the specific properties of the distortion map including its strength, the UV space in which it is projected as well as its scale can be defined on a per-instance basis.
Depending on the effect that you want to achieve you may want to select different UV spaces for the distortion. The four available projections for the distortion map are Local Space which refers to the actual UV coordinates of the sprite, Reflection Space which refers to the coordinates calculated to project the reflection and which can be skewed alongside it, Screen Space and World Space. The Distortion Map Scale is applied on the corresponding UV space.
Advanced Reflection Settings
The topics included in this section are intended for more advanced uses of the tool and may require a different scene setup and design in order to work correctly. Furthermore, most of these topics use features available only in the Standard Edition.
Post Process FX
PIDI 2D Reflections 2 is designed to work out of the box with the Post Process Stack v2. Once this package is installed into your project either through the Package Manager (Unity 2018.3+) or manually, everything you need to do to take advantage of PostFX in your reflections is to enable them in the General Settings tab
There are however a few considerations to take into account when using Post FX with our reflections system :
- Effects dependent on Motion Vectors (Motion Blur, TAA) are not compatible and cannot be rendered within the reflection itself
- Using FXAA anywhere in the scene will affect some alpha-dependent features such as the remove background setting unless “Keep Alpha” is enabled.
- Using Post FX in the reflections has a considerable performance cost. Reducing the reflection resolution may improve performance
Starting with PIDI 2D Reflections 2 version 2.1 there are two different ways to configure the Post FX support of each reflection, either copying the settings from the camera that looks at the reflection itself (in most cases the game camera) or by setting up a custom set of overrides, which allows you to set unique PostFX volumes for the reflections that are independent from those used for the rest of the game.
When enabling the POST PROCESS FX SUPPORT setting on the General Settings tab you will see a new tab appear on the UI called POST FX SETTINGS

The POST FX SETTINGS MODE allows you to select from where will the POST FX SETTINGS for this reflection be read from, either the game camera or a custom set of options. If you use CUSTOM SETTINGS then a set of controls corresponding to a default POST PROCESS LAYER will appear. For additional information about these settings please read the Post Process Stack v2 documentation.
This system may not be fully compatible with custom Post Process FX nor is compatible with third party tools. The PostFX compatibility of PIDI 2D Reflections 2 is limited and designed only for the Post Process Stack v2 (Standard Renderer) and v3 (Universal RP).
Masked Reflections (Standard Only)
Sometimes it is necessary to render a reflection over a large surface while keeping only some parts of it visible. This is especially true when using local reflections over other reflective surfaces. To achieve this effect and ensure that your reflection is visible ONLY when it is over another object you need to use the Masked Reflections feature, which can be enabled in the General Settings tab.
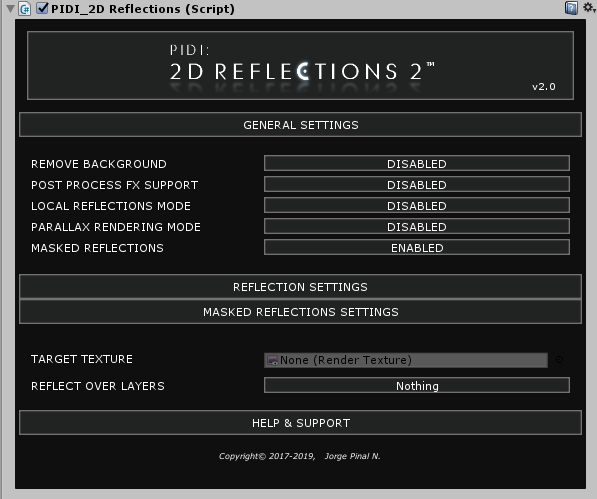
Once enabled, a new settings tab will appear called “Masked Reflections Settings”. Inside this tab are all the settings needed to control the masking process, including the possibility of rendering the mask texture (used to define where the reflection can be displayed) to an external RenderTexture that can be shared across multiple instances as well as the layers over which this reflection can be rendered.
Just as when rendering the reflection itself to an external texture, if a Target Texture is assigned and Passive mode is disabled, this reflection will render its mask to the RenderTexture. If Passive mode is enabled, the RenderTexture will be read instead, saving performance. This way it is possible to have only one instance with Passive mode disabled and rendering its mask to a RenderTexture while all the others just read from it.
Parallax Reflections (Standard Only)
PIDI 2D Reflections 2 is also compatible with Parallax Scrolling (or Parallax Backgrounds) with very little setup required. While these kinds of reflections can be considerably more expensive than regular ones due to several cameras having to be combined into a single reflection, the results are optimized enough to be used without issues.
You can enable this feature directly in the General Settings tab. Once enabled, a new settings tab called “Parallax Reflections Settings” will appear showing all the relevant settings. Due to the way that parallax reflections work, they are incompatible with some other features such as local reflections and the “remove background” feature.
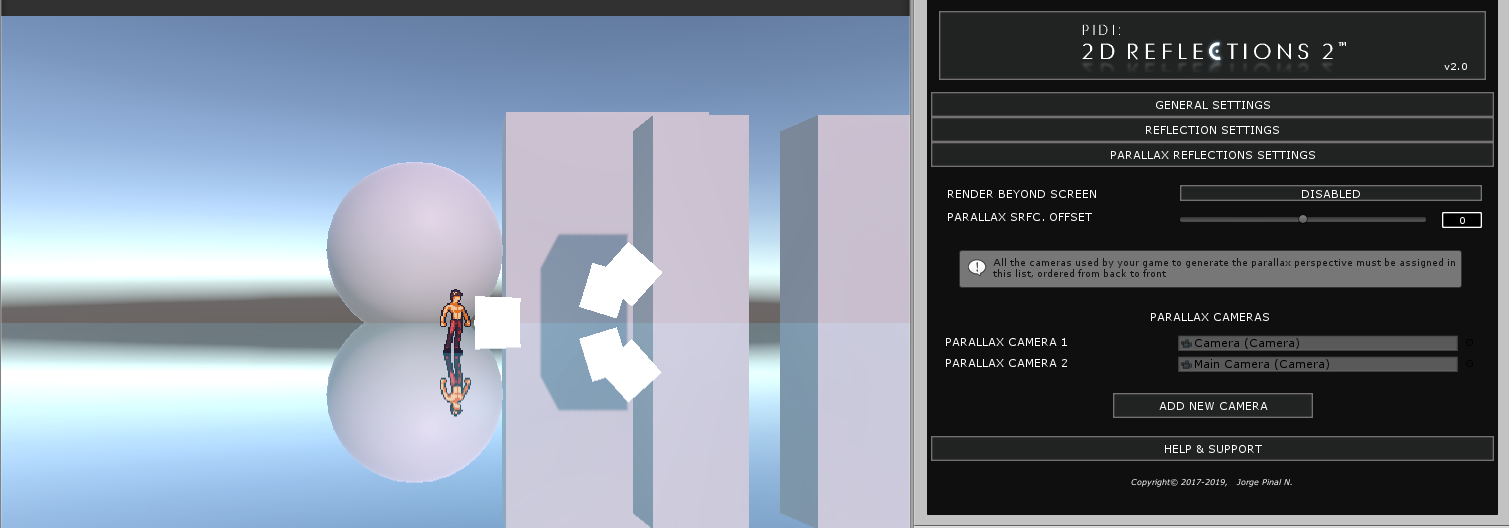
Once Parallax Reflections are enabled, all you have to do to make use of them is to assign the cameras of your scene to its camera's list, ordering them from back to front. PIDI 2D Reflections 2 will take care of the rest.
Notice : Parallax Reflections are NOT previewable in the Scene view due to the way they are handled. They can only be previewed in the Game View.
Local Reflections
Local reflections are designed for specific cases where you need a reflection to follow an object ( for example a character ) and to move with it over another reflective surface. This is useful to better simulate water surfaces and floors where the characters and objects may need to move over the surface without having their reflections disappear.
PIDI 2D Reflections 2 provides a basic integrated workflow for this behavior, but it works with horizontal reflections ONLY.
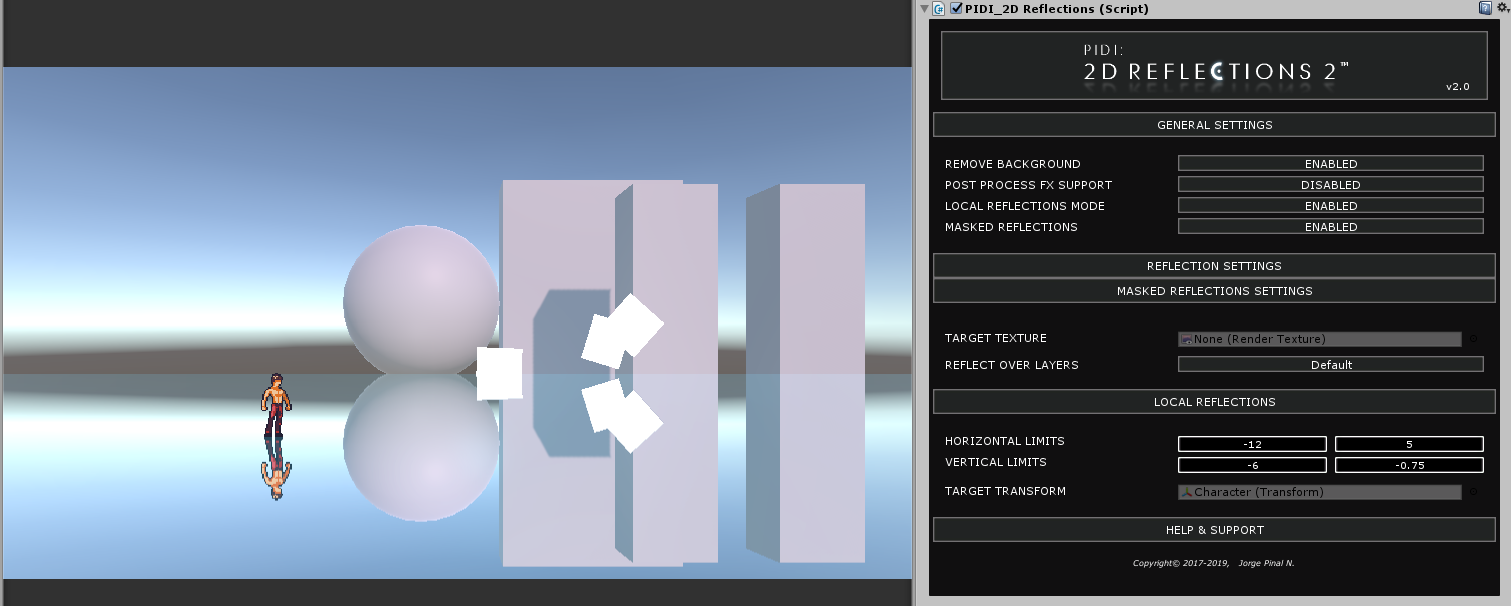
In the General Settings Tab you can find the feature Local Reflections. Once enabled, a new tab with the corresponding settings will appear.
Inside the Local Reflections Settings tab you can control the horizontal and vertical limits of the local reflection. These limits are represented in the scene view as red and blue lines and help you to limit the are in which the local reflection will follow the target object. In the Multi-Effects demo scene included with the package the local reflection has been set up to be masked as well, to prevent it from displaying outside of the boundaries of the reflective floor.
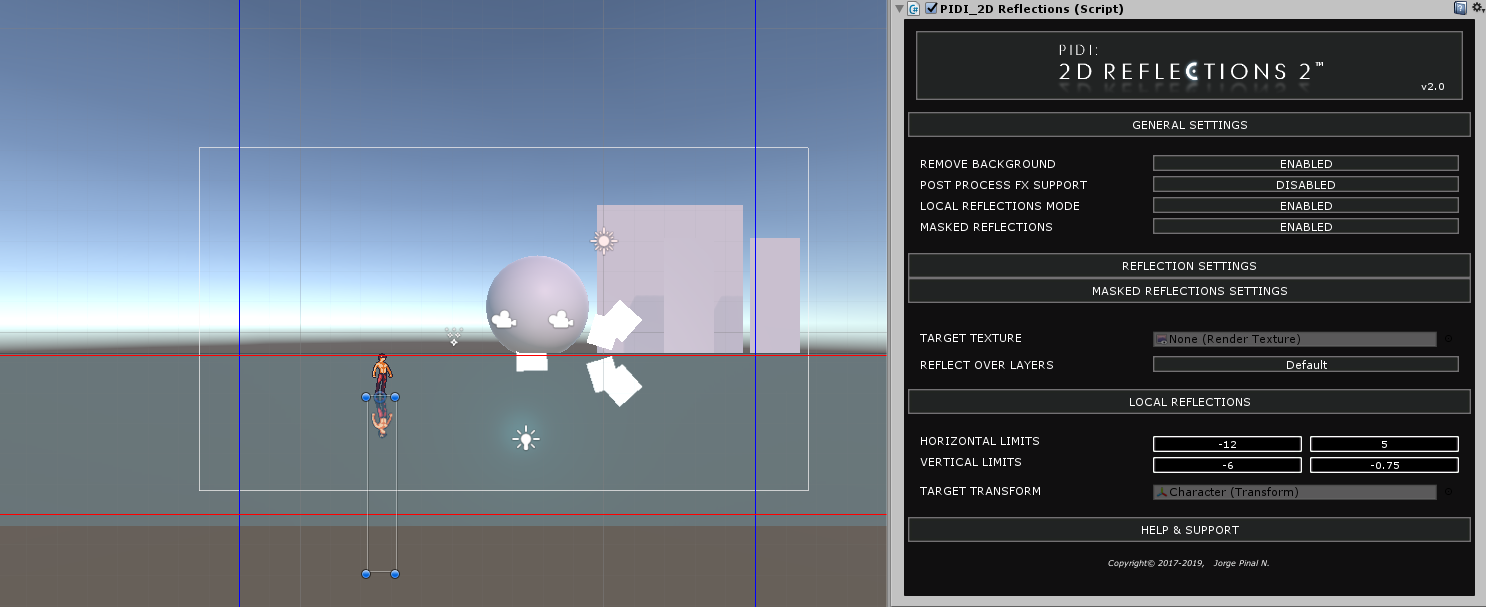
The Target Transform slot should receive the transform / object that you want the local reflection to follow. Once this is done, you just need to set up the Reflection Layers (inside of Reflection Settings) to be the same as the layer of the object you want to reflect. Local reflections are designed to reflect only one object at a time, so they require a careful layer management in order to achieve the best results.
Additional Topics
Shader Based Reflections
Included with this tool are two shaders that generate reflections without any additional components. These shaders are designed for ultra-fast performance and can, with some tweaks in the scene, reflect both Parallax backgrounds and PostFX.

These shaders however have many important limitations when compared to the usual reflections that PIDI 2D Reflections 2 produces and should be used sparingly, mostly in cases where performance is a much higher priority than quality.
The limits of the Shader based reflections are the following :
- They can only reflect in an upwards direction and can only be applied to horizontal surfaces
- They cannot work with masking
- They cannot render just a selection of layers and will instead reflect everything that is on screen behind them
- Since they reflect everything located behind them, making them interact with complex scenes requires a good deal of layer and ordering tweaks
- They cannot reflect anything that is outside the screen and will produce glitches when reflecting objects that are partially out of bounds.
Custom Shaders (Code based)
Custom shaders can be created to expand or customize the behavior of the reflections and achieve different effects. To be recognized by this tool as a PIDI 2D Reflections compatible shader, your shader must contain the following parameters :
- _2DReflectionTex as a 2D sampler
- _SurfaceXY as a Vector4 parameter
Additionally, the shader can have a _2DReflectionMask 2D sampler which will receive the corresponding mask texture and many other parameters that you can see on the included shaders' source code.
This guide will not cover how to write custom shaders, as this is a very extensive topic much better covered by other articles, guides and tutorials. There are however a few technical details that might be useful for you when deciding how to handle the reflection output from our tool in your own shaders :
- The reflection texture output is not flipped nor mirrored. It is rendered in a default Y up orientation with its lowest edge matching the edge of the reflective surface.
- The SurfaceXY vector will contain the coordinates of the upper left and bottom right corners of the reflection bounds in viewport space ( the reflection's viewport ) which is useful to project the reflection accurately over the surface. Please refer to the included shaders to see the way we have implemented this perspective.
Custom Shaders (Amplify Shader Editor)
Creating custom shaders with ASE (Amplify Shader Editor) that are compatible with all effects and features of PIDI 2D Reflections 2 is extremely fast and easy in both Lite and Standard Editions of this asset.
First, install ASE into your project. Afterwards, unpack the ASE Samples Pack.unitypackage file into your project. It contains two already made copies of the standard shaders re-written with ASE Nodes as well as a special Shader Function Node called 2D Reflections Outputs which automatically creates all the parameters needed by the tool and generates all the necessary outputs for you to render them.
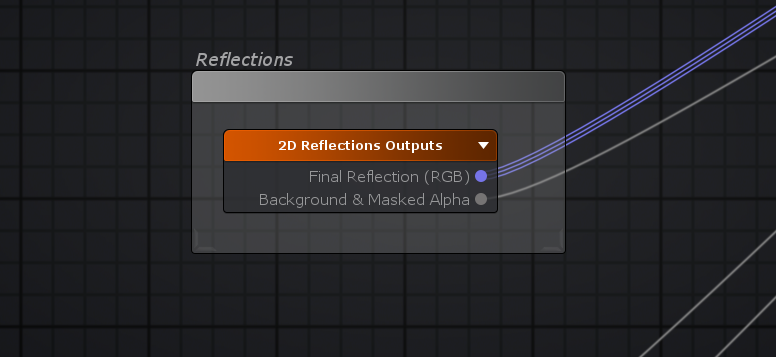
In most cases, you will want to plug the Final Reflection (RGB) output from the 2D Reflection Outputs node to the Emission output of your shader and its Background & Masked Alpha output to the Opacity output of your shader.
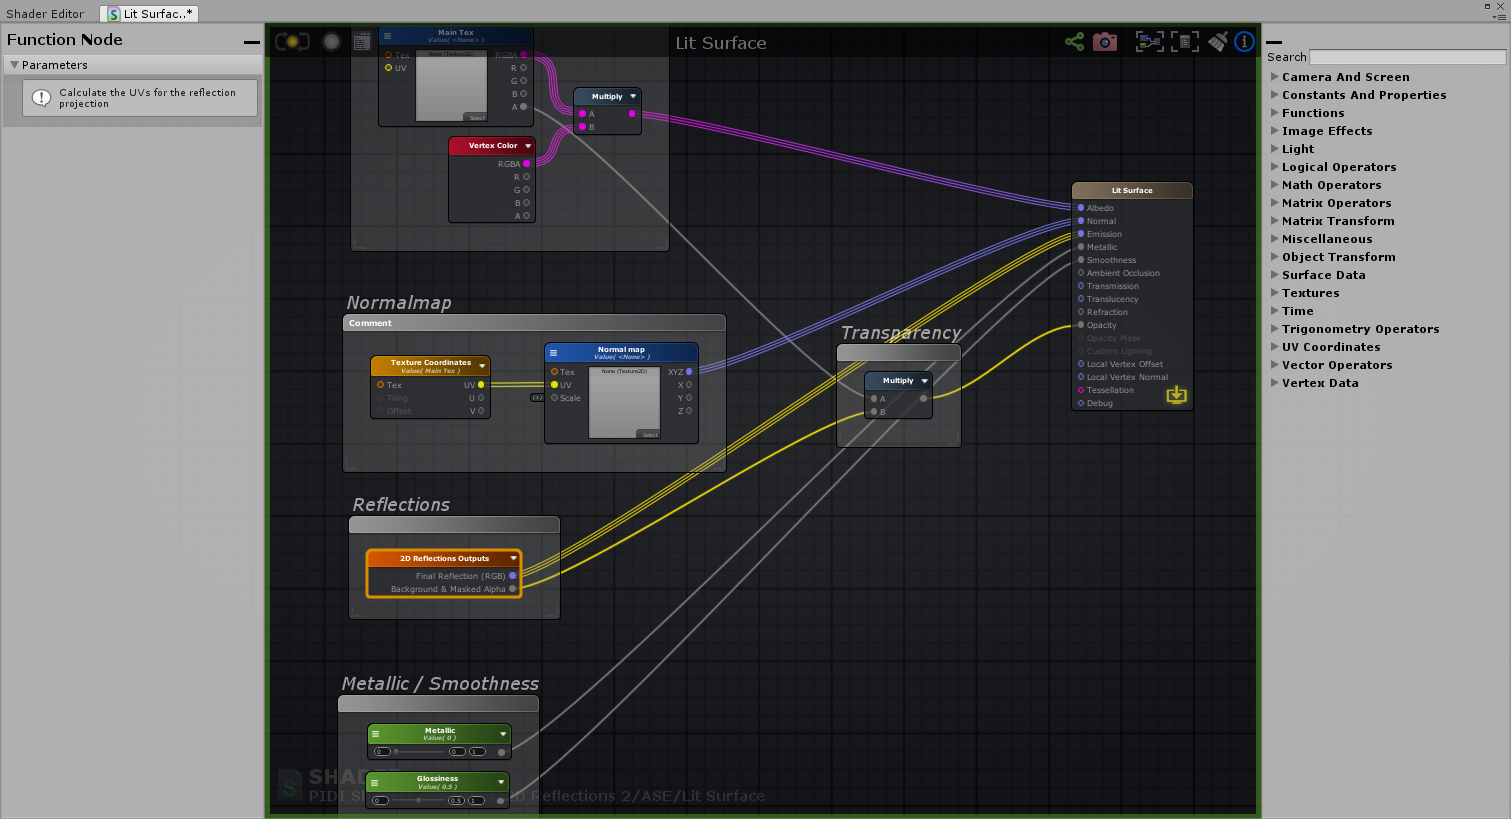
For a more detailed description of this whole process, please watch the small video tutorial below.
Custom Shaders (ShaderGraph Editor)
Starting with version 2.07, the Universal RP Add on package of PIDI 2D Reflections 2 comes with an additional package called “ShaderGraph Elements” and the number of the Unviersal RP version they are intended for. They include ShaderGraph example shaders that you can use as a reference to build your own as well as a very useful SubGraph that handles most of the reflection parameters for you, as long as you provide the necessary inputs.

To make the process of creating your own custom shaders as easy as possible, the subgraph included with the Shader Graph elements includes all the inputs that you will need to use PIDI 2D Reflections and their names are the exact names you need to give each parameter so that they can be automatically managed by the PIDI 2D Reflections component
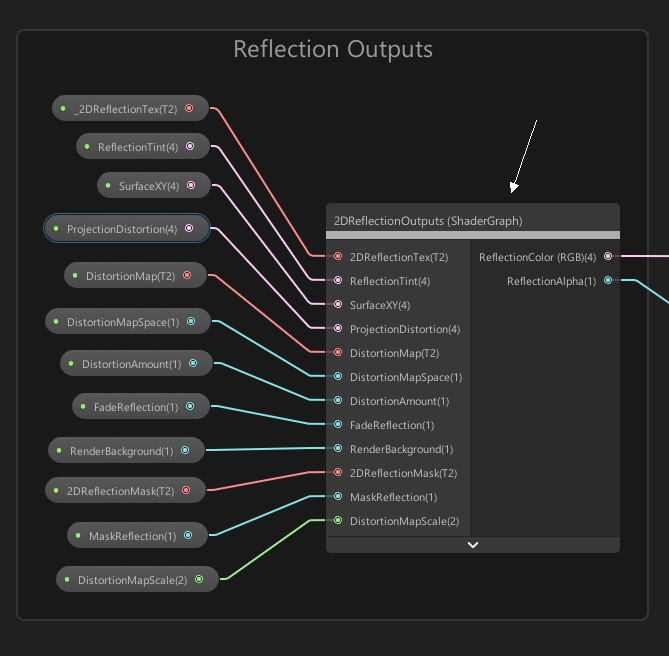
Remember that in ShaderGraph the parameter names you assign are not the same as the ones used by the shaders internally. However, PIDI 2D Reflections requires these names to be the same, except that the internal names or References must have a “_” symbol before their name as in the following picture.

While a lot of effort was put into making sure that all shader editors have the easiest workflow possible, ShaderGraph is still an evolving tool that receives new features on each iteration. One such feature is the Custom Function node, added in Unity 2019.2 but non-existent in 2019.1. Due to these differences, we recommend that if you are going to use ShaderGraph in your project to create shaders for PIDI 2D Reflections 2, you should upgrade your project to Unity 2019.2 to take full advantage of all features, since our ShaderGraph implementation on Unity 2019.1 lacks a few features, most importantly the ability to select the projection space for the distortion maps
If you have additional questions about the functionality of our tool or are having issues with any of the components included with it please don't hesitate in contacting us at our support email.
Copyright© 2017-2020 - Jorge Pinal Negrete. PIDI 2D Reflections, PIDI Game Development Framework, Irreverent Software, their logos and branding as well as the content and documentation in this wiki are trademarks and or copyright property of Jorge Pinal Negrete. All other trademarks and copyrights belong to their respective owners.