
This is an old revision of the document!
Table of Contents
PIDI Planar Reflections 2
### PIDI Planar Reflections 2 is an advanced tool to add real-time reflections to your 3D scenes easily and with a low performance impact. The tool comes with dozens of custom shaders that allow you to create all kinds of reflective surfaces from simple mirrors and basic opaque surfaces to complex PBR materials, water and glass floors and walls. ###
### Furthermore, the asset comes with specific shaders and workflows for mobile devices and the new Lightweight SRP renderer, starting with version 5.7 for Unity 2019.1. In this documentation you will find a general description of all the different features of this asset, a small setup guide and some performance tips to help you add reflections to your scenes in no time. ###
LWRP vs Standard Pipeline
### Due to the many limitations in SRP rendering including the inability to render cameras manually, render with custom shaders/effects, the limited access to the rendering process on a per-camera basis and many others, reflections in LWRP are severely limited. In essence, LWRP reflections can use only the basic features of this asset but for a full feature comparison you can see the table below. ###
| Feature | Lightweight SRP | Standard Rendering |
|---|---|---|
| Non-Mesh reflectors | X | ✓ |
| Reflection to Render Texture Asset | ✓ | ✓ |
| Dynamic reflection resolution | X | ✓ |
| Layer-specific reflections | ✓ | ✓ |
| Advanced optimization | X | ✓ |
| Advanced rendering control | X | ✓ |
| Water shader | X | ✓ |
| Depth based effects | X | ✓ |
### While a LWRP package for older Unity releases (pre 2019.1) is provided, this package is no longer supported nor is recommended to use in any projects. ###
### Two newer packages are provided to support the actual LWRP releases, one for LWRP 5.7 on Unity 2019.1 and one for LWRP 6-9 on Unity 2019.2. These packages are clearly labeled as such and easy to install, just by unpacking their contents inside the Unity Editor after double clicking on either one. ###
###
The LWRP capabilities of this asset are then limited to Unity 2019.1 and 2019.2. For future Unity releases and LWRP versions you may want to consider upgrading to PIDI Planar Reflections 3
###
Quick Start Guide
### In this quick guide we will go through the whole process of using PIDI Planar Reflections 2, from installing the software into your project to adding it to a scene. ### ### As a first step, please ensure that your project fully meets the requirements below : ###
- It is being developed with Unity 2017.4+
- If it uses LWRP, make sure it is using a compatible version
Installation and upgrade
### While PIDI : Planar Reflections 2 has been designed to be integrated to any project at any stage of development with little to no setup required, there are still some considerations to be made for projects which are upgrading from the original release (version 1.0 - 1.9 ) or projects using the new Lightweight Rendering Pipeline (LWRP). Below you will find the steps to follow in order to install and setup PIDI : 2D Reflections 2 in any of these cases. ###
Standard Pipeline Projects
###
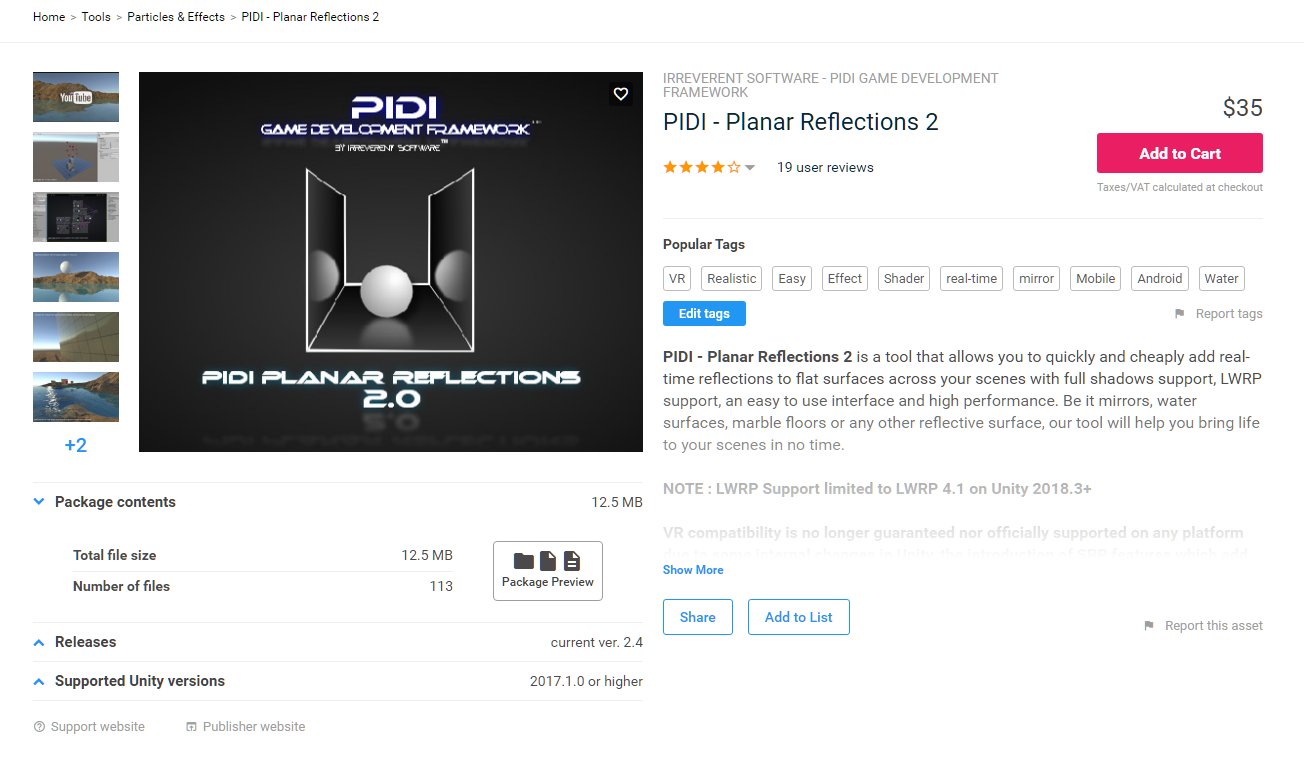
For projects working with the Standard Pipeline there is little to no setup required. If this is a first time installation you just need to head to the Asset Store and find this asset either under the section “My Assets” or by a normal search in the store itself.
###
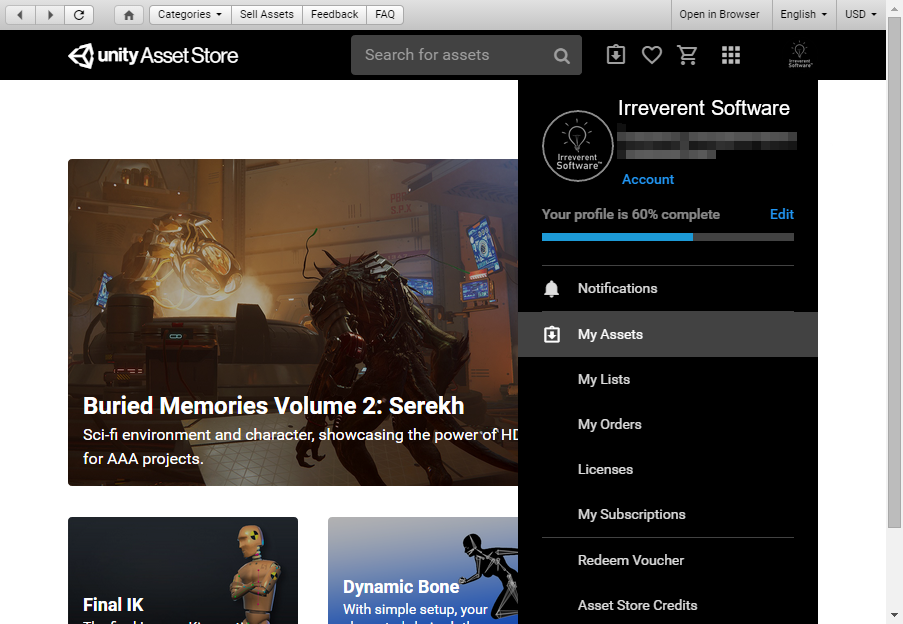
###
If you have bought the asset, a Download / Import / Update button will show, depending on if you have never downloaded the asset before, you have downloaded it and it is in cache already or there is a new version available for download, respectively.
###
###
Once the import dialog appears, just import all the contents of the asset as usual. To verify that the asset was imported without any errors try to open one of the demo scenes. If they work without issues, the package has been imported correctly. If you see any graphical errors you must re-import the asset. If the issues persist even with a brand new and empty project, please contact us at our support email
###
LWRP Projects
###
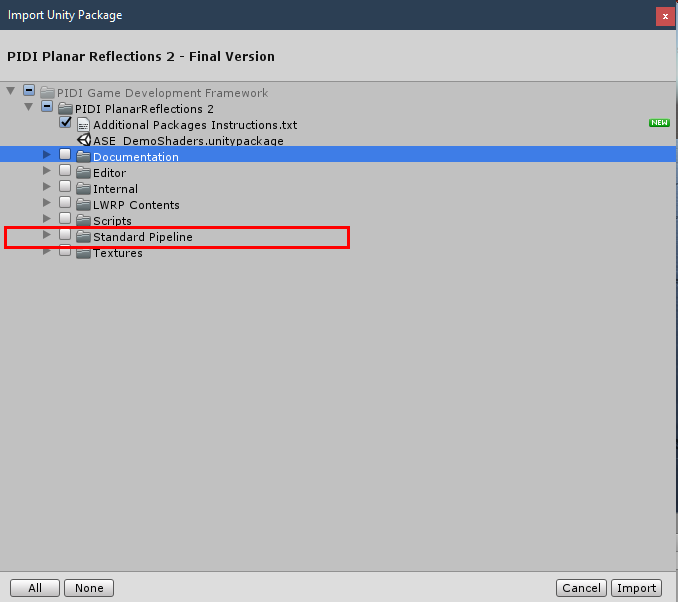
In the last step described above, once you see the import dialog while adding this asset to your project, DO NOT import the Standard Pipeline folder to your project. Importing this folder would cause errors due to the shaders and materials included in it being incompatible with LWRP.
###
###
Instead, once the tool has been fully imported, unpack LWRP 5.7.unitypackage (which is located inside the LWRP Contents folder) into the project or the LWRP 6.9.unitypackage file if you are working on Unity 2019.2 and import its contents. This will add all the necessary shaders, demo scenes and additional files for you to start using PIDI Planar Reflections 2 in Unity 2019.1+ with LWRP 5.7+
###
### While we do our best to keep up to date with LWRP releases there may be times when Unity updates their pipelines and adds or removes functionality from them (and in most cases breaking the compatibility of LWRP shaders) before we can issue the corresponding update. If your version of LWRP does not load the shaders appropriately or the demo scenes inside the LWRP Add on folder show pink materials please be patient, as we will issue the corresponding patch usually within 1-2 days of a new LWRP release or contact us to let us know the details of the error to our support email. ###
### Warning : Please remember to make a backup of your project before upgrading or installing any tool or asset. While we do our best to ensure that our software is free of errors and easy to use, we are not responsible for any loss of data, corrupted files or projects produced during the installation or use of this software. ###
### Once the asset has been successfully installed into your project, adding reflections to an existing scene is a simple process that can be done in just a few minutes. For more advanced uses and in-depth information about each feature please continue reading this documentation. ###
Adding Reflections to a Scene
### There are several ways to add dynamic, real-time reflections to your scene with our plugin. Which one you should use depends a lot on the kind of project you are developing and its target devices. In this section we will describe the basic and general approaches you can use for your projects. ###
Method 1 : The PIDI_PlanarReflection Component
### The easiest (and most common) way of adding dynamic planar reflections to your scene is to simply add the PIDI_PlanarReflection component to a GameObject that has a MeshRenderer component and a compatible material (a material with a ReflectionTex property). ###
### The PIDI_PlanarReflection component will automatically try to use the forward direction of the object as the normal from which the reflections will be calculated. This normal is simply put a straight vector perpendicular to the reflective surface. ###
### While this is useful for most flat objects such as floors and walls, sometimes this behavior is not optimal since the forward direction and the actual normal of the reflective surface may not match. In these cases, simply enable the EXPLICIT NORMAL setting and define the explicit normal direction (in world coordinates) that will be used to generate the reflections. Starting on version 1.7 you can enable the LOCAL NORMAL MODE flag so the explicit normal is calculated based on the object's local coordinates. This is useful if the reflective object will rotate during the game. ###
Method 2 : The Planar Reflector Game Object (see note at the end)
### In some cases, such as a house with floors of different materials but all in the same plane, you may want to render a reflection that can be shared across all of them. In other cases a single mesh may contain more than one reflective material, making it impossible to add the PIDI_PlanarReflection component directly. ###
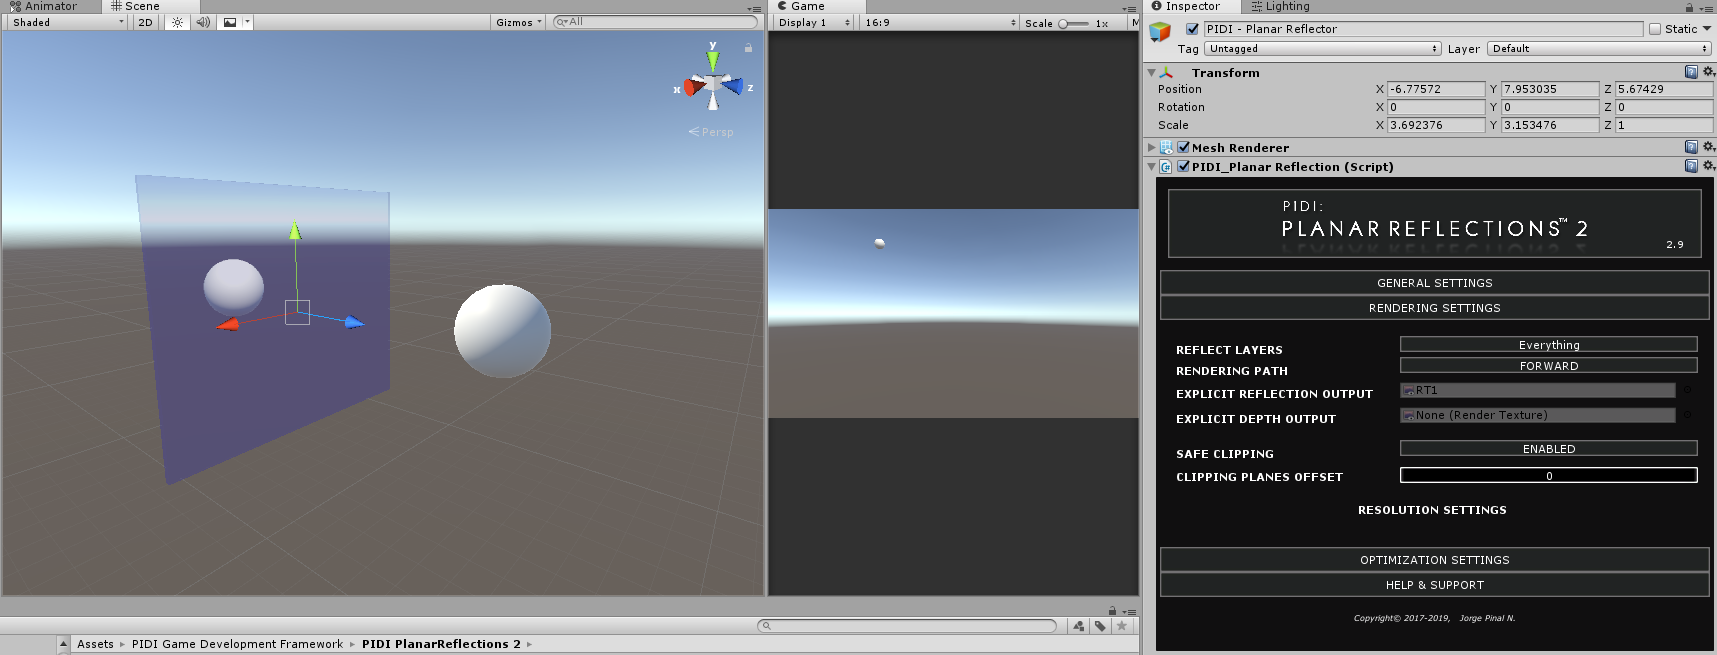
### For these situations the right solution is to create a Planar Reflector Object. These objects render reflections to a custom RenderTexture asset which can then be assigned by hand to any number of materials. Furthermore, these reflector objects are only visible in the Scene View which makes them ideal for complex scenes and a more precise control over the reflections. ###
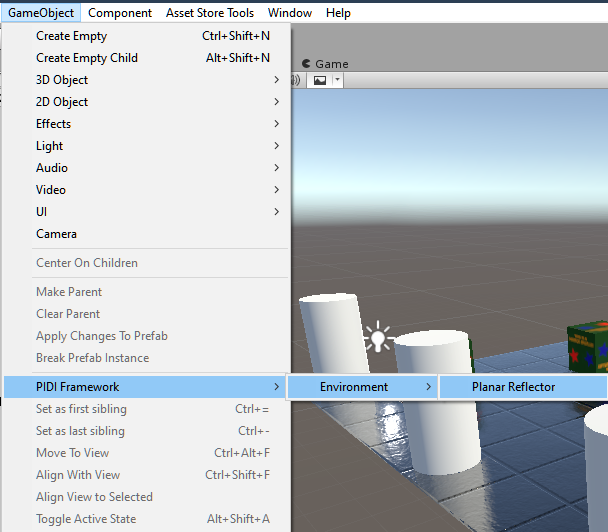
### To create a Reflector Object, go to the “GameObject/PIDIFramework/Environment” menu on the Unity's Editor top toolbar, and select Planar Reflector. ###
### Once the Reflector is created, simply assign the RenderTexture asset into the Explicit Output variable of the Rendering Settings tab and it will immediately start rendering an accurate reflection. ###
### IMPORTANT : The Reflector Objects are not compatible with the LWRP workflow and generally are not as flexible as having one reflection component per surface. Please use carefully. ###
Basic Reflections Setup
### While the Planar Reflections component provides plenty of settings that will be more thoroughly covered in the next sections of this documentation, there are some basic ones that you need to pay special attention to in order to configure basic and efficient reflections. ###
### Besides the EXPLICIT NORMAL value covered before, the REFLECT LAYERS setting can define which layers are reflected and which ones ignored, to ensure a better performance. ###

### Finally, the different resolution settings allow you to control the final quality of the rendered reflection. A higher resolution might help to reduce aliasing in cases where MSAA or FXAA cannot be used, while a lower resolution will greatly help with performance when rendering scenes that use complex per-pixel effects. ###
### Please keep in mind that due to the way Planar Reflections work (by basically re-drawing all the reflected objects for each camera that looks at the reflection) the best way to optimize the framerate of your project is to reduce the total amount of draw calls either by simplifying the scene or by reducing the amount of objects that are reflected. Reducing the resolution of the reflection, its update frequency and other factors will only help performance up to a point. ###
PIDI Planar Reflections 2 - Reference Manual
PIDI Planar Reflections 2 - Understanding the UI
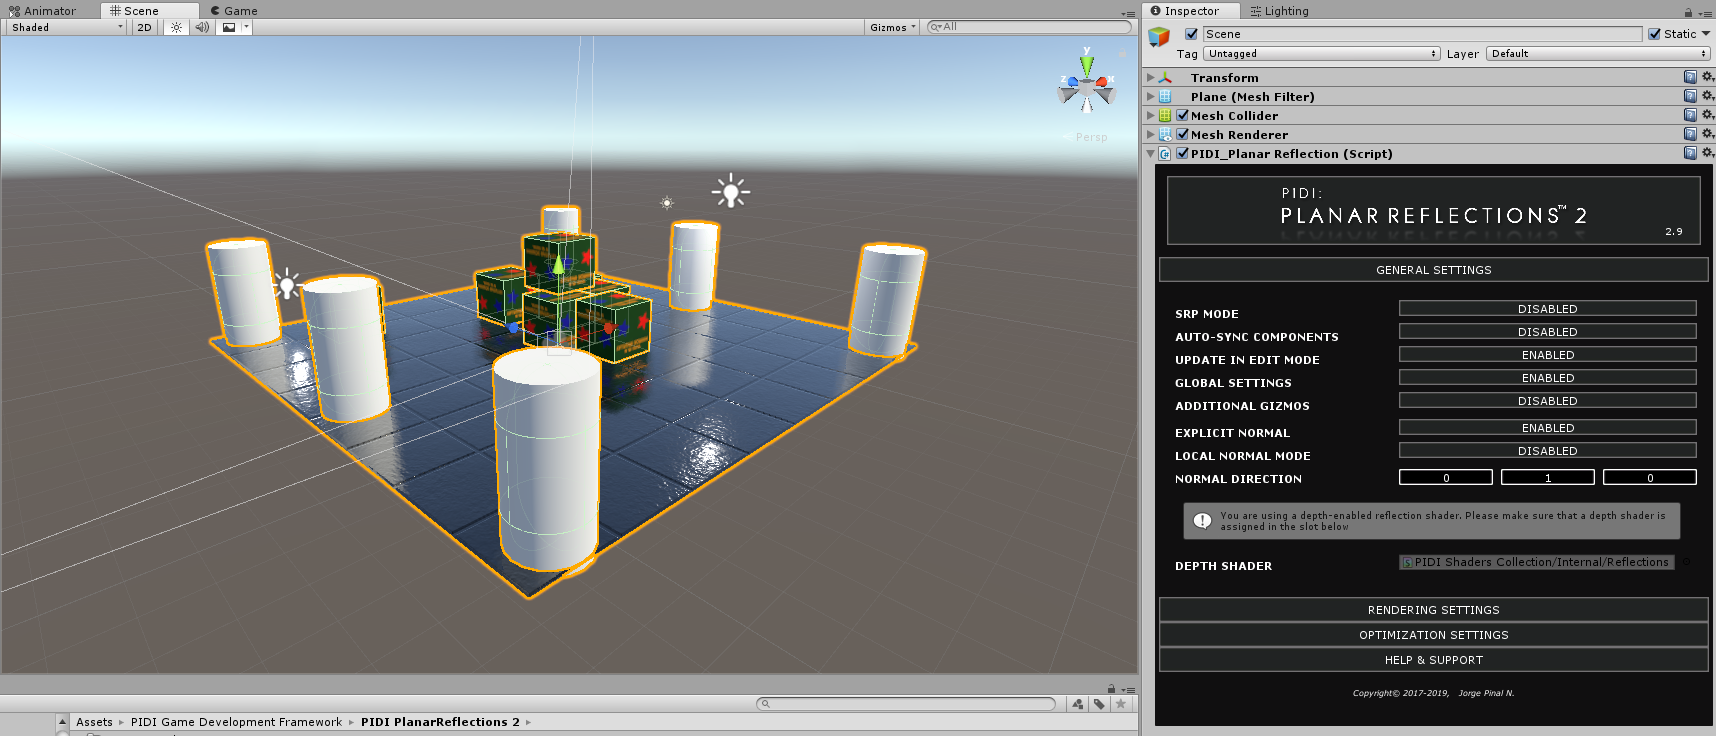
### The Planar Reflection Component has a custom inspector that allows you to easily manipulate its settings and configure it according to your needs. The parameters are split in three groups : General Settings, Rendering Settings and Optimization Settings. ###
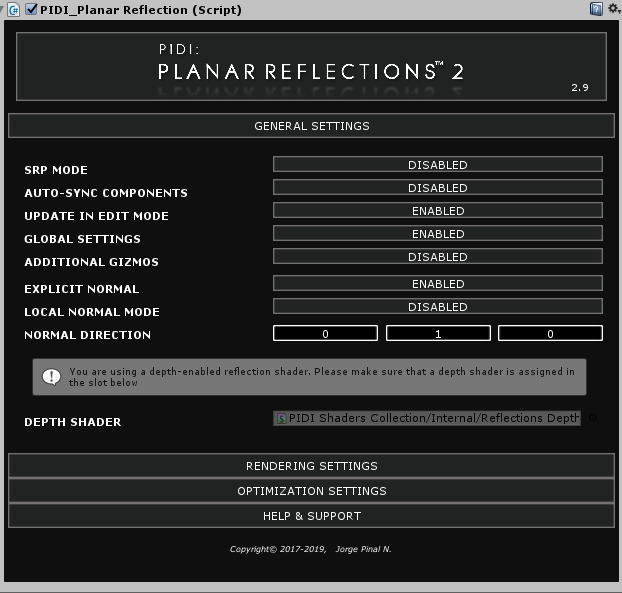
### In the General Settings section you can find the following settings : ###
- SRP Mode : Enables or disables compatibility with the LWRP workflow
- Auto-Sync Components : Automatically adds and syncs any components attached to the reflective surface to the reflections themselves. This is useful to, for example, add a Post Process Layer to the surface and thus add Post Process FX to the reflections
- Update in Edit Mode : Updates the reflections and renders them for the Scene View camera
- Global Settings : Defines whether this reflection will be affected by the global reflection settings (v_maxResolution which limits the maximum resolution of any reflection and v_forceQualityDowngrade which down-scales all reflections in the scene).
- Additional Gizmos : Shows additional visual aids for the reflection, including representations of the surface's normal
- Explicit Normal : Use a Vector as the global direction of the surface normal, from which the reflections will be generated.
- Depth Shader : The shader to use when performing depth based calculations for the reflections. By default, it is set to the internal depth shader included with the package.
- Chroma Key Effects : When enabled, modifies the rendering workflow of the reflections to adapt them to the Chroma Key shaders, giving them a precise color background that will be removed by the shader.
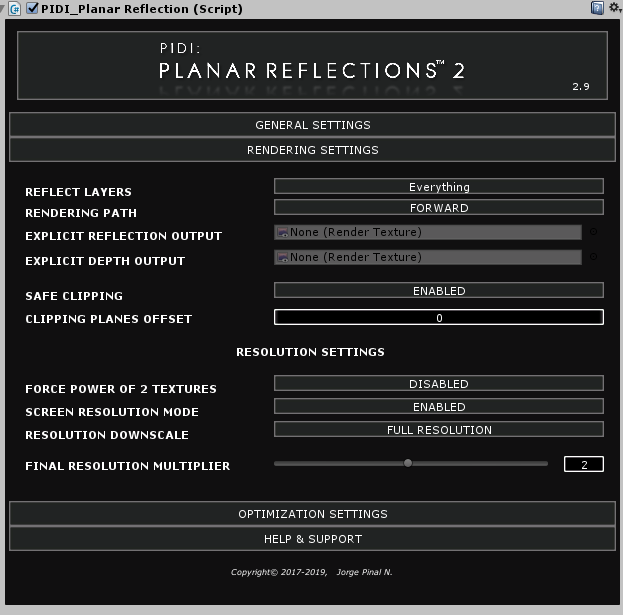
### In the Rendering Settings tab you can find all the following settings : ###
- Reflect Layers : Defines which layers will be reflected and which ones will be ignored
- Rendering Path : Defines the rendering path to be used by the reflection. In many cases, this can help reduce the draw calls and performance impact of the reflection
- Explicit Reflection Output : An external Render Texture Asset to which the reflection will be rendered.
- Explicit Depth Output : An external Render Texture Asset to which the depth of the reflection will be rendered.
- Safe Clipping : When enabled, the projection used for the reflection will be completely accurate to the surface of the plane thus avoiding any clipping glitches. When Safe Clipping is enabled, shadows may not be reflected accurately in most Unity versions due to limits on the way Unity handles shadow projections and the near and far clip planes are not modifiable.
- Clip Planes Offset : A manual offset to move the reflection point closer or further away from the plane's surface
- Near/Far Clip Distance : Final offset applied to the near/far clip plane of the reflection camera.
- Shadows Distance : The maximum distance to which the shadows will still be rendered in the reflections.
- Force power of 2 textures : Forces the reflection to be rendered in a power of 2 RenderTexture (128,256,512,1024 etc)
- Screen Resolution Mode : Renders the reflection at the full screen resolution (Best)
- Reflection resolution : The custom resolution of the reflection
- Resolution downscale : Allows to render the reflection at a fraction of the original resolution
- Final Resolution Multiplier : Allows a more precise control over the final resolution.
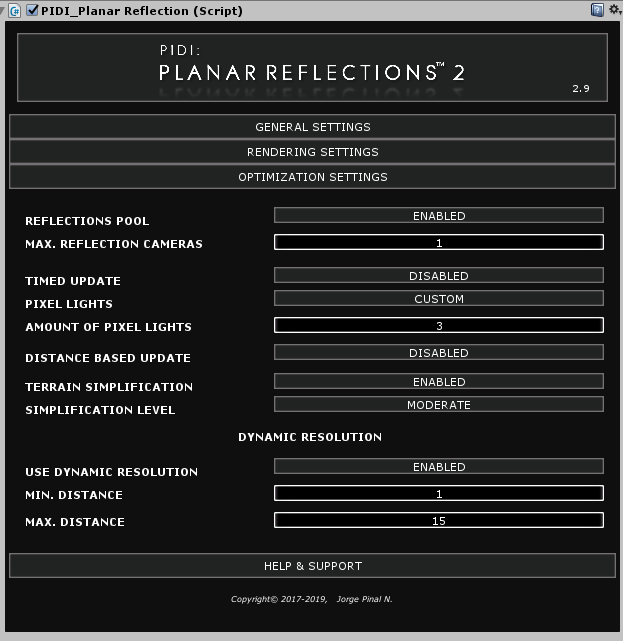
### Finally, in the Optimization Settings section you can find the following settings : ###
- Reflections Pool : A shared pool of cameras will be used instead of generating one reflection camera for each reflective surface and each camera that looks at it when this setting is enabled.
- Max. reflection cameras : The size of said pool of cameras.
- Timed Update : Updates the reflection only a certain amount of times per second.
- Pixel Lights : The amount of pixel lights that will be used in the reflected rendering.
- Distance Based Update : If enabled, it will ignore cameras further away than a given max distance.
- Terrain Simplification : Reduces the LOD of any terrain that is reflected.
- Simplification Level : How aggressive will be the LOD applied.
- Use Dynamic Resolution : If enabled, the resolution of the reflection will be dynamically adjusted according to the distance to the current camera. This allows the reflection to reduce its quality when it is far away from the camera and become much clearer when it is closer.
- Min/Max Distance : When the camera is closer to the reflective surface than min. distance, the reflection will be rendered at full resolution. When it is further away than Max. distance, the reflection will be rendered at quarter resolution.
Additional and advanced features
### In this section of the documentation we will learn more about advanced features included with the system, as well as some features that while now deprecated and unsupported may be useful for some projects with specific needs. Any feature that is no longer supported, experimental or deprecated is marked as such. Please read carefully all instructions before trying to use any of the settings described below. ###
Reflection's Depth
### If the shader used by the material of your reflective surface has a _ReflectionDepth parameter, the PIDI Planar Reflection component will render, besides the reflection pass, a depth pass containing information about the distance from every object to the reflective surface itself, allowing it to render more accurate reflections. ###
### The depth calculations of the reflections component are handled internally, without requiring you to do anything to enable them. You just need to make sure that the PIDI_PlanarReflection component has the included PD_Internal_DepthShader assigned to the corresponding DEPTH SHADER slot. To disable depth calculations simply change the shader to one without a _ReflectionDepth parameter. ###
### Reflection Depth is not supported on Planar Reflector objects since all their calculations are made in a per-surface basis and cannot be shared. The additional Reflection Depth pass also causes a higher performance impact, so use it carefully ###