
Table of Contents
PIDI : XFur Studio™ : 1.9x Version
This is the documentation for the original release of XFur Studio, covering the last releases of the 1.x cycle starting with XFur Studio 1.9. If you haven't updated your XFur Studio installation to this release please be aware that this step is required if you plan to upgrade to XFur Studio 2 and newer XFur releases.
XFur Studio is the most complete and advanced toolset to add, manage, style and customize fur on any character inside of Unity. While a wide selection of parameters, settings and shaders is offered to ensure that XFur can be used on lower end devices with an acceptable quality, the system itself and most of its features are targeted to higher end devices. XFur Studio has all the features you need to achieve high quality and detailed fur simulations in your games.
Quick Start Guide
In this quick guide we will go through the whole process of using XFur Studio, from installing the software into your project, preparing a model, adding fur, customizing its parameters and having it ready to use.
As a first step, please ensure that your project fully meets the requirements below :
- It is being developed with Unity 2017.1+
- Does not use any SRPs (Lightweight, HDRP, Universal RP, etc)
- Does not use XFur Mobile
If your project meets these requirements, then we are ready to move on towards the first steps of this small guide.
Installation & Initial setup
To add XFur to a project there is little to no setup required. If this is a first time installation you just need to head to the Asset Store and find this asset either under the section “My Assets” or by a normal search in the store itself.
If you have bought the asset, a Download / Import / Update button will show, depending on if you have never downloaded the asset before, you have downloaded it and it is in cache already or there is a new version available for download, respectively.

Once the import dialog appears, just import all the contents of the asset as usual. To verify that the asset was imported without any errors try to open one of the demo scenes. If they work without issues, the package has been imported correctly. If you see any graphical errors you must re-import the asset. If the issues persist even with a brand new and empty project, please contact us at our support email
Preparing your 3D models
XFur Studio is compatible with both regular and skinned meshes (meshes for animated characters, with a rig). Most models will work with XFur Studio without requiring any changes nor modifications, there are a few requirements that is recommended that your model meets in order to take full advantage of XFur Studio.
- Use low-poly models whenever possible. Fur is rendered in samples, which means that for every pass the fur shader does (between 4 and 12) the geometry is re-drawn. The lower the polygon count, the better the performance of the shader will be.
- Use a uniform scale, rotation and location for your models. Make sure that the mesh itself has a location and rotation of 0,0,0 and a scale of 1,1,1. Any other values will most likely result in errors when rendering the fur.
- Make sure that the root transform / root bone shown in the Skinned Mesh Renderer component of your model is either the root object of the model or a model whose rotation matches the default Unity rotation (z axis forward, y axis up). Otherwise, some effects such as the snow may fall on the side, back or bottom of the model instead of on its top.
- Generate a secondary UV channel (UV2) with a cubic projection, as this will ensure that the fur strands are projected in a uniform manner across the model's surface.
- Do not store information on the UV3 and UV4 channels. Those are used internally by XFur for important things such as physics and special FX.
- Whenever possible, try to use only one material on your character or two if there are large areas that will not be covered in fur. This will improve performance.
- Use as few bones as possible if you plan to use the physics module. It has a 64 bones limit. You can define these 64 bones manually.
For the examples of this Quick Start guide we will be using a very high quality model developed by Malbers Animations, the Realistic Raccoon model on its LOD3 variant, from the Realistic Raccoons and Red Panda package that you can get in the Unity Asset Store. We want to thank Malbers Animations for sharing this model with us for the purpose of testing XFur and for this small tutorial.
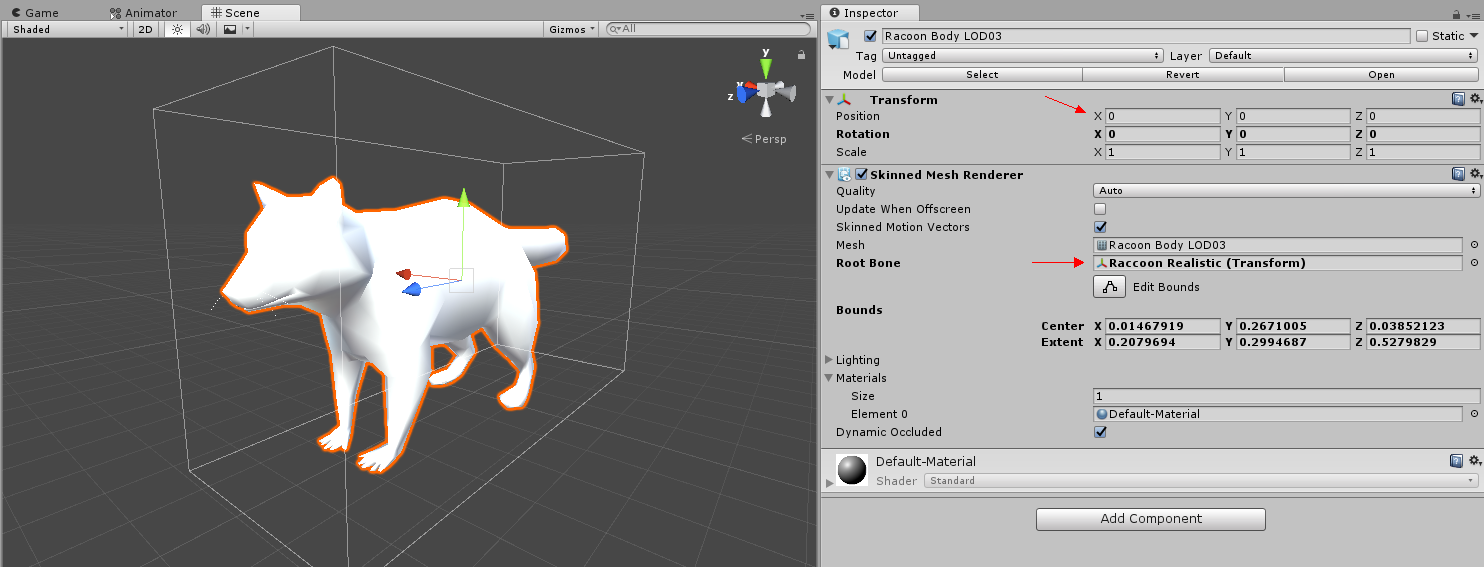
For this particular model, to ensure it will work with XFur Studio without any issues, we set the rotation of the mesh (called Racoon Body LOD3) to be 0,0,0 instead of its original value of -90,0,0. We also set the Root Bone in the Skinned Mesh Renderer component to be the Raccoon Realistic root object instead of the Pelvis transform that it has assigned originally. This does not affect the animations in any way, but allows us to recalculate the normals in a more accurate way internally, which is necessary for XFur Studio to use the more advanced features such as snow coverage.
You should follow this step with any model that doesn't have a 0,0,0 rotation, a 0,0,0 location or a 1,1,1 scale to reduce any errors that may happen if the transform values of your mesh are not the correct ones.
Finally, we re-adjust the bounds by hand to make sure that they are bigger than the mesh itself, otherwise our model will stop rendering while it is still in frame due to the bounds not being correctly sized.
Following these requirements will ensure that your models take full advantage of XFur Studio, have the best performance possible and that all features and effects work without errors.
Adding fur to a model
Adding fur to a model is a straightforward task. We will first create a core XFur material for our entire project. For this tutorial, we will call this material XFur Tutorial mat. Once created, we will assign the sixteen samples shader from the Standard branch to our material.

Once the shader is assigned, the material will display the custom shader inspector for XFur Studio. Since most of the features of the material are controlled by each XFur instance (and this is actually the intended behavior) we will not touch most of them. We will only assign the XFur_FurLayers1 map to the FUR GEN MAP slot and set the FUR CUTOFF value to 0.03

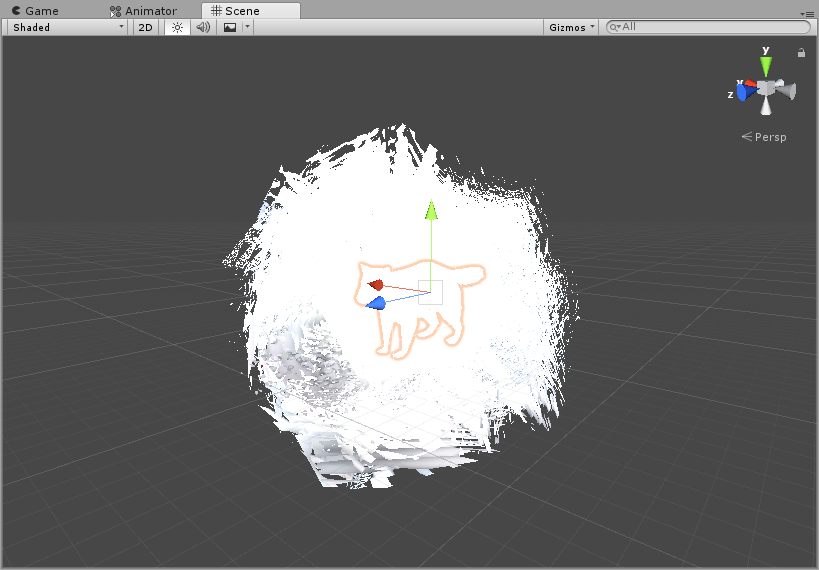
We then assign our material to the Racoon Body LOD03 mesh. The mesh will appear to explode, which is perfectly normal since most of the data XFur needs is not yet present.
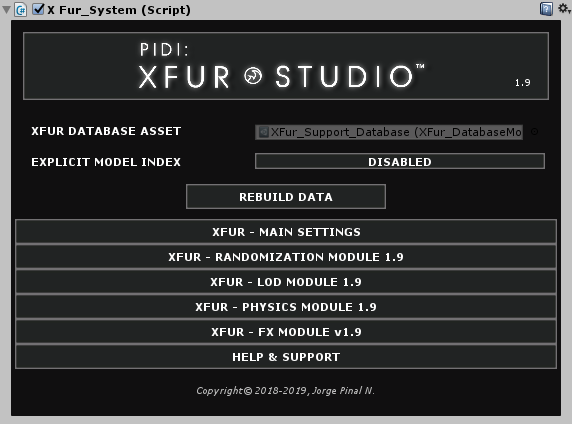
Now, we will assign the XFur_System component to the mesh. After loading it, the component will inform us that we do not have a database asset assigned to it. We will solve this now, before proceeding. The XFur_System Component must always be placed next to the Mesh or Skinned Mesh Renderer Component.

Inside the PIDI - XFur System folder, in the Database Module subfolder you can find a Database Asset pre-packaged with our tool. However, since this database gets overwritten with every update we release, you should not use it directly for your project. Instead, we will simply select it, press Ctrl+D to duplicate it, and store it somewhere else in our project.

Once we have our database ready to be used, we will assign it to the XFUR DATABASE ASSET slot in the UI of the XFur System component. The Unity Editor will freeze for a few seconds as the mesh of the raccoon character is being automatically copied, patched with the needed data, and stored safely in the database. This allows you to keep your original mesh untouched while providing XFur with everything it needs. Once the patching process is over the XFur Studio UI will show all the available options.
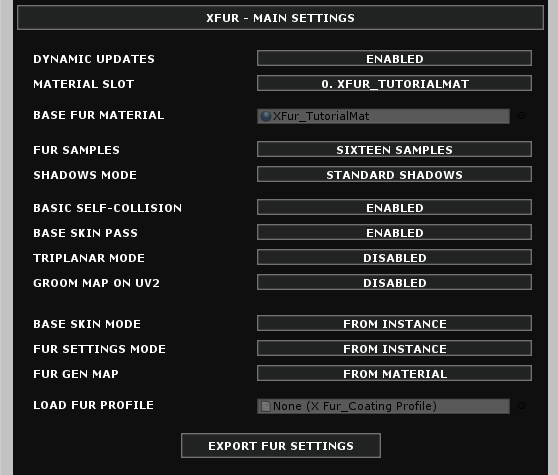
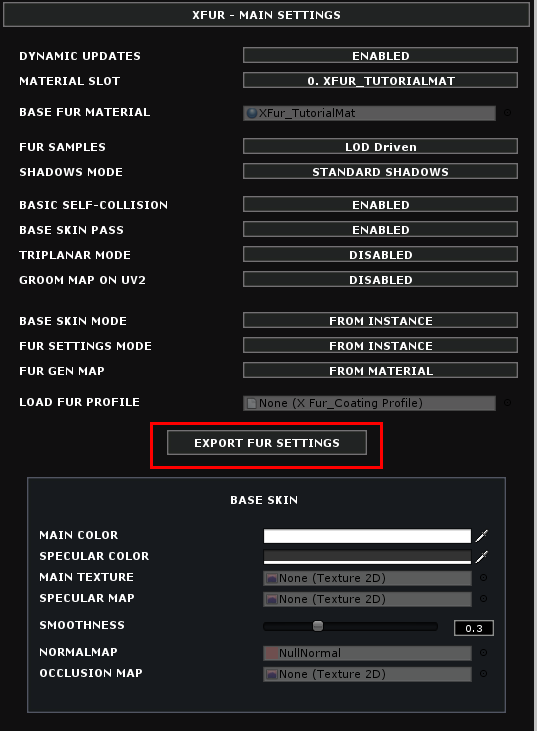
We will open now the XFUR - MAIN SETTINGS tab and set up some first parameters that will allow us to control the fur carefully. We will first set the FUR SAMPLES value to sixteen (more samples = higher quality strands = lower performance), the SHADOWS MODE to Standard Shadows and both the BASE SKIN MODE and the FUR SETTINGS MODE to be FROM INSTANCE rather than FROM MATERIAL. These last two options will allow us to override the material parameters on each object, which can let you share a single material across every single fur covered character in your game.
XFur Studio offers two sets of shaders for your characters that differ mostly in the way they interact with shadows and lighting. These shaders can be selected by changing the SHADOWS MODE setting in the XFur System UI. The Standard Shadows mode works by generating all the fur samples on the GPU, which makes it much faster to render but does not receive accurate shadows in Forward rendering, only in Deferred mode.
The Full Shadows mode generates the additional geometry and manages it on the CPU which is considerably more expensive but it also produces much more accurate results, higher quality fur strands, full and accurate shadows on Forward rendering and it also allows you to change the amount of samples dynamically. For our tutorial, we will select the Standard Shadows mode.
A BASE SKIN block of settings followed by a FUR SETTINGS block will appear in the UI. In the BASE SKIN block, we will assign the corresponding texture of the Raccoon to our MAIN TEXTURE slot, set the MAIN COLOR to a dark gray (to simulate the shadow from the fur) and adjust any other values we wish.

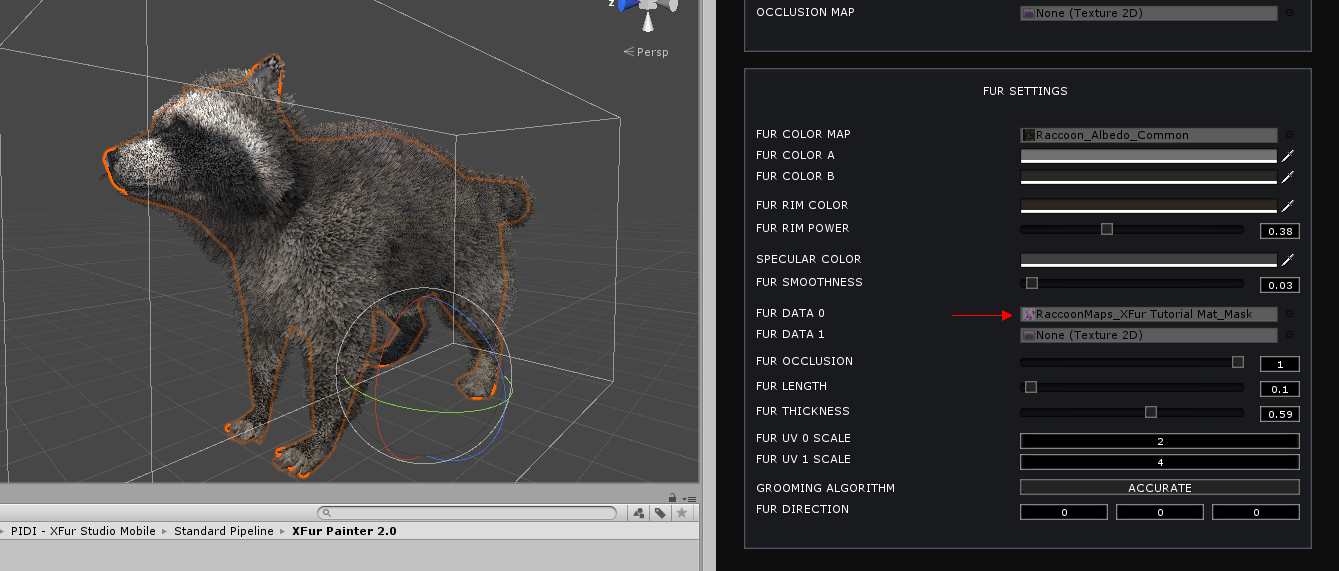
On the FUR SETTINGS block, we will set the FUR COLOR A and FUR COLOR B to a light gray color (you can play with these values until you get the result you want) and assign the same Albedo texture from the Raccoon to the FUR COLOR MAP slot.
We will also play with the RIM COLOR and RIM POWER values (which adjust the backlight effect on the fur) as well as with the FUR LENGTH and FUR THICKNESS. For the best results, you can try to copy the values in the following picture into your own object. Remember that Fur length values are most of the time very small to produce accurate, good looking results
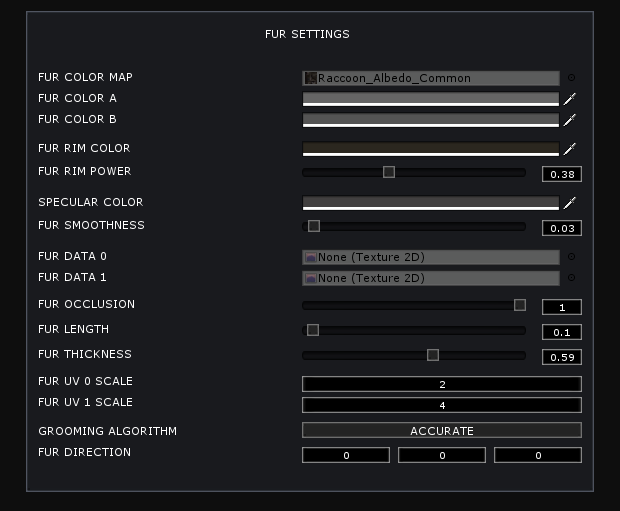
For now, since we will not paint any additional data nor groom our character yet, we will also set the GROOMING ALGORITHM to ACCURATE and the FUR DIRECTION value to 0,0,0. Following the steps detailed above and copying all the parameters shown in the pictures will give us a great baseline to start working with our character and, in some cases, it will be everything we need to do, depending on the results you want.

However, if your character needs additional details or more refined control over the appearance of the fur, its length, direction, etc. then you should continue reading this guide and move on to the XFur Painter section, where we will cover the basics of XFur Painter, the included tool to work over all the small details of your character's fur within the Unity Editor and through the use of easy, simple brushes and strokes.
While the following video shows the workflow for XFur Mobile, an asset designed as a port from XFur Studio, all of the steps described in this quick guide and shown in the video are the same between both tools, so it might give you a good idea about how to set up your character to use it with XFur Studio 1.9
XFur Painter
First, let's save our work. Create a prefab of the Raccoon model (or any model you are using) with all the XFur settings and parameters we have set up to this moment.
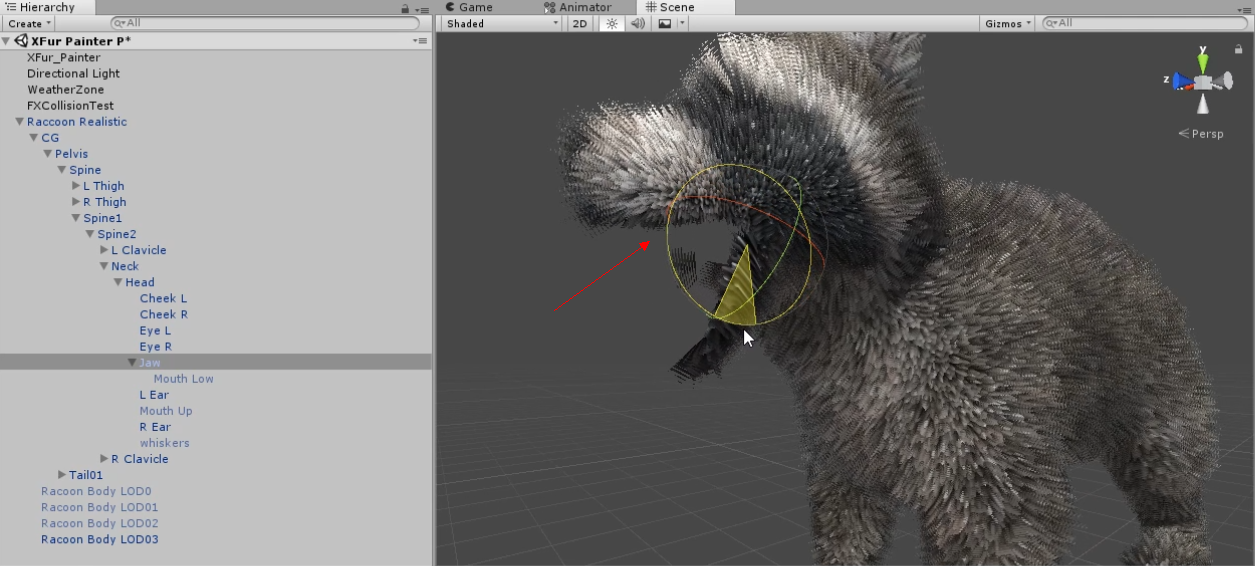
Then, open the XFur_Painter scene included with this asset. Once opened, disable the demo model of the dog from the root game object. XFur Painter will automatically detect the active object in the scene and leaving the German Shepherd in there will interfere with the Raccoon we want to paint. Once the German Shepherd is disabled, place the prefab we just made in the center of the scene, at location 0,0,0 and with a rotation of 0,0,0.
If your character has places that you believe will be difficult to reach (such as the inside of the mouth, under the arms, etc) you should modify its pose by hand to one that is easier to manage. In our case, we will open the mouth of the raccoon and disable all the unnecessary meshes such as the upper and bottom teeth, and the whiskers.
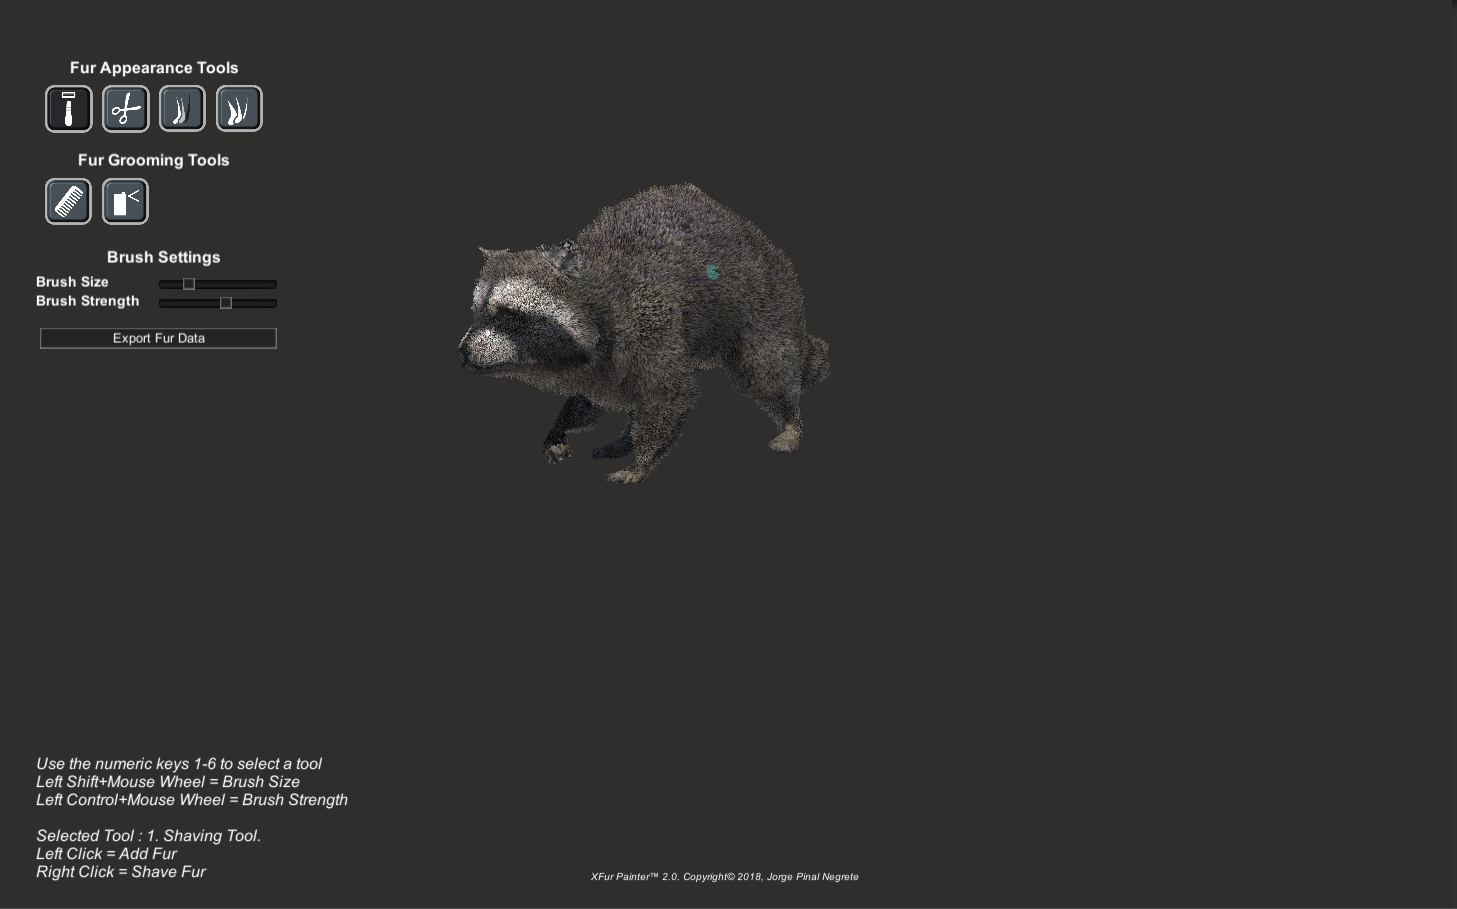
Once the model is ready, you just need to hit play and XFur Painter will start. To see a detailed timelapse of how to use XFur Painter, please watch the video below.
The brushes available in XFur Painter are divided in Appearance Tools and Grooming tools. The appearance tools are, from left to right, Fur Shaving, Fur Length, Fur Shadowing and Fur Thickness. You can switch between the addition and subtraction modes of each tool with the left and right buttons of your mouse. You can use the middle mouse to rotate around the character or pan if you keep Left Shift pressed as you drag your mouse with the middle button.
Once you are happy with the results you achieve in XFur Painter, you must click on the Export Fur Data button and save the resulting fur data maps somewhere in your project. Once this process finishes, you can stop the application. Your character will seem to have lost all fur data, but if you assign the Fur Data maps you exported to the corresponding slots of the XFur UI (the length map goes on Fur Data 0 while the grooming map goes on Fur Data 1) that information will be restored.
While XFur Painter is versatile enough to provide high quality results in most meshes, there are a few situations in which XFur Painter will not be able to reach certain areas or in which the groom will not work properly (for example, in cases where the character is mirrored). We suggest you to experiment and see which feature, applied in which way fit better. Since the Fur Data maps are plain textures it is easy to add even more detail in programs such as Adobe Photoshop, GIMP, etc.
Further Learning
There are many more things you can do with XFur Studio, from switching different Fur Layer / Fur Noise maps to achieve different styles of fur to using physics, advanced LOD, randomization to generate dozens of instances with different fur variations, snow and blood effects and much much more. Please read carefully the next sections of this online documentation to learn in detail everything you can do with XFur Studio.

With XFur Studio, the possibilities for your fur covered characters are limitless, to bring your projects to the next level.
XFur Studio - Reference Manual
This online documentation is regularly updated as new features are added to XFur Studio. It contains detailed descriptions of every component, feature and setting of XFur Studio. Many of the topics covered here are quite advanced so we recommend to read thoroughly through all the sections before using these features in your projects.
XFur Studio - Components
Fur rendering in XFur Studio depends on a wide array of components and data to ensure the best balance between quality and performance. Thanks to its unique design and the careful tuning done over more than a year through every section of the system, XFur can achieve the best fur rendering for Unity available.
These main components that control fur rendering in XFur Studio are :
- Fur Shaders, that tell the GPU how to display the fur. They can be adjusted for double sided rendering, triplanar projection support, anisotropic highlights, full forward shadowing or a more simple, deferred dependent one, etc.
- Fur Noise Maps, that control the appearance of the fur strands themselves. The red and green channels control the overall shape or “fluff” of the fur, the blue channel controls where the secondary color (FUR COLOR B) will be displayed and the alpha channel controls the shape of the strands themselves.
- Fur Profiles, which are special assets containing all the parameters of a specific fur configuration. They can be exported and imported through the Editor or at runtime through code.
- XFur Database Assets, which contain the patched meshes with the additional data required by XFur as well as a list of all the available shaders.
XFur Studio comes with all the assets, shaders and noise maps you will need to start adding fur to your characters, to ensure that everything works as “out of the box” as possibly.
XFur Studio - System Modules
XFur Studio has different Modules that add new, advanced features to the fur simulation. From LOD management and dynamic performance adjustments to full randomization and physics, these modules offer a whole new array of possibilities for the fur simulation that XFur Studio provides.
LOD Module
The LOD Module is fairly simple to use. It controls the quality of the fur in samples as the object gets closer or further away from the camera.
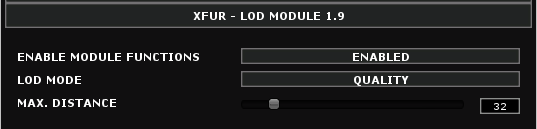
The LOD MODE setting controls whether the LOD Module will have a bias towards higher quality fur, switching to higher sample counts at a greater distance or towards performance, keeping the sample counts low unless the camera gets very close to the object.
The MAX DISTANCE slider controls after which distance the fur will switch to the lowest sample count. This is useful to control performance and ensure that the objects far away in the distance do not consume as many resources. While you can combine this with the Standard LOD Module included with Unity, you may need to add a XFur component to every LOD level of your model and it may introduce some conflicts with the way XFur works, since it directly interacts with the render in the middle of the XFur normal processes. Please keep in mind this when designing how your LOD system will work.
Randomization Module

The randomization module allows you to assign different fur profiles or even completely random parameters to the fur of your characters at runtime easily. These changes are applied on startup, but they can also be called at will from code at runtime.
For each Fur enabled material that your model has, you can assign any number of fur profiles with information about fur length, thickness, occlusion, color, textures etc. These profiles are created by setting up any configuration you want in your characters and then pressing the EXPORT PROFILE button.
IMPORTANT : You can also use these profiles to switch fast and easily between different fur configurations as if they were templates by just dropping them into the LOAD FUR PROFILE slot in the XFUR - MAIN SETTINGS tab.
Once you have exported a few profiles, you can assign them in the list for your material, adding or removing as many slots as you need.
If you enable the RANDOMIZED PARAMETERS feature, the randomization module will take two of the profiles you assigned and iterate over every single parameter, getting a random value for each one of them that is contained between the original values of both profiles. This way, for example, you could have a clear colored profile with short fur and a dark colored one with long fur and enabling the RANDOMIZED PARAMETERS feature would give you random fur variations that take the clear and dark profiles as its min. and max. variation points.
Physics Module
The physics module is a quite demanding one, since it has to perform expensive computations to simulate physics over the fur strands. These operations can be dynamically scaled up and down depending on the instance's distance to the camera if the LOD module is enabled. However, this dynamic scaling can also be disabled by setting the LOD INFLUENCED MODE to Disabled.

The BASIC MODE limits the physics simulation to a fairly simple approximation based on bones movement. The ANGULAR FORCES setting allows the rotation of both the object and the bones to affect the fur's movement.
PHYSICS ITERATIONS refers to the number of calculations that can be performed, at max, on a single second. These are also dependent on the amount of vertices of the character so in a very complex character the max amount of iterations may not be reached if it is set to a high number, since in these cases performance is prioritized.
PHYSICS SENSITIVITY refers to the amount of movement that the bones have to perform before they are tracked by the physics simulation, while PHYSICS STRENGTH controls the amount of influence the bones and object's movement will have over the fur
Finally, the GRAVITY STRENGTH is the amount of force that will be applied downwards to the whole fur and INERTIA STRENGTH controls the way that the forces applied to the fur will slow down with some slight inertia after the bones/object have stopped moving.
In XFur Studio, there are two modes to define which bones will affect the physics simulation. If Auto Track Bones is enabled, the first 64 bones of the rig will be automatically assigned to the simulation. This might not always be desirable as some rigs may use multiple bones for facial expressions, fingers or other elements that may not require the physics simulation and take up the space of more important bones such as limbs and accessories.
If you disable the Auto Track Bones feature you will be able to assign the bones that will be tracked manually. The limit is the same, 64 bones, but by assigning them manually you may be able to reduce greatly the work of the module by limiting it to only the highest priority ones. This feature is however fairly experimental in comparison to the Auto Track method, so it is recommended to keep your rigs simple and use it.
IMPORTANT : Whenever you enable or disable the Auto Track Bones setting or make any change to the array of bones that will be tracked you must press the Rebuild Data button so that the corresponding information is patched into the model again. You cannot define different bones for different instances of the same model, as this information is patched across all of them
FX Module
The last module available is the FX Module. The FX Module controls the special effects applied to the fur, particularly the weather effects (wind, snow, water) and the blood effects. These effects can be applied either through the global weather system, through a global direction to specify wind, snow and rain or through collisions with other objects and particles, using the FX_Collision, FX_Volume and FX_Particle components.

The AUTO NORMAL UPDATE setting lets the component update the normals direction as the character is being animated ensuring that some effects, such as the snow coverage, always fall on the faces that point upwards regardless of the pose of the character. This way, even if the character is laying down for example, the snow will fall accurately on top of it.
The MAX ITERATIONS and the VERTICES BUFFER values work similarly to those in the Physics Module. The LOCAL WIND STRENGTH is a modifier to control how much does the wind affect the fur. This allows you to control the intensity of the wind on a per instance basis on top of the global control that the XFur_WeatherSystem allows.
For each effect, you can control the way it will be applied to the fur, either GLOBALLY (through the Weather System) or ON DEMAND (with the Collision / Volume / Particle components or through code ). You can also control the color, specularity and smoothness of every effect, their falloff (to control how much they spread), penetration on the fur strands and even how long they take to fade out
IMPORTANT : For better results, please assign a FX Noise texture to your fur material on the ADDITIONAL SETTINGS tab, in the FX PARAM NOISE slot. These textures contain special channels that give a better appearance to snow and blood when applied over the fur
The FX_Collision module will apply boold, snow or water effects over the fur in the points where it detects a collision with the character. The FX_Volume will do the same but for any section of the model that enters the volume. Finally, the FX_Particles component will make the particles of a particle system apply fx over the fur upon colliding with it.
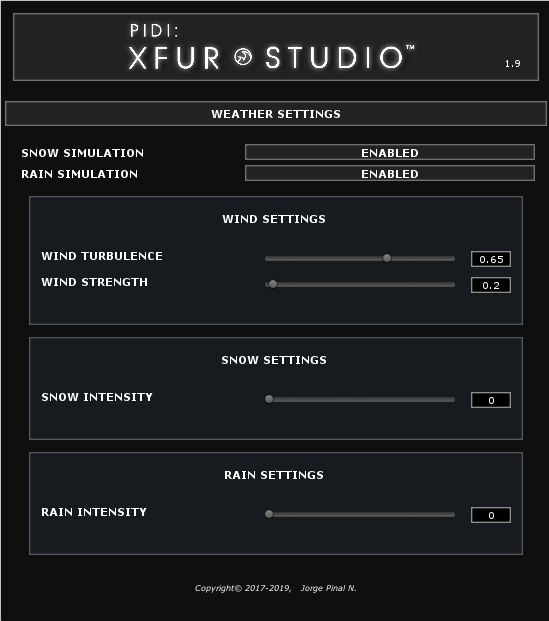
The XFur_WeatherSystem component is quite self-explanatory, offering you easy to understand controls over wind, snow and rain effects.

Using these components and the FX Module amazing results can be achieved on any of the supported platforms with a perfect balance between performance and quality, even on VR projects.
XFur Studio API
XFur Studio is intended to be used through the different UIs and tools to make the whole workflow as easy as possible. However, for advanced users and very specific situations you have some functions and interfaces available that grant you access to different parts of the system.
All XFur classes are contained within the XFurStudio namespace. To call any function from the XFur system or any of its components, you must write using XFurStudio at the top of your C# script.
The main entry point for any function is the XFur System Component. Usually, in your scripts, you would access it like this :

Where gameObject is the target object from which you want to access the XFur_System component.
To access the fur properties of any of the materials, you use the FurProfiles interface and the index of the fur material you want to edit. After this, if you have auto-complete enabled on your coding IDE, you should see all the available methods and variables with a small explanation of what they do :

Any function that does not have a description should not be called by your scripts, as they are most surely intended for internal use only. Do not call nor use any internal function unless you are sure of what you are doing.
The main functions that you can call from other scripts and that you may need at some point in the development of your project are the following :
On XFur_System.cs :

This function lets you assign a fur profile (profile) to the XFur system manually, to the specified fur material (material Index). This is useful if, for example, you are allowing your players to customize their characters and need to let them choose among a series of fur patterns. Simply assign the profile that corresponds to the choice of the player, and load it with this function to make the system load all the fur properties.

Forces all materials (or the specific material with index equals to profileIndex) to update and apply any changes that you have made.
WARNING : Once an XFur System component is added to an object, it will override and take control over the Materials array of said object's renderer. If you want to swap the materials of the object at runtime through code you need to override both the original material from the corresponding XFur material profile (this step is optional on Unity 2018.3+) and the material itself on the sharedMaterials array of the renderer :

Do not swap a XFur material for another XFur material. Use Fur Profile Assets instead.